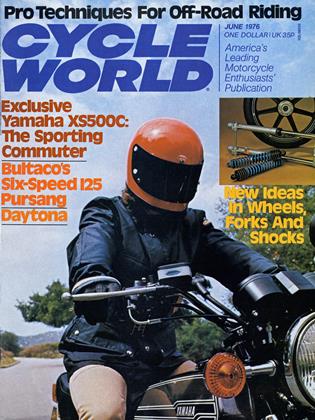
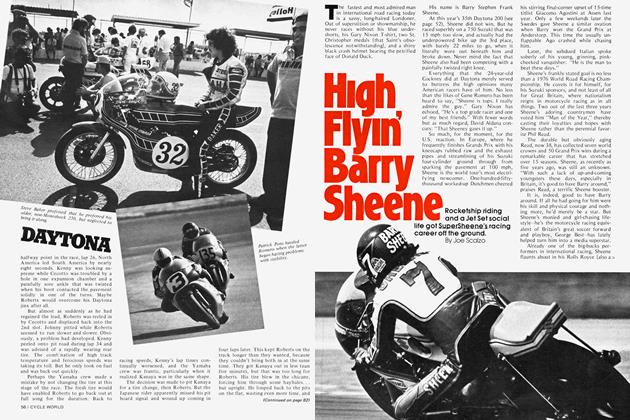
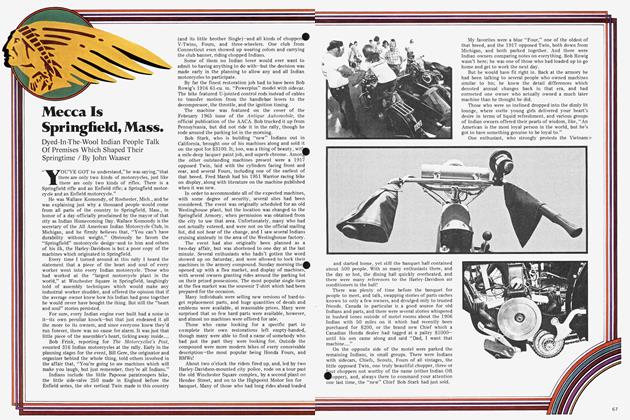
Pro Techniques For Off-Road Riding
Pro Techniques For Off-Road Riding
Russ Darnell
Editor’s Note: Riding off-road is not only challenging, but also fun if you know what you're doing. On the other hand, if you haven't been at it too long, trips to the mountains or desert with your motorcycle can be a source of frustration.
The best way to become a proficient dirt rider is to attend a special off-road riding class, like the ones Russ Darnell teaches in various parts of the country. Second best is to read up on the proper techniques and then practice with the help of your friends.
If this second alternative is the only one available to you, or if you want to review what you've already learned first-
hand, read on, because CYCLE WORLD is publishing a book, in segments, on professional techniques for off-road riding. The book, authored by Russ Darnell, one of the best instructors in the business, is geared for both racers and recreational motorcyclists.
All installments of Darnell's book assume that you've mastered the basics. The book begins with the first major obstacle dirt riders encounter: hills. Other topics this month are sand and braking techniques.
HILLS
Hills are the bane of most Novice and Amateur riders, and even some Experts. Downhills are especially troublesome and feared. Going uphill is easier to cope with mentally than going down.
Racing upwards, you get a sense of security from the fact that the machine is under power, and from your narrow field of vision. You usually can’t see the top of the hill. Downhills are a different story. You are riding happily along when the ground begins to slope downward, signaling the approach to a steep descent. When you reach the edge of the downhill, your senses are assaulted with inputs. Your mind is bombarded with the wide-angle, panoramic view of the terrain beyond, coupled with the sudden problem of slowing the bike without skidding on the slope. This combination is what produces the gut-wrenching fear most riders experience on downhills. It doesn’t matter whether you are racing or just riding for fun, the effect is the same.
When it comes to riding
in the dirt, Russ Darnells
written the book...
and Cycle World's publishing it,
beginning this month.
UPHILL TECHNIQUE
The key to climbing any hill is the approach. The more speed you can build up before the base of the hill, the easier it will be to climb. As you begin your run, look up the hill as far as you can to get an idea of the trail surface. If the trail looks hard and reasonably smooth, you can maintain your present speed. If the hill goes up a long distance, increase your speed accordingly. If the hill has a loose surface or is very rocky, you need a big speed increase.
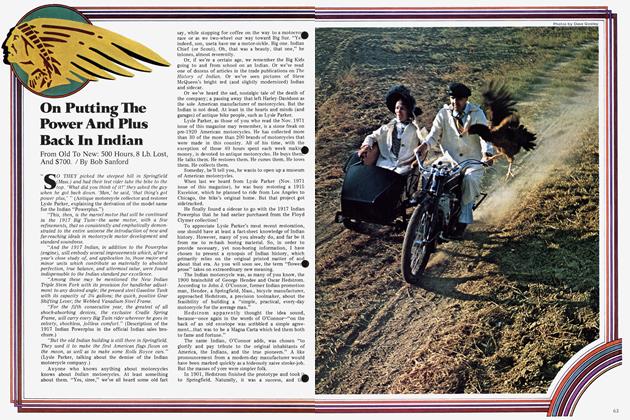
By hitting the approach with enough initial run, your speed will “carry” well up the slope. In many cases, the “carry” effect will be enough to keep you from having to shift down in the middle of the hill. If you do need to shift when climbing, shift early. Don’t let the bike bog down before changing gears (photo 1). Downshift while the engine is still revving well. This will prevent missed gears when you stomp the shift lever in a panic to regain power. Also, if you wait too long to shift down, you risk the possibility of wheelieing when you catch the next lower cog. A wheelie will cause you to shut off for a second. . . and it’s all over brother. Go back down and try it again.
Maintaining the correct traction is the biggest problem in hillclimbing (photo 2). Too much traction makes the front wheel light. Too little creates wheelspin. Use your body to transfer weight from one area of the bike to another in order to achieve balance and desired traction. If the hill has a tacky, wheel-grabbing surface, stand up with your knees flexed slightly and lean forward. Sitting down and leaning forward will work also, but you can’t transfer as much weight while sitting on the saddle. Keep your weight forward and the throttle on. If the wheel gets off the ground slightly, don’t snap the throttle shut. You will lose forward momentum that will be hard to regain. Instead, learn to thrust your upper body quickly forward for weight transfer, and roll the throttle setting down slightly, then right back on. Momentum loss with this technique will be minimal.
Loose surfaced hills are the most difficult. They require a wide open approach. Don’t be afraid to hit an uphill “too fast.” There is no such thing as too fast on a treacherous uphill. Remember, you can stop any time on an uphill by merely shutting off. The incline will do the rest. Make a good, high-speed run-in, sit down and kee your weight directly on the saddle. A low center of gravity helps on loose surfaces. If you stand up, you exert too much leverage on the bars and the front wheel will get light even on a loose hill When you hit the incline, stay on saddle and lean your upper bo ward. This position will allow the best use of the available traction. By hooking your feet slightly on the pegs you can easily hold yourself forward against the acceleration.
If you get stopped on a loose or sandy uphill, you won’t have any chance of restarting. Use one higher gear on a loose hill than on a hard-packed surface. This will keep the bike on the torque peak instead of screaming at the rev peak. Winding the motor tight just causes wheelspin.
Often you will have to climb a hill that is soft only in certain parts. Other riders dig holes when they stall and try to get going again. The holes they leave make traps for the following riders, and they in turn stall, which makes the holes deeper, wider, softer. Look ahead to spot these obstacles. It may seem difficult, but you can alter your line on an uphill to avoid potholes, rain ditches and other hazards. You can't, however, turn sharply on the face of a hill, so plan your line far ahead so that any course changes can be gradual. To change lines, apply pressure to the footpegs to direct the bike (photo 3).
By concentrating pressure on the left peg, the bike will veer to the left. Alternating pressure to the right peg will cause the motorcycle to move right. This technique can be used even when you are accelerating hard.
Once in a while you will face a hill that has a high step or series of steps to negotiate. These are difficult. Most rid ers blow it on steps because they allow the front wheel to hit the obstacle. This pops the front tire up and destroys momentum. The proper way to traverse a step is to approach at a constant speed, the same speed at which you have been climbing the hill. Stand up 30 feet or so before the step, and just as you reach the obstacle (about 10 feet before the step), pull the bars back to carry the front wheel over the ledge (photo 4). The throttle should be rolled off for just a split second before the rear wheel touches the ledge, otherwise the bike will kick up in the rear too much. The front wheel will carry beyond the step and the rear wheel will ride up and over. As soon as the rear wheel hits the step, flex your knees and move your body forward to lighten the load on the rear wheel. This will take some of the strain off the shocks, wheel, tire and hub. The rear wheel will jump slightly off the ground; at this point you should roll the throttle back on hard. That will help to regain any speed lost over the step, and will give you an extra burst of power for the rest of the hill.
A jump on the side of a hill is very similar to a step. Uphill jumps can be taken two ways. I prefer to loft the front wheel over the jump using the same technique just described for climbing steps. The only difference is that you leave the throttle on the entire time rather than shutting off before the rear wheel hits (photo 5). Don’t fret if the rear wheel kicks up off the ground.
HILLS
There is very little chance of doing an endo on a steep uphill. However, on a milder slope where speeds are higher, it may be best to shut off to prevent the rear wheel from being tossed too high. The other method for jumping uphill is to allow the front wheel to hit the jump just as in any other jumping situation. Flex your knees to absorb the upward shock, then as you hit the jump, crouch slightly to keep the bike low and flat. Once in the air, keep your weight well forward (you’re still on a hill, remember), and get the gas on hard again before you land.
If you encounter rain ruts on a hill, you will probably be drawn to them like metal to a magnet. This is especially true if the trail is narrow. If the erosion ditches are reasonably narrow, say 18 inches or less wide, cut back and forth across the trail. In this way the wheels can pass over the tops of the ruts at an angle without being trapped. Often these rain ruts will converge to make larger ditches. Try to time your crisscrossing of the trail so that you catch converging ditches at the point where they form a “Y.” The little island in the “Y” will support your wheels at least once.
You won’t always be able to avoid getting caught in a rain groove. Once down in the groove you may be able to ride to the end to get out. If you can’t get out that way, there are other methods for extricating yourself. Stop the bike. Turn the front wheel as hard as you can to one side. This will wedge the tire against the sides of the ditch. Keep your hand on the clutch and apply throttle. Use both feet to help lift the front wheel. When steady throttle doesn’t work, use more throttle and snatch the clutch several times. Once you get the front wheel out, rock the bike back and forth until you can ride out. You can also get the front wheel up on one bank by popping a small wheelie, then directing the wheel to the side and out.
The other method merely requires brute force. Stop the bike. Grasp the front wheel at the top, and drag it up and out of the rut. Always do the front wheel first because it will be lighter. Next lift the rear of the machine out. Flex your knees when you pull the bike up, or you will hurt your back. Another version of the grunt-and-heave method is to lay the bike on it’s side in the rut. Then drag the front and rear wheels out. If you can’t get both wheels on the same side of the rut, use the foot peg as a pivot to turn the bike crosswise to the trail.
Some hills are so difficult they will be littered with bikes and riders when you get there. Watch for alternate routes while you are riding ahead of yourself. The couple of seconds you take to plan your assault are little enough time when compared to the 10 or 15 minutes that will be required if you get stuck on the first try.
Never follow directly behind another rider if you can avoid it. Ride a different trail (if possible), or at least ride to one side or the other. This helps you avoid his wake, plus it improves your vision of the trail ahead. If a rider you are chasing suddenly crashes, you can often bypass him if you aren’t right behind his rear tire. If a fallen rider blocks the way completely, try to ride around his bike without losing speed. This sometimes means running through the center of a bush or over a rock, but it’s better than being stalled. If there is no possible way to avoid a fallen bike, you can occasionally luck out and ride over the machine. If you have to hit another bike, try to aim for the wheels, especially the front one. The step technique works best. Never run over the owner/operator of the fallen machine or you may not make it to the top of the hill alive.
If your bike is over-geared (geared too high) for an uphill, you may still be able to make it with the traverse method. Instead of going straight up, cut across the face of the hill in a diagonal line. Make a turn and go the other way, cutting another diagonal. Repeat until you have made the top. This technique will get you up the most horrendous of hills.
If it is getting late in the day and you are desperate to make a bad hill, let most of the air out of the rear tire to increase traction. Once over the top, continue on slowly to save the rim. This trick may save you a long, cold night in the boonies at the price of a $4 inner tube.
Often, you will know in advance that the terrain you are going to cover in your day’s ride will be predominantly steep. Whether you are racing or just cowtrailing, you may want to consider gearing the bike lower for the course.
No matter who you are, or what you ride, you won’t always climb a hill on the first try. Most, riders wait too long before they react to the engine’s bogging down. Learn to anticipate when the machine just isn’t going to make it. Before you lose speed completely, turn the motorcycle sideways on the face of the hill. This will prevent you from rolling backwards out of control. To go back down for a restart, grab the front brake and wiggle the front wheel from side to side to make it slip downhill. Always keep the machine leaned into the hill so you won’t high-side when it starts to come around. If your bike is hard to start after a fall, make sure you shut the gas taps before coasting down the hill. Otherwise it will be badly loaded up when you reach the bottom. Bump-start the engine on the way down using second or third gear to clean out the bottom end, then flip the taps back on.
If you get stuck climbing a hill, you can lay the bike over on one footpeg and drag the front wheel around. Remount the bike when it is crosswise to the hill and wiggle the front wheel around to complete the turn. If you don’t get stuck too deep, you may be able to restart without going back down by bouncing on the saddle to improve traction. Once stuck, don’t sit there and spin the wheel. You will just dig yourself in deeper.
When you are almost to the summit of a hill and the bike begins to bog or lose traction, don’t hesitate to jump off and push. There is nothing ignominious about shoving a bike over the top when you consider the alternatives. When pushing, ease off the throttle slightly from time to time to let the rear wheel “catch up.” Otherwise, it will just bounce, hop and skid without forward progress. Sometimes you can lay your upper body across the saddle while pushing. This improves traction, but the position is awkward and can cause you to drop the motorcycle.
Those last few yards were murder! Sweat is streaming down your face. You’re puffing and panting from the strain, but you made it to the top. It really takes an effort to sling your leg back over the saddle after pushing uphill, but you’re well satisfied with the feat. You made that steep nasty hill the first time, and you passed about 20 other riders who didn’t. The wind cools the perspiration on your body as you move down the trail.
HILLS
Through the trees you get a glimpse of a group of riders stopped. All of them are looking down. One of them moves away from the group and quickly disappears from sight.
“There? Down there?! These guys have to be kidding.” But they’re not kidding. At the brink of the downhill is a guy in a T-shirt pointing the way the trail goes. It goes down. Really down.
HILLS
ill is steep, sandy and long. It must be a quarter-mile to the bottom. The riders at the top are just trying to screw up their courage before attempting to descend. Down the hill you see many riders inching along. Most have their engines shut off. Some are even walking their bikes to the bottom.
Sandy downhills are the easiest to ride of all downhill sections. You can de a sandwash, can’t you? Well just think of a steep, sand downhill as a sandwash tilted down at one end. The main trouble riders experience in the sand is having the front tire dig in and toss them off. Same problem on a sand downhill, but it’s worse because of weight transfer. Traveling downhill, most of the weight of the bike/rider combination is concentrated on the front wheel. Using the front brake causes even more weight transfer, and the rear wheel becomes extremely light. Any little bump or rut can now cause the rear wheel to hop, or the rear tire to skid. Use your body weight as you did for uphills. To increase the load on the rear tire, stand up and lean back over the fender (photo 6). This will make the front wheel slightly lighter to prevent the bike from plowing so much. Apply weight to either footpeg to alter your line. Use both brakes evenly to control your speed.
I never kill the engine to go down a hill, especially a sandy one. The use of power will help keep the bike stable. It will also get you down the hill faster. After all, in sand you can easily stop the machine any time you want. When you have a long downhill, plan to use just the last hundred yards or so to stop in.
If you want to race someday, learn to race downhill. One very good method for racing downhill is the “brake-andburst” technique. When you have clear vision of a course downhill (such as on the steep sandy downhill I first described), give a burst of throttle followed by application of both brakes. In this manner you proceed down the sandy hill in spurts. It doesn’t really matter which gear you use, but I recommend you try first and second to practice, then work up your speed as you gain confidence. When you are comfortable with this technique, you will find it cuts your downhill time in half or better. You will also be able to easily pass the riders who are walking their bikes, or painfully creeping down the hill with both feet dragging.
Falls on sandy downhills are nearly always caused by too much front wheel brake. It is a reflex reaction to squeeze the brake lever harder if you begin to fall. That just compounds the problem, and over you go. Teach yourself to release the front brake so the tire doesn’t have a chance to plow. If the engine is running you can use compression to assist in slowing the machine.
For any downhill your position on the motorcycle is extremely important. You should always stand on the pegs to keep as much weight away from the front wheel as possible. Keeping your body weight well back will also keep the forks extended to absorb any bumps or rocks you encounter. Your knees should be flexed slightly to let the machine move freely under you. Don’t clamp down on the bike and restrict its movement. It is much more stable than you are. In fact, if you let the bike go at the top of the hill it would go all the way to the bottom by itself without falling over. Any time you crash a motorcycle on a downhill it is entirely your fault.
To change your line going downhill, apply pressure to either footpeg and turn the bars slightly in the direction you want to go. If the downhill has a turn in it, concentrate your foot pressure on the outside (of the turn) footpeg. This will give the tires more bite and keep the machine from slipping too much in the turn. While in the turn itself, ease off the brakes before you lean over onto the edges of the tires. This prevents sliding out.
Some downhills will be hard and slippery. These are the most difficult to descend. It is very hard to keep the bike going as slowly as you would like it to without skidding the tires. Engine compression can help in these situations. Put the engine in first or second gear (depending on the severity of the hill), and let the motor drag as you go down. Use both brakes evenly, letting off once in a while to allow the forks to extend again. A steep, slippery downhill is the one place a compression release is worth its weight in gold. Otherwise, they are pretty useless except to start. Pulling in the compression release will give you a very smooth braking effect without skidding either tire.
To go down a super bad, hard-packed hill, you can use a sort of crab technique. Keeping the bike going slow enough is the big problem for most riders. For the crab method, turn the engine off (don’t forget to close the gas taps), put the bike in low gear, and ease over the brink of the hill. Put the foot you shift with on the ground and lean the bike into the hill on that side. Use both brakes and slide the bike down the hill sideways a little at a time. If you get hung up at any one spot, just pull the clutch in for a second to get things rolling again. If you want the front wheel to drop downhill a bit farther, just wiggle the bars and the tire will slip down.
If you encounter rain ruts (photo 7) while riding downhill, you can cross them in the same manner as you did climbing uphill. Because you are going downhill you will probably have the brakes on. Make sure you ease up on the brakes as you cross the ruts, or the erosion grooves may bottom the suspension and cause a fall.
Ledges and steps should be jumped on most downhills. If the hill is too steep or the terrain rocky you may not be able to jump down a step. Stand up and get your weight way back on the bike. As the front wheel drops off the edge, thrust your arms out straight and push back as far as you can go. This will extend the forks to their full travel while getting your weight transfer to the extreme rear of the machine. When the front tire reaches the bottom of the step you can absorb the shock with your arms and flex your knees to make the exit smoother.
To bypass bottlenecks on downhills, the traverse method works best. Instead of riding directly down the main trail, cut across theface of the hill at an angle. Your line down the hill will be longer, but less steep, and you will avoid bottlenecks if other riders are stuck on the trail.
Rock downhills are always a prob lem. It is extremely important to keep your feet on the pegs as much as possible. Not only can you steer the machine easier with a feet-on-the-pegs stance, but you have much better bal ance. Every time you put your foot down, you unbalance the bike. If the rocks along the trail are stationary, it is best to stand up trials-fashion and pick your way through. If the rocks are rounded instead of jagged you can often pick a smoother line over the obstacle than around it. When passing between boulders, keep in mind your footpeg width. Catching your peg or the bars on a rock outcropping can lead to a bad fall.
DOWNHILL
If the downhill is full of smaller, loose rocks, assume the trials position once more to pick your way. Again, keep your feet up at all times. If a rock suddenly veers the bike to one side causing you to sit down, you are in big trouble. Often the bike will go careening off to one side, gaining speed and becoming uncontrollable. Stay up on the pegs with your knees flexed. In this position your knees should feel bouncy. Allow the motorcycle to move freely between your legs. You must get used to the feel of the bike "dancing" under you. Each time you hit a loose rock, the bike will move around under you. If you are relaxed, the jostling of the rocks will be absorbed, but the wandering motion of the bike may be disconcert ing. Watch ahead of the front wheel and you will soon learn to anticipate the direction the bike will move. Let off the brakes slightly each time you pass through a group of loose rocks. This will let the wheels turn more freely to climb over the obstacles.
Don’t follow other riders closely when going downhill. As in every other riding situation, the rider you are following may fall or stop. Leave yourself a way out. To pass on a downhill look for alternate lines. If the hill is wide enough, such as on a big sand hill, the brake-and-burst method will help you to pass other riders easily. If you are going downhill in a narrow canyon, it won’t always be possible to pass. If you have to follow in a single.file section, always be ready to pass.. Maybe the trail will open up around the next corner. If you are ready, and the guy you are following isn't, you may be able to catch him napping and blast by where he least expects it.
SAND
The sandy fire road is a welcome change after a downhill. The roadbed itself is coarse sand with an occasional rock protruding. The coarse sand com position of the road is very power consuming. You find yourself constantly shifting to keep the engine in the right rev range. Three or four miles of this twisting, dodging, shifting makes you tired. Already you have over-shot three turns, and been passed by all your friends. You have been straining to keep the bike from wiggling and wandering around so much. The front tire seems especially troublesome.
The first thing to learn about riding in sand is that the motorcycle will wiggle. Always. No matter how hard you strain to keep the bars from oscillating, you will fail. What’s worse, you will quickly wear yourself out. It is entirely normal for a motorcycle to snake around a bit in the sand. This is due to the fact that the sand is layered and of uneven consistency. Because a cycle has two wheels mounted in tandem, the effect of wandering is much more noticeable than with a four-wheel vehicle. The front tire of your bike will “hunt” to find the path of least resistance to its rolling surface. This hunting motion of the front tire is usually interpreted by inexperienced riders as a sign of instability in the bike. This creates the idea that you are always on the verge of crashing whenever you are riding in sand.
To save energy in the sand, let the machine do most of the work. Be loose and flexible on the bike. Any tenseness or fear-grip will be transmitted directly to the bars, and you will be constantly over-correcting when steering. Your grip on the bars should be light, but firm. Your body should be relaxed. Try to ignore the hunting motion of the machine, and concentrate on the terrain ahead.
Steering in the sand should be done mainly with the feet and knees. You never have to turn the front wheel far to corner in sand. To turn left, apply pressure to the left footpeg. This will cause the bike to “bank” slightly, like an airplane. To further direct the machine to the left, apply pressure to the right side of the gas tank with your right knee. Combining foot and knee pressures will make your turns and line > changes in the sand much smoother and more controlled. Try to keep both feet on the pegs, then you will always be ready to apply pressure to the footpegs or tank when needed. Riding with a feet-up stance will also lessen the chance of getting your foot caught on a hidden rock, or twisting your knee in deep sand.
SAND
The light color of sand makes long range visibility a problem. After a while the uneven terrain blends together, making it difficult to pick out individual hazards such as rocks, sharp bumps or washouts. For best visibility, keep your eyes moving continually. Sweep from side to side with your eyes, and stand up on the pegs occasionally to increase forward vision. No matter how vigilant you are, now and then you will be surprised by a cross-cut ledge, or an alluvial fan in a sandwash. If you can’t avoid hitting a ledge, loft the front wheel over the obstacle and flex your knees to absorb the shock. Get the front wheel high enough over the ledge to counteract the blow to the rear wheel. This will lessen the chance of doing an endo.
To ride in deep sand, it is important to maintain momentum. The faster you go, the easier it is to ride. The slower you go, the more difficult it becomes to control the bike. Grinding along in the sand in low gear is not only tiring, it isextremely hard on the engine. Motorcycle engines rely on large amounts of air passing through the cylinder and head fins for cooling. Slow speed means less air. This is fine if you are putting along on a fire road, but when you are screaming the guts out of the motor in the sand, heat builds up rapidly, often causing piston seizure or crank failure.
To maintain speed, ride in as high a gear as possible. Never lug the engine. You want to keep the motor in the upper part of the rev and powerband. This way you always have some power in reserve for hard acceleration. If you wind the engine tight in a sandwash, you won’t have any emergency power to loft the front wheel over obstacles. As your speed increases, the tires will lift slightly so the bike rides more on top of the sand. Hard use of the throttle will keep the bike on top of the sand and make forward progress easier. If you stop for any reason in a sandwash, restarting becomes difficult. Start out in second gear if possible. Ease the clutch out and gently apply throttle. Keep the revs fairly low for the first 20 or 30 feet to prevent excessive wheelspin. As your speed increases, apply more throttle and shift up through the gears as soon as the bike will pull a higher cog.
Throttle should be increased gradually as you pick up speed. Remember that throttle control is a rheostat, not an on/off switch. Rolling the throttle on is one key to riding smoothly in sand. When you roll the gas on, the slide needle in the carb is gently lifted up through the needle jet and away from the main jet. This allows the taper on the needle to work as it was designed, supplying the engine with the correct air/fuel mixture. The engine runs much cleaner from the bottom end, and you never experience the bogging or hesitation at low rpm that you often get when the throttle is snapped to the stop. Chain slack, clutch lash and internal gear clearances are all taken up more gently when you roll the twist grip on smoothly.
blip the throttle, the bike lunges forward and you soon get out of the proper rhythm for taking the bumps in series. Keep the front wheel light by moving your weight to the rear. If you encounter an especially high bump in the whoop-de-doo section, loft the front wheel by applying more throttle. This will bring the wheel right up because you already have your weight back over the seat. Always loft the front wheel before you get to the big bump. This allows the bike to roll over the hump very gently and will prevent the front wheel from being “kicked.” Flex your knees as in the step method (mentioned earlier) to absorb the shock.
If whoop-de-doos occur on a trail, you can often avoid the big bumps by riding the very edges of the course. If they occur on a road, try to ride up the bank of the roadbed to bypass the bumps. Most riders go down the center of the trail, so the middle of the course will always be rougher. Sand whoop-dedoos tend to be highest in the middle, then taper off gradually at either side. If you can’t avoid the bumps altogether, at least ride the edges of the trail where Whoop de doo sections (photo 11) are the most tiring of all sand condi tions. Undulating sand bumps should be ridden on the pegs. By standing up, you allow the machine to move rhythmically up and down between your legs. Sitting on the saddle through whoop.de.doos will preload the suspension, resulting in constant bottoming and side hop. Main tain a steady, even throttle setting through whoop-de-doos. Many riders have a habit of gassing it, then shutting off This is bad because each time you the whoops will be smallest.
Riding the edges of the course (photo 12) can be an excellent tech nique for cornering on a sandy fire road. By riding the outside bank or berm, you can often go right around whoop-de doos formed in the middle of the turn. Braking bumps on any road can be bypassed in the same manner.
If there is no bank or berm to use in a sand corner, consider the fact that sand makes its own berm (photo 13). Any time you lean the bike over to turn in sand, you leave a berm in your wake. Take advantage of this fact when cor nering. Lean the machine slightly to initiate the turn, then roll the throttle on and lean over farther. This makes the tires dig in and give you a very secure "berm" on which to turn. It is impor tant to turn the throttle on before laying the bike all the way over. If you try to coast through a sand turn with the throttle' off, the front wheel will plow and slow the cycle down too much. The sudden deceleration, coupled with the understeer of the front tire, is the biggest cause of falls in sand turns.
In narrow canyons you can avoid. constantly turning in the sand by riding up the walls (photo 14). This will help to keep your speed up, and your tires will be in sand only for an instant each time you cross the bottom of the canyon. Stand on the pegs and ride diagonally up one wall just before you reach a turn. Don't go too high on the first wall, or you will lose speed. Just before the apex of your turn, apply pressure to the downhill footpeg and turn your head to look at the opposite bank. Turn the bars slightly and lean your weight forward. As the bike comes around, roll the throttle on to give yourself a burst of speed across the bottom of the canyon and up the next wall. Anticipating each turn will increase your overall speed. This technique is great fun and serves the practical purpose of allowing you to avoid consecutive sand turns in a confined space. It can also help you pass slow riders who are poking along in the bottom of the gorge.
Deep water crossings should be taken like a trials section. Stand up and just putt through. Splashing through deep water can drown out the air filter or electrics if your machine is not waterproofed (photo 15). It can also wash away chain lube. If the water crossing is shallow, say six inches or less, and not real wide, lofting the front wheel is the best method. A wheelie through a shallow creek will cause the least amount of splash. You remain dry. The motor remains dry. Only the rear tire gets wet.
Grand Prix events often have water crossings that can be taken at speed. You are never really sure how deep a water section is in the desert, but in Grands Prix and European scrambles, you cover known territory each lap. A known water crossing in a sandwash can usually be taken flat out. Say your approach speed to a shallow crossing is 45 miles an hour. Get your weight back on the saddle (photo 15), then pull the front wheel up 10 or 15 feet before you hit the water. If the crossing is wide, say 30 feet, pull the front wheel up an extra amount to clear the water. Water resistance will drag on the tire and bring the front wheel down on the far side of the creek. Resist the urge to shut off for an instant before hitting the water. By leaving the gas on hard you will be able to loft the front wheel easier, and once the wheel is up, it will carry farther.
I never hit a water crossing full-out unless I have already been across at moderate speed. It is easy to misjudge depth. If you underestimate the depth of a water crossing, you run the risk of dropping the front wheel too soon. When this happens your feet will surely be swept off the footpegs by the wake of the front tire. >
SAND
As soon as you have cleared a creek crossing, drag both brakes lightly with the gas on to dry them. There is nothing more disconcerting than to blast into a corner after a water crossing, just to find the brakes wet and useless.
“Whew! That was close. Almost had a Yucca for breakfast.” So far you’ve been doing pretty well. Only crashed twice in the sand, then that near miss a few seconds ago.
BRAKING TECHNIQUE
You’ve been over-shooting turns, killing the engine with the rear brake and getting tired. In an effort to avoid blowing turns, you slowed your pace. Now you are being passed by other riders. It’s all very frustrating.
The key to going fast—safely—in a desert race, or any time you ride a motorcycle, for that matter, is proper use of the brakes. Both brakes. Try to remember back to when you were first being taught to ride. The person teaching you probably said something like: “Okay, now for the controls. They’re different from a car’s. That lever on the left side of the motor is the shift lever. Pull it up or push it down to shift gears. On the right side, under your other boot, is the brake pedal. Now, on the left side of the handlebars is the clutch lever. On the right side, over here, is the throttle control. It’s a twist grip. Roll it toward you to increase speed. Got it?” You answered, “Yeah, I got it, but didn’t you leave something out?” He replied in a gruff sort of voice, “Oh, you mean this lever here on the right end of the bars? Don’t touch that. It’s the front brake lever and it’ll make you crash!”
You are duly impressed with his admonition. Since falling is the main thing you want to avoid, you never use the front brake while you are learning. Because of this seed of fear, planted early, most riders never learn to use the front brake. By the time you are an experienced rider, you develop the habit of using only the rear brake for stopping or slowing. It is a very bad habit, and a difficult one to cure.
Practice with your front brake each time you go out play riding. If you are afraid of the front brake, adjust the cable so that you can’t lock up the wheel, no matter how hard you pull the lever. Then go out on a fire road or trail and get used to the feel of slowing the machine with both brakes together. This helps to establish the habit of at least reaching for the front brake lever. As you become more confident, you can adjust the cable tighter to give yourself more braking force at the front wheel. Everyone knows that when you lock up the front wheel brake, the tire skids, the bars twist to one side, and down you go. But why? A motorcycle is stabilized, once in motion, by the gyroscopic effect of its two wheels. When one of the gyroscopes is stopped in braking, instability occurs. If the rear wheel stops, the machine will skid, yet will remain fairly straight in its path. This is because the major portion of the mass of the bike is still ahead of the stopped gyroscope. On the other hand, when the front wheel is locked up, the concentration of mass is behind the stopped gyroscope. The pushing mass creates a pendulum effect around the fork pivot which the rider cannot overcome. Therefore, the front wheel turns to one side, and a crash results.
I adjust my front brake so that I can lock up the front wheel at any time. The most efficient braking occurs just before the wheel locks up, but if I can’t completely stop the wheel with the brake lever, I am losing some of my braking force.
To convince yourself of the value of the front wheel brake, try a simple test. Get an experienced rider to have a braking contest with you. Use a straight section of road, marking a line across it as a braking point. Approach the line side by side at the same speed. When you reach the line, both stop as quickly as possible. Have your more experienced opponent use both brakes, while you use just the rear stopper. Once you get stopped, mark and compare the stopping distance. You will find that using both brakes stops a motorcycle 50 to 60 percent shorter than using only the rear brake.
The reason for stopping so much quicker using both brakes is simple.
When you apply only the rear brake, you get weight transfer to the front tire, away from the rear tire. Since the rear wheel is the only one slowing down, it becomes light and skids easily. When you apply both brakes together, you also get weight transfer to the front tire, but now the shifted weight is beneficial. The forward weight transfer loads up the front tire and makes it “bite” for maximum stopping traction.
BRAKING
Besides the pendulum effect, the rider has another thing to overcome: his natural reflex to brake harder in a panic situation. When the panic situation is caused by a locked-up front wheel, squeezing the front brake lever tighter only compounds the problem. You must learn to conquer this reflex action. Here is an effective practice technique. Adjust the cable so you can easily stop the front tire (photo 16). Now ride along a flat piece of ground in first or second gear and squeeze the front brake lever until the wheel stops. Apply throttle to keep the bike moving. Use only the front brake for this practice. Skid the tire as far as you can. When the bars begin to turn to one side, simply ease off the brake lever to regain control. Keep your feet firmly on the pegs. At first you will be able to skid the front tire only five or six feet at a time. With practice, the distance will become 50 or 60 feet. What is the value of this solo technique? It teaches you to control the front wheel brake, rather than the other way around. It improves your balance, timing and coordination. It also removes the fear of locking up the front wheel. By practicing this technique, the next time you race you won’t crash your brains out if you inadvertently lock up the front wheel in the heat of battle.
Most braking should be done while the machine is completely upright on the centers of the knobbies. Falls are often caused when an inexperienced rider tries to corner or lean the bike over while braking. For best traction keep your body weight evenly distributed along the centerline of the bike. To increase the bite of the front tire, lean your upper body forward over the handlebars. The brakes can be applied when the bike is laid over (photo 17), but they must be used very gently to prevent slides or washouts.
I’m often asked, “How can I use the front brake on bumps?” The problem on bumps is that the bike is jumping around so much that you don’t want to release your grip on the bars long enough to apply the front brake. The answer is to use one or two fingers to control the brake lever. This leaves your thumb and outside fingers wrapped around the handlebars. The circle made by your thumb and outside fingers is very strong, and wholly adequate for controlling the bars in the rough while you brake.
By using both brakes in the rough, you can drive much deeper into the section or turn than you can when using only the rear brake. By braking later, you can confine your slowing distance to a small area in the bumps. The rider using only the rear brake must begin braking much sooner; and applying or dragging the rear, brake through bumps causes the bike to hop from side to side.
Outbraking another rider is one of the most effective ways to pass. The rider you are challenging may have more power than you, but you have a distinct advantage if he is only using the rear brake. Follow to one side of his path and wait for a clear shot going into a turn. When he shuts off, you can leave the gas on and drive past him. Once by him, you can begin maximum braking with both brakes. On a fire road or fast trail, the front brake can gain you 20 to 40 feet in each turn over a rider who uses only the rear binder. o
The next installment of "Pro Tech niques for Off-Road Riding" will follow in the August issue and will deal with cornering, high-speed sections, jumps and lofting the front wheel.