A Hands-On Guide To Getting the Most Out of Adjusting Your Suspension
A HANDS-ON GUIDE TO GETTING THE MOST OUT OF ADJUSTING YOUR SUSPENSION
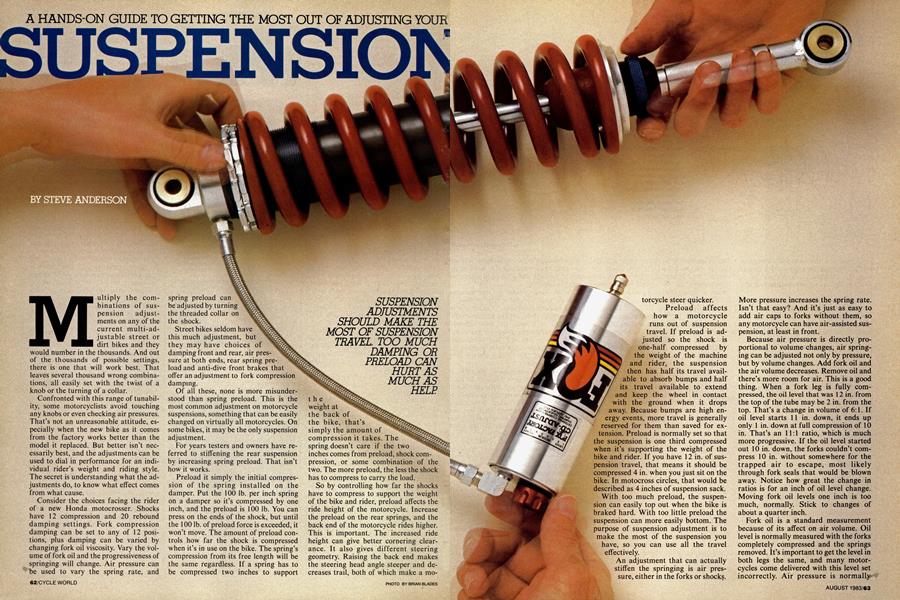
SUSPENSION ADJUSTMENTS SHOULD MAKE THE MOST OF SUSPENSION TRAVEL. TOO MUCH DAMPING OR PRELOAD CAN HURT AS MUCH AS HELP
STEVE ANDERSON
Multiply the combinations of suspension adjustments on any of the current multi-adjustable street or dirt bikes and they would number in the thousands. And out of the thousands of possible settings, there is one that will work best. That leaves several thousand wrong combinations, all easily set with the twist of a knob or the turning of a collar.
Confronted with this range of tunability, some motorcyclists avoid touching any knobs or even checking air pressures. That’s not an unreasonable attitude, especially when the new bike as it comes from the factory works better than the model it replaced. But better isn’t necessarily best, and the adjustments can be used to dial in performance for an individual rider’s weight and riding style. The secret is understanding what the adjustments do, to know what effect comes from what cause.
Consider the choices facing the rider of a new Honda motocrosser. Shocks have 12 compression and 20 rebound damping settings. Fork compression damping can be set to any of 12 positions, plus damping can be varied by changing fork oil viscosity. Vary the volume of fork oil and the progressiveness of springing will change. Air pressure can be used to vary the spring rate, and spring preload can be adjusted by turning the threaded collar on the shock.
Street bikes seldom have this much adjustment, but they may have choices of damping front and rear, air pressure at both ends, rear spring preload and anti-dive front brakes that offer an adjustment to fork compression damping.
Of all these, none is more misunderstood than spring preload. This is the most common adjustment on motorcycle suspensions, something that can be easily changed on virtually all motorcycles. On some bikes, it may be the only suspension adjustment.
For years testers and owners have referred to stiffening the rear suspension by increasing spring preload. That isn’t how it works.
Preload it simply the initial compression of the spring installed on the damper. Put the 100 lb. per inch spring on a damper so it’s compressed by one inch, and the preload is 100 lb. You can press on the ends of the shock, but until the 100 lb. of preload force is exceeded, it won’t move. The amount of preload controls how far the shock is compressed when it’s in use on the bike. The spring’s compression from its free length will be the same regardless. If a spring has to be compressed two inches to support the weight at the back of the bike, that’s simply the amount of compression it takes. The spring doesn’t care if the two inches comes from preload, shock compression, or some combination of the two. The more preload, the less the shock has to compress to carry the load.
So by controlling how far the shocks have to compress to support the weight of the bike and rider, preload affects the ride height of the motorcycle. Increase the preload on the rear springs, and the back end of the motorcycle rides higher. This is important. The increased ride height can give better cornering clearance. It also gives different steering geometry. Raising the back end makes the steering head angle steeper and decreases trail, both of which make a motorcycle steer quicker.
Preload affects how a motorcycle runs out of suspension travel. If preload is adjusted so the shock is one-half compressed by the weight of the machine and rider, the suspension then has half its travel available to absorb bumps and half its travel available to extend and keep the wheel in contact with the ground when it drops away. Because bumps are high energy events, more travel is generally reserved for them than saved for extension. Preload is normally set so that the suspension is one third compressed when it’s supporting the weight of the bike and rider. If you have 12 in. of suspension travel, that means it should be compressed 4 in. when you just sit on the bike. In motocross circles, that would be described as 4 inches of suspension sack.
With too much preload, the suspension can easily top out when the bike is braked hard. With too little preload the suspension can more easily bottom. The purpose of suspension adjustment is to make the most of the suspension you ;, so you can use all the travel effectively.
An adjustment that can actually stiffen the springing is air pressure, either in the forks or shocks. More pressure increases the spring rate. Isn’t that easy? And it’s just as easy to add air caps to forks without them, so any motorcycle can have air-assisted suspension, at least in front.
Because air pressure is directly proportional to volume changes, air springing can be adjusted not only by pressure, but by volume changes. Add fork oil and the air volume decreases. Remove oil and there’s more room for air. This is a good thing. When a fork leg is fully compressed, the oil level that was 12 in. from the top of the tube may be 2 in. from the top. That’s a change in volume of 6:1. If oil level starts 11 in. down, it ends up only 1 in. down at full compression of 10 in. That’s an 11:1 ratio, which is much more progressive. If the oil level started out 10 in. down, the forks couldn’t compress 10 in. without somewhere for the trapped air to escape, most likely through fork seals that would be blown away. Notice how great the change in ratios is for an inch of oil level change. Moving fork oil levels one inch is too much, normally. Stick to changes of about a quarter inch.
Fork oil is a standard measurement because of its affect on air volume. Oil level is normally measured with the forks completely compressed and the springs removed. It’s important to get the level in both legs the same, and many motorcycles come delivered with this level set incorrectly. Air pressure is normally measured with the forks fully extended. Naturally, this measurement changes with air temperature, so it’s normal to discover higher pressures at the end of a race.
There are tools that make setting oil level and air pressure easier. A low pressure air gauge can be more accurate and it will change pressure less when it is used. A common model is the Malcolm Smith gauge. A hand pump works best to change air pressure because the volume is so small. It’s also possible to fit a lowpressure regulator and use an air compressor. To change oil levels, a turkey baster can be used to remove excess oil. Steve Simons sells a calibrated version of the baster, but most riders make do with a tape measure and a baster from the hardware store.
The other common adjustment is damping. This is most often found on newer motorcycles, though owners of old bikes can modify fork damper rods to achieve similar results. It just takes more work.
On the compression stroke, damping works with the springs to resist upward movement of the wheel. Increased compression damping will give a rougher ride, much like stiffer springs. It can also give more resistance to bottoming. Rebound damping opposes the springs and slows the wheels when the springs shove them away from the motorcycle. Rebound damping keeps the back end of a dirt bike from kicking back after a bump. And it damps out the pitching that makes a street bike weave in corners. Too much rebound damping causes the suspension to pack down over a series of bumps; the wheels return so slowly after the first bump that they’re partially compressed for the second bump, even more so before the third bump, etc.
Fork damping is most commonly adjusted by changing fork oil viscosity. This affects both compression and rebound damping. Shocks are less affected by oil viscosity and more often come with external damping adjustments.
One possibility for changing front fork damping is an aftermarket damper rod kit. These reached the peak of their popularity in the late 1970’s because they extended the travel on front forks. Some offered improved damping as well. If you have an older bike that could use more suspension travel, or a newer bike with poor fork performance, a damper rod kit could offer help.
One adjustment found on some street bikes but not dirt bikes is anti-dive. This is a system that increases compression damping when the front brake is applied. On Hondas, Suzukis and Kawasakis, some adjustment is provided. With the anti-dive turned to the maximum setting, there is more compression damping, slowing the front end dive during braking and increasing suspension harshness at the same time.
DIALING-IN A DIRT BIKE
With all these adjustments available, it’s important to make changes in logical order. And it’s most important to make only one change at a time. The best place to start is with an owner’s manual. This will explain where the controls are and what function is controlled by what knob or valve. Many manuals also recommend initial settings and give good advice on what to look for.
Before leaving your garage, measure fork oil level and set spring preload to stock recommendations. If there are no recommendations, set the suspension for one-third sack with the rider aboard. This measurement must be taken between fender and axle, not at the rear shock of a single shock bike, because the progression of the linkage means they are not the same.
After the preliminaries, it’s time to ride. Note that this is not time to race. Racing and tuning are different things, and when you are doing one, you can’t da a good job with the other. Your riding area should be a normal loop, one you are familiar with. For motocross, it’s important to set up the bike for the track you will be competing on.
The first thing to check is if the bike is using all available suspension travel at both ends. Both wheels should lightly bottom under the harshest bumps. If they don’t, you’re wasting wheel travel. Sometimes you can’t feel the suspension bottom, but you can see if the fork scrapers are cleaning off dirt all the way up the sliders, or if the shock is wiped clears all the way to the bump stop. It may be easier to put a tiewrap around one stanchion tube and see how far it’s pushed up.
If the back end isn’t using the full travel, you can either use less compression damping, less spring preload or a, softer spring. Obviously if your bike doesn’t have an adjustment for compression damping, your choice is limited, but be careful of depending too much on spring preload. It isn’t a cure-all.
To determine which adjustment to make, find a flat area with small washboard bumps. Ride over the bumps and pull on the front brake hard. If the rear wheel chatters, it has probably extended fully and would work better with less preload. If the rear wheel tracks the bumps, it would be better to reduce compression damping. Don’t change both preload and compression damping at the same time. You will have no way of knowing which adjustment caused what affect. It’s possible to correct rear wheel chattering with less compression damping or less preload, but it will be easier to try with less damping. Set the damping down one notch and see what difference is made. Remember that a change in preload affects steering head angle-while the damping adjustment in back will have less affect on chassis geometry.
Sorting through the combinations of spring preload and compression damping may be the most confusing part of setup. It’s worth taking a little extra time and experimenting. It may be that you can increase suspension travel by either reducing preload or easing off on the compression damping. Because the preload affects steering, it’s a good idea to finetune the rear suspension with compression damping or spring rate changes, not preload adjustments.
Changing springs may not be a typical suspension modification, for the average hobbyist but perhaps it should be. When damping and preload settings are at their limits and the bike still bottoms or tops out, it’s time for a different spring rate. Springs sack with age, or a rider weighing more or less than average may need a different spring rate. This is one place where riders of dual shock machines have an advantage: it’s cheaper to replace two small springs than one big one.
A stiff spring isn’t the only way to keep a suspension from bottoming, though. More compression damping is the easiest fix, and it works well. But if the stiffer compression damping makes the ride too harsh, a stiffer spring might do the job better. A slight increase in preload may help, but this isn’t the first or best solution, though it is the most common.
Here’s where the single-shock bikes get even. One spring and shock are more expensive, but most of them can be tuned as delivered.
Dual-shock bikes aren’t so easy. Springs are available. Some of the shock makers, like Mulholland and Koni, have models with adjustable damping, on the bike or off. And some, S&W is probably the best known, offer soft, medium and stiff versions of the same model. Check the catalog, and remember at the same time that it’s possible to increase front end bite with a longer pair of shocks, or to make the bike more stable at top speed with shorter shocks.
The real drawback here is that you pay for alternate shocks before you know if you like them, so be sure you need the stiffer or softer dampers before you order them.
When setting up the front suspension for maximum travel, the same techniques apply. If the forks don’t compress all the way, a decrease in compression damping or spring rate is called for. If you have compression damping adjustment, try that first. If that doesn’t do enough, then reduce air pressure or oil level. Decreasing air pressure normally softens the entire range of fork travel, while decreasing the oil level mostly softens the fork at the end of travel.
If the forks are harsh over small bumps—that washboard area where you checked for rear suspension topping out is a good place to notice this—you want either softer springs or less compression damping. If the forks bottom and are harsh, this is an example of not enough progression.
Just because your forks have air caps doesn’t mean you have to pump a lot of air into them. Most of the newer dirt bikes are designed to operate with 0 psi in the forks.
When forks bottom severely, try increasing compression damping before adding air pressure. Changing pressure works much like a change in spring preload, and that changes the ride height, which changes steering head angle. An increase in compression damping is more likely to make the ride harsh over small bumps. If increasing compression damping has made the forks too harsh, an increase in spring rate or higher oil level will work better.
Much of this suspension setup requires careful observation. You need to create testing conditions that allow you to feel what small parts of the suspension are doing. Sometimes you won’t be able to feel any difference between changing compression damping and changing air pressure. Then it’s time to try another area or find some other challenge for the suspension to overcome. You need to look for small changes, not big changes. Don’t try to take in too much at one time.
When the combination of preload, spring rates and compression damping has your suspension system using full travel, it’s time to set rebound damping. Rebound damping controls how fast the wheels extend after the suspension is compressed, and the goal is to slow them down just enough that the bike doesn’t kick up after bumps. Too much rebound damping will mean a loss of traction and a loss of suspension travel.
The best place to test the rebound damping is over a series of medium or high rolling bumps on a fast straight. Stay away from square edged bumps because it can be difficult to distinguish between compression and rebound effects over them. Concentrate on the rear suspension first.
What you are looking for here is a kick from the rear suspension. This isn’t the kick of the suspension running out of travel, but the rebound kick after the rear tire has hit the bump. If you don’t observe any kick, try reducing rebound travel until you notice it. This gives you the boundary of the desired adjustment. Try increasing the damping slowly, until the back end feels more stable. You want to add just enough rebound damping to stabilize the bike, and not enough to prevent the wheel from tracking the ground.
Front rebound damping is less critical than rear rebound, but the same approach applies. There should be enough damping to keep the front wheel from topping out violently after bumps, not so much that the wheel pumps down over a series of bumps. In most cases forks work well with the factory settings. To evaluate the front rebound damping, ride over the same rolling bumps used to test the rear suspension. If the front end gradually packs down, there is too much rebound damping. If the forks have a springy feel, bouncing back off bumps noticeably, they could be improved with more rebound damping. Normally, this requires a change of fork oil, which also changes compression damping. Changes in oil viscosity should be slight. Use fork oil 5 wt. or 2.5 wt. different from the stock oil. And don’t be surprised to find the stock oil working best.
Now you’ve spent most of a day playing with springs and dampers. You should have your motorcycle using all of its suspension travel effectively. You should also have developed a sensitivity to changes, and with this, you can begin fine-tuning suspension characteristics. You may now discover handling problems relating to ride height, or some peculiarity of damping. For subtle problems, refer to tables l-3 for a quick troubleshooting guide.
Remember to make just one change at a time, though. And you might find it helpful to take a friend along to observe the motorcycle. Sometimes it is easier to see what the wheels are doing when you aren’t riding the bike. This is particularly useful at a motocross track where an observer can notice how your bike and other bikes work over the same obstacles.
STREET BIKE SETUP
For normal street riding, the suspension should give a compliant ride with enough damping to keep the bike from handling badly. Handling problems are commonly high speed weaves, or the loss of control experienced when a suspension bottoms hard. If the bike is carrying only one person, the factory recommendations for minimum preload, air pressure and damping will probably work best.
Suspension sack is a useful tool for setting the preload on a street bike. Like a dirt bike, a street bike normally works best with about one-third of the suspension travel used for sack. This means the shock preload should be set for around l to 1.5 in. of sack on most street bikes. And on many bikes that is the only adjustment available.
Rebound damping is best noticed when riding on a road with long, smooth waves for the surface. On this type of pavement the bike will extend and compress its suspension. When the dips and rollers end, the pitching or bouncing motions should end within one or two oscillations. If the bike is overly springy and has adjustable rebound damping, a firmer setting can help. Unfortunately, the springiness frequently comes from worn out shock absorbers, and the only solution is to replace the shocks, or rebuild them if they are rebuildable.
What most people call speed wobble is more precisely known as a high-speed weave, and worn dampers are one common cause of this effect. The pitching of a motorcycle on its suspension is one of the essential conditions for a high speed cornering weave. There can also be other causes of a high speed weave, and just because you replace the shocks, you may not have eliminated a high speed weave.
Some street bikes are more prone to high speed weave when shock preload is set to the maximum. This steepens the steering head angle and it also provides more cornering clearance, which puts more of a load on the motorcycle from the greater cornering angle. This is one reason why setting every suspension adjustment to the maximum is not a cure-all for handling problems.
Bottoming a street bike is, to some extent, a condition that has to be accepted. There isn’t enough suspension travel available on a street bike to absorb all the bumps and still provide an acceptable ride. But if a bike bottoms too often, or it is used primarily for carrying two people and lots of luggage and it’s operated near the gross vehicle weight rating, a set of stiffer springs can be of use. Increasing the preload will also reduce the tendency to bottom, but the difference will be slight. A bike with air-adjustable shocks offers the easiest adjustment. Just add air pressure for a greater spring rate. Air shocks are particularly valuable on full-dress touring bikes, or other heavily loaded bikes, because these machines can experience a wide range of loads. Also, a passenger added to a bike is only adding weight to the rear suspension, making adjustments of the shocks useful.
Front end bottoming can be reduced by adding air pressure through air caps. Bikes without air caps can have air caps fitted at reasonably little expense. If the front end bottoms only during hard braking, but is otherwise acceptable, the dirt bike practice of raising the fork oil level is particularly useful. This increases the progressiveness of the springing and stiffens the bottom portion of the travel without requiring high air pressures that degrade the ride under all other conditions. Like adjusting a dirt bike fork oil level, make changes in quarter-inch increments.
For normal street use, suspension is straightforward. Use enough preload or air pressure to give a reasonable ride height and rear end sack with rider and passenger, fork air pressure and volume set to give a good ride without excessive dive, and just enough rebound damping to keep the bike from bounding about too much on its springs.
Setting up a street bike for racing is a different matter. The most important requirement often isn't the best suspension, but the greatest ride height. This is because most street bikes run out of cornering clearance before they run out of tire traction. The typical production racing practice is to jack up the spring preload as far as it will go, then set the rebound damping on the highest setting and run the highest possible pressures in the forks. This may allow faster laps, but it’s not the best solution.
A better compromise would be to raise the bike as far as the rules permit by other means, such as longer shocks and fork tubes and taller tires. Then remove or hammer in the worst ground clearance offenders and, finally, stiffen the suspension enough to keep the hard parts form digging into the asphalt. Just as with dirt bikes, a slight increase in spring rate works better than excessive amounts of preload. What’s excessive? When the rear wheel hops during braking over bumps, that’s too much. So is anything less than an inch of rear end sack, too much preload.
Maximum rebound damping isn’t necessarily a good idea, either. Rebound damping slows the return of the wheels after hitting a bump, and too much damping can cause a loss of traction because the wheels aren’t allowed to move quickly enough to track the ground contour. It can also cause the suspension to pump down over a series of bumps. This time the result is a loss of critical ground clearance in a bumpy corner. Start with light rebound damping and increase it only in response to specific problems such as excessive pitching or weaving.
Even when the suspension is adjusted as as well as it can be, a motorcycle, whether street or dirt, may not be perfect. There are limits to the amount of travel and there may be other factors causing problems. It’s possible to use too much tire or to have some inherent handling problem that no amount of suspension adjustment will cure.
You may not end up with a motorcycle capable of beating Bob Hannah or Kenny Roberts. Instead, you may get your motorcycle working better than it ever has.