Learn Fast, Learn Hard
Learn Fast, Learn Hard
When working on motorcycles, it seems, nothing is as easy as it should be. Modifying a motorcycle compounds the problems. In modifying the Seca 650, we had our share. In no particular order, highlights follow:
—Information. The local Yamaha shop didn’t have a Seca service manual in stock, but ordered one for us. It arrived 10 days later, and, when it did arrive, the “Service Manual” listed on the retail parts microfiche turned out to be an ordinary owner’s manual. Consulting a list of dealer service publications, the parts man found the real service manual, part number LIT-11616-XJ-65, $11.95. It arrived a week later, after we had already finished the project work.
—More information. Lacking the service manual when assembling the engine, we had no instructions as to timing the camshafts. A friendly Yamaha mechanic and racing buddy told us what marks to line up where, and since two staff members had experience building dohc Fours, timing the stock cams was no problem. Timing the Yoshimura cams, which are marked differently and which came with no instructions, was another matter. It took two tries to get them right—the first time the cams were installed one tooth retarded and the bike barely ran. Happily, we got away with the error without bending the valves.
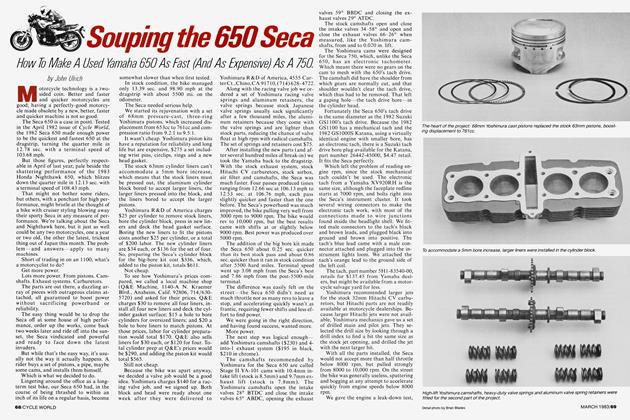
—Valve shims. Because the
Yoshimura camshafts’ base circles were larger than the stock camshafts’ base circles, all the valve lash adjustment shims had to be replaced. Yamaha shims are numbered in increments of 5, each 5 representing .0025 in. The required shim size change averaged 10 (or .005 in.), that is, a valve that was too tight with a 275 shim was just right with a 265 shim, etc. The catch is to figure out what size shims are needed before actually needing them, since shims cost $3.25 each and not all Yamaha shops have all sizes in stock. Yamaha shims interchange with Kawasaki KZ1000 shims, numbering system and all, and Kawasaki shims sell for $4.50. Some shops sell used shims for half price.
—Special tools. Adjusting the Seca’s valves requires a special tool, part number 90890-01245-00. Not only did the local Yamaha shop not carry the tool, the parts manager couldn’t find the part number, (listed with a photo of the tool in the official Service Manual), in his parts lists. It turned out that the tool must be ordered as part number YM01245 and that it sells for $10.05. We couldn’t wait for the tool to arrive, so we borrowed one. The Yamaha tool is cumbersome and time-consuming to use, turning what would be a fairly simple job on a Suzuki (using an official Suzuki tool) into a frustrating hassle.
—Piston ring compressors. Mechanics from both Yoshimura R&D and Vance & Hines Racing swear that they install piston kits using their fingers to compress the piston rings enough to slide the cylinder over the pistons. We tried that, and it took five people and a lot of cursing to get the cylinder on the Yamaha. We also tried an official Suzuki ring compressor, (which we couldn’t make work), and an official Kawasaki ring compressor, (which didn’t match the Seca’s bore centers). Next time we’ll use hose clamps, just like we did in high school.
—Gaskets. Our local Yamaha shop did not stock all the gaskets we needed. We had difficulty obtaining four exhaust gaskets, a sump pan gasket and a valve cover gasket at various times.
— Lost parts. Sharp-eyed readers might note the reference to a sump pan gasket above and wonder why we were removing the sump. It’s like this—we dropped two bolts down the cam chain tunnel while adjusting the valves and had to remove the sump pan (twice) to retrieve them. After that, we covered the tunnel—and other likely bolt-attracting openings—with shop rags when working.
Nothing beats being fast learners.
John Ulrich