Pro Techniques For Off-Road Riding
Pro Techniques For Off-Road Riding
This Month: Proper Bike Preparation And Cost-Saving Maintenance Tips
Russ Darnell
Editor's Note: Up to this point, Russ has stuck strictly to riding technique. And we think he's covered all the essentials. He talked about hill climbing, downhills and sand. From there he offered instruction on cornering, riding over rough terrain, and what to look out for when riding at speed.
Finally, he addressed jumping technique. If you paid attention, you have the knowledge to tackle just about anything. A ll you need now is practice, so you can polish every technique and develop a style all your own.
Before you run off, though, it's necessary to consider bike preparation. If your machine isn't set up properly and/or isn't reliable, all attempts at rider improvement will fail.
While you 're reading this section, make note of Russ' cost-saving tips. Dirt riding need not be as expensive as you think!
The trailing or racing effort of the best dirt rider can be negated by simple mechanical failure. Almost completing a trail loop or leading an entire race can be very frustrating if you break down two miles from the truck. This becomes particularly significant when you realize that much of this mechanical trouble can be avoided by thorough preparation.
If you are truly serious about riding, then you will need to increase preparation time quite a lot. No, it doesn’t take 40 hours a week to keep a machine ready. Just one hour each night, for a total of five hours each week, will get the job done nicely. Bigger, more important rides will, of course, require much more preparation.
It is usually a good idea to skip riding the week before a big event, unless you have access to another bike. This allows you more time to shape up the machine for the “big one” coming up. If you race, this maintenance time is doubly important. For example, in either the Mint or Baja, you will find the money you win is almost directly proportional to the time you spend setting the bike up.
Following is a list of off-road preps that will help keep your machine off the DNF list. Not all of the steps need to be taken each week, so I have also included some periodic service lists for one race, five races, 10 races, and seasonal repairs.
SAVE MONEY
You can save a bunch of money by doing your own mechanical work. Anybody can be a mechanic. It just isn’t that mysterious. The first step in your home shop program is to get a workshop manual for your particular bike. Don’t settle for a manual that is “almost” what you need. Get the exact book for the model and year of your motorcycle. If you want to acquire some formal education in the skills of cycle wrenching, there are many programs in local colleges that include motorcycle mechanics as a course of study.
The main thing you save is the cost of labor. It’s really silly to take your entire machine to the shop when it has a flat tire, for instance. They have to charge you extra labor for removing the wheel from the frame; then most shops will replace the tube instead of throwing on a 15¢ patch.
Or how about when you need work on your crankshaft? There is no part on a bike that takes more time to get to than the crank, so you can expect to pay through the nose if you take the whole machine into the shop. At the very least, remove the engine and take just that in. Better still, consult your workshop manual, and carefully disassemble the motor as far as your tools and skills allow. Sometimes special tools are required to split the engine cases. If not, split them yourself, and hand the guys at the shop the naked crank assembly. Labor on rebuilding a bare crank is usually between $15 and $25, plus parts. The labor the shop charges to tear down your entire bike will be between $100 and $200!
The shops aren’t out to gouge you in most cases, but their labor costs them money, and that cost, plus their profit, is passed down to you, the customer. So, when your bike is ailing, take in just the sick part if you can.
When you get a workshop manual, read it! Go all the way through the book, and study the pictures along with the text. By the end of the book the inner workings of your engine won’t seem so forbidding. Manuals usually have a list of special tools necessary to work on the engine, and sometimes the forks. If you really like doing your own work, invest in some of these tools as you have a use for them. Some workshop tools are so simple you can build them yourself. Many types of “factory” pullers can be purchased for
about half the cost in the tool departments of large department, discount and automotive stores.
Money can be saved in other areas of motorcycle maintenance too. Buy American standard parts that match the higherpriced parts sold in the bike shops. For instance, bearing sizes are standard throughout the world. Any bearing that fails can be replaced for about half the cost by going to a bearing supply company. Bearing supply outlets are listed in the Yellow Pages of the telephone book. Take your old bearing with you so they can cross-match the number on a reference chart.
Drive chain can also be purchased at considerable savings from bearing outlets, and from another listing in the Yellow Pages, “Power Transmission Equipment.” Most of these places sell Diamond Chain, which is one of the best brands money can buy. Bearing supply stores will sell drive chain cheaper in bulk, so maybe you can get together with some friends and buy a hundred feet or so.
You would be amazed at how many of the gears in a motorcycle can be bought at a bearing supply or power transmission place. Seals of every description can also be found. Take the old part. If you have need of clamps or springs, a large auto store or hardware is the place to go. Nuts and bolts, including metric sizes, are available from large hardware outlets at about one-third to one-fifth the price in shops. If the high price of tires is making the wallet moths nervous, try a recap. The new recaps on the market are quite good.
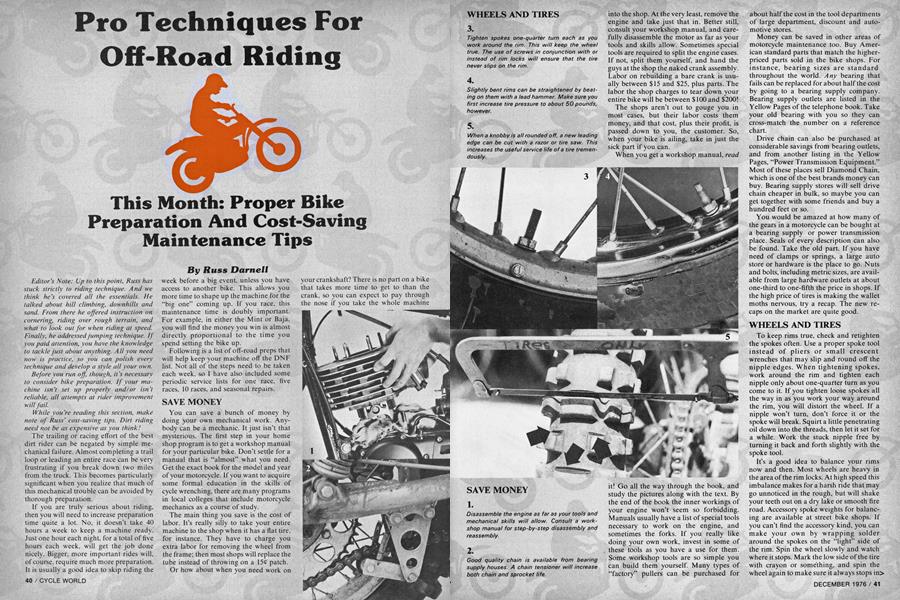
WHEELS AND TIRES
To keep rims true, check and retighten the spokes often. Use a proper spoke tool instead of pliers or small crescent wrenches that may slip and round off the nipple edges. When tightening spokes, work around the rim and tighten each nipple only about one-quarter turn as you come to it. If you tighten loose spokes all the way in as you work your way around the rim, you will distort the wheel. If a nipple won’t turn, don’t force it or the spoke will break. Squirt a little penetrating oil down into the threads, then let it set for a while. Work the stuck nipple free by turning it back and forth slightly with the spoke tool.
It’s a good idea to balance your rims now and then. Most wheels are heavy in the area of the rim locks. At high speed this imbalance makes for a harsh ride that may go unnoticed in the rough, but will shake your teeth out on a dry lake or smooth fire road. Accessory spoke weights for balancing are available at street bike shops. If you can’t find the accessory kind, you can make your own by wrapping solder around the spokes on the “light” side of the rim. Spin the wheel slowly and watch where it stops. Mark the low side of the tire with crayon or something, and spin the wheel again to make sure it always stops in> the same spot. Your solder, or spoke weights, should be placed exactly opposite your crayon mark. By spinning and adding weights as necessary, you can quickly balance the wheels. A perfectly balanced wheel will stop randomly at any point along it’s circumference.
If you crack a rim, you don’t necessarily have to throw it away. Welding can save many rims. Dented rims can be returned to a certain state of roundness by beating on the dented area with a lead hammer, or by pressing the dent out with a rim jack. If your rim is tweaked so that it wobbles from side to side in the frame when the wheel is spun, it needs to be trued. Most shops have facilities for rim truing; just take in the complete wheel with axle.
To increase tire life, flop them over on the rim to change their direction. This presents a new leading edge of the knobby. When a knobby is all rounded off, a new leading edge can be cut with a razor or a tire saw. A tire saw can be made from a hack saw blade by grinding all the pitch off the teeth, leaving a straight, serrated knife edge.
Flats can often be avoided by the use of an antileak compound in the inner tubes. Six Days Trials tubes with extra thick walls are on the market, as are several types of six-ply tires.
Fine dust penetrates everything, so remove the wheels often to service the brakes and bearings. Remove the brake shoes from the backing plate to brush, or blow out, all the collected dirt. Remove the brake cam and regrease the shaft. Use a wire brush to take the glaze off the brake shoes, then lightly regrease the shoe pivot and cam faces. Blow out any dust in the bearing areas and check the bearings for play. Cross-cut the brake shoes whenever you replace them. These cuts improve brake response and limit glaze. They also throw off water should you encounter any. Sand the rust out of the wheel hub with light grit paper. Lightly grease the axle before slipping it back in.
CHAIN AND SPROCKET CARE
Water dramatically cuts chain life, so remove your drive chain before washing the bike. Clean the chain in gasoline or solvent and, if possible, let it soak overnight. Brush off any excess dirt with a stiff bristle brush. When you remove the chain from the solvent, hang it up to dry for about an hour, then apply your favorite lube. I immerse my chain in a container of clean oil after drying from the solvent. I let the chain soak for two days in the oil, shaking the container from time to time to make sure the oil penetrates every link. The oil I use is a good grade 30W mixed with an ounce of molybdenum disulfide (moly), and a couple squirts of WD-40. After the oil soak, I hang the chain up so the excess oil mixture drips back into the container for future use. Besides any home
lubing system you may devise, don’t forget to generously lube the chain immediately prior to the start of a ride.
Adjust your chain tension for the full range of rear-wheel movement. The best way to do this is to remove your shock springs, then pull the wheel through it’s full arc, checking the chain tension throughout the travel. You will probably find one point where the chain is extra tight, or extra loose, depending on the bike and the rear-travel arrangement.
If your chain passes through a wide range of tensions, you need a springloaded chain tensioner. Many of the bikes using long-travel rear suspension now have tensioners similar to those found on most trials bikes. The tensioner consists of a supporting arm arrangement, a spring, and a roller to guide the chain onto the rear sprocket. These work quite well and improve chain life. Too tight a chain will hamper the suspension and stress the gearbox unduly. Too loose a chain will wear the sprockets out quickly, and make the chain prone to jumping off. You can tell if a chain is worn out by laying it out on the floor and making a “D” of it. The chain forms the round side of the “D,” and you
measure from the center of the chain to the straight line which can be drawn between the ends of the loop. The side deflection should not be greater than twelve inches.
Sprocket teeth should be checked often for signs of “hooking.” Hooked teeth look as though they have been bent forward in the direction the chain travels. A hooked sprocket should be replaced, otherwise the chain will quickly wear out. At the first sign of sprocket wear, which precedes hooking, flip the sprocket over to increase its life. If your countershaft sprocket is spline-mounted, check the fit often. The sprocket will wear out before the countershaft spline does, and a loose fit will cause the securing nut to come off. If you lose the countershaft sprocket while underway, the result is almost always the destruction of at least one engine case when the chain balls up.
SUSPENSION
Check the fork seals every week for leaking. At the first sign of leakage, remove the fork legs and clean out the tube and seals. If leaking is caught early, cleaning the seals will usually cure the problem for a while. When it’s necessary to replace seals, make sure you wipe some grease around the inside sealing surfaces before you reassemble the forks. It’s a good idea to put a little strip of foam rubber inside each of the external fork wipers to further isolate the seals from pollution.
While you have the forks apart, measure the fork springs for sacking. Leave the springs out when refilling the forks with oil. After filling, pump the fork legs up and down to dispell any trapped air from the damping system. Oil should just cover the damper rods. Install the springs with the narrow-wound coils at the top to cut unsprung weight. To make the caps breathe better, squirt some lube of the WD-40 variety into the breather holes before you reassemble the forks.
Shocks need constant attention, especially with long-travel setups. Watch for leaking, and rebuild at the first sign of moisture. If you think to yourself, “Hell, those will last another ride or so before I have to rebuild ’em,” you’d better consider the possibility of emergency repairs. Seals are cheap. Internal parts are not. Leakage is not only a sign that oil is coming out, it is a sign that dirt is going in.
One often neglected area of the shock is the grommets. Many riders will take perfect care of the rest of the damper while allowing the grommets to deform and become loose. Shock failure is much more likely when the grommets get ratty. The looseness causes mounting eyes to break off, and shock bolts to work loose and disappear. Check the springs for sacking while you have the shock off.
EXHAUST PIPE
Exhaust pipes can be quite a problem, especially if you ride hard. Heat, resonance and vibration all combine in force to crack the pipe and its mounts. Crashes don’t help either, as most pipes are very much exposed. Downpipes get eaten up pretty fast, even when protected by a skidplate. When you are engineering shock mounts for exhaust systems, use some sort of rubber or spring setup. A combination of rubber mounts and springs works best, because a motorcycle exhaust pipe, especially the two-stroke variety, expands and contracts at a ferocious rate. When rigidly mounted, points of stress are rapidly defined, and cracks result. Husqvarna pipes used to be notorious for breaking and cracking, until the factory introduced a rubber mount. The simple rubber grommet arrangement cured the problem completely. Springs work particularly well for securing the head pipe to the cylinder. If you replace or add springs, make sure you get some that are heat-treated.
Remove your pipe every other race or so to inspect the surface for wet spots. These wet areas signal the presence of small holes or cracks, which can lead to pipe failures. Reweld to repair. A weld-on silencer with a repackable core is a nice finishing touch to preparing your exhaust system for the rigors of off-road riding. The weld-on type mufflers give much better service than the bolt-on or clamp-on sort, which can easily fall off.
HANDLEBARS
Many riders get cramps in their arms, blisters on their hands, and aching backs without ever realizing that a change of handlebars might solve their problems. Here is an easy test to determine if your bars have the correct bend and height for you: Sit on the bike in a comfortable riding position with your eyes closed. Raise your hands over your head, then let them settle down slowly toward the bars. Your hands should drop comfortably onto the grips. If you miss the grips altogether, the bars are too far forward. If your wrists hit the grips, the bars are too close to you. Adjust as necessary.
Next, to determine if the bend is correct, examine your grip on the bars. Your thumb should be wrapped comfortably around the bar and your fingers should all> be touching the handgrips with the same pressure. If you feel any spots where the pressure is uneven, you have a good chance of getting blisters in that area of your hand. When riding, if the insides of your wrists hurt, ache, or get tired easily, you need a pair of bars that have less bend toward you. If the outsides of your wrists are the problem, you need bars that are bent toward you more. An ache in the low back, especially when standing, is a sure sign your bars are too flat or low for you. This type of bar is most often found on motocfoss machines; you may need to buy a set with the same bend but more height. Your bars are too high when you feel tiredness in the elbows and shoulders. Bars that have too much height for you will also be awkward when standing for long distances.
Levers should be adjusted so that you can reach them without changing your grip. Levers pointed too far down cause you to roll your wrists forward, and levers angled too high make you roll your wrists under. In both cases the pulling and holding forces of your hands are greatly reduced, which can cause you to lose your grip on the bars. Having one side of the bars fly out of your hand in the rough is not something you want to incorporate into your riding technique. If your hands are small, bend the lever blades back toward the bar where you can reach them more easily. Another way to bring the lever closer to your hand is to put some sort of a shim between the blade and the lever housing. A master link works very well for this, and it keeps that spare part handy. Motocross-type leather lever covers should be added to keep grit out of the adjusters and the lever housing. A final touch for the handlebars can be a padded guard for the crossbar to protect your bridgework.
AIR FILTER
The airbox and air filter should, of course, be cleaned after every ride. For dusty conditions a foam or double-foam filter is best. The dual-foam filters give your engine maximum protection and resist clogging. Foam filters can be cleaned in most solvents, or in warm water with detergent. After cleaning, let the foam filter dry completely before applying oil. Wring out excess oil with your hands, then wrap three or four paper towels around the foam, and wring it out again. This leaves just the right amount of dust-stopping oil in the foam element. Before reinstalling the filter, make sure the airbox is spotless. There is no sense starting a race with dirt already in there. Use a mediumweight grease to make sure the foam element seals on both ends. Don’t be stingy with the grease, either; use plenty to keep unwanted dirt particles out.
Much of the dirt that collects on the filter comes in from the bottom of the airbox, so if your bike has an airbox with a partially open base, seal the gap between
the fender and the box with duct tape. This move won’t restrict the intake air, as the gap under the seat will pass a large volume. With this setup you avoid the continuous dust cloud that roils up around the swinging arm pivot and enters the airbox on the underside.
IGNITION
The best way to dust-proof the ignition is to waterproof it. Spray all the internal wire connections with an ignition spray sealant, available at all auto parts stores. Not only does this make the connections dust-and waterproof, it also makes them less likely to vibrate out. Seal the magneto cover with caulking compound or silicone seal. Glues and gasket sealers will also work, but they make removal of the case more difficult. Then, too, the dried material must be completely scraped off before resealing, which is a hassle. All outside terminals and wire connections should first be sprayed with ignition sealer, then sealed with silicone compound. Seal the secondary coil wire and spark plug cap with silicone seal, too. Now you can run in wet or dry conditions and not worry about the ignition. One last prep is to wrap a length of duct tape around the coil and over the top of the frame. This will keep the coil with you even if the mounts break off.
Many bikes now have two-plug heads, which really cuts plug changing time to nothing. If your bike doesn’t have provisions for a two-plug arrangement, accessory heads are available for most models, or you can have your cylinder head modified to accept another plug. The latter solution is much cheaper. Some desert racers carry the dual-is-better idea to it’s logical conclusion and build dual ignitions with two of every component for maximum reliability. The ignitions are connected by a switch, and if one side fails, the other is clicked on. Another big advantage to this system is that you have spare parts. If both systems fail, chances are you can build one good ignition out of what’s left.
CABLES AND WIRES
Cables should be routed with as few bends as possible to keep them operating smoothly. Cables that are routed through tight places and sharp bends have much more resistance and break a lot sooner. Keep cables away from moving areas where they can get caught and pinched. Special care must be taken in the area
behind the triple clamps where the cables are often trapped by the fork stop. Cable ties work well in spots like this. The throttle cable should be well taped at the twist grip, to prevent dirt from getting into the housing. Route the throttle cable from the twist grip to the carb in the most direct line possible. At the carb end, seal the cable with silicone seal where it enters the top of the carb, to keep dirt and water out.
To lube cables, hang them up so they dangle, then squirt a light oil into the housing at the top so it can run down inside along the wire. Keep adding lube every few minutes, and move the wire up and down in the housing to dislodge any dirt present and to distribute the lubricant.
Wires should be routed in a way that brush can’t catch them, and taped tightly against the frame to prevent them from chafing. Tape at about six-inch intervals for a sano routing. Ignition wires that run along the upper frame tube under the tank should be securely taped to the underside of the frame member for maximum protection. A dangling wire here can easily be burned through on the exhaust pipe, or worn away by the movements of the fuel tank. Always try to route cables and wires separately. Where there is no way to avoid contact, protect the electrical wires by slipping a length of fuel line over them and taping that into place to act as a bumper.
MISCELLANEOUS
Here are some extra touches to make your bike more bulletproof. Install extra foam padding under the tank to isolate it from vibration. Vibration creates cracks and makes the fuel froth at high rpm. Frothing can starve the engine and cause seizures.
Route spare clutch and throttle cables right along the ones that are hooked up. Tape the ends to protect them from dirt. When you break a cable, the switch can be made in a matter of minutes. Run a good length of breather hose from the top of your fuel tank to some lower part of the frame to keep gas drool away from you when the tank is full.
Install a skidplate to protect those expensive cases. Look at the fiberglass skid pans on the market. They are often lighter than the steel ones. Drill a small hole in the brake pedal and attach a wire between the pedal and the lower frame member to cut brush. Do the same to the shift lever. Small-diameter wire cable works best for this application. To keep your kickstart lever from flopping out while underway, secure it to the frame or the carb mount by means of an inner tube rubber band.
(Continued on page 83)
Continued from page 45
If you are a serious racer you may want to have your saddle rebuilt with more padding for comfort on those long rides. Add rubber flaps to each end of the front fender to cut down on dirt thrown in your face. You can make the engine quieter by stuffing little blocks of rubber between the cylinder and head fins to cut resonance. Another way to do it is to drill four holes, one in each corner of the cylinder, down through the fins, then force a length of plastic tubing through the holes.
SAFETY WIRING AND CEMENTING
Some people are safety wire fanatics, but your bike doesn’t have to look as though it belongs to Spiderman in order to keep parts on. Here are the parts that need to be wired: All engine drain plugs, engine bolts, clutch spring nuts, and spokes where they cross. If you are paranoid, you can also include: axle nuts, swinging arm pivot nuts and shock-mount bolts. Aircraft-type locknuts are most valuable at points of vibration, such as engine nuts, pipemount nuts, shock mounts and sprocket carrier. Fenders and airbox mounts are also ripe for locknut applications.
Cement with locking compound any plain nuts in vital areas, including the magneto nut, clutch hub, clutch drive gear, countershaft sprocket, cylinder and cylinder head bolts, and fork crown ring. Normal maintenance will keep everything else on the machine tight.
TOOLS AND SPARES
A tank-top leather tool pouch is a good addition to any off-road bike. All the tools you need for emergency repairs can be carried in one of these handy bags. Whether in a tool pouch or not, the following list of tools and supplies should be somewhere on your bike: Extra plug, bobby pin for plug cleaning, plug wrench, medium crescent, vise grips, sand paper or emery cloth, supply of duct tape, length of baling wire, length of rope for pulling or being pulled, extra chain links and master link, chain breaker, screw driver, knife, inner tube rubber bands and matches.
The crescent is your adjustable metric toolkit. Vise grips chew things up but allow you an infinite variety of repairs and fixes. The use of duct tape is limited only by your imagination. Baling wire will hold on whatever keeps falling off; it’s also handy for emergency electrical work. The chain breaker will rarely be used, but when you need it, nothing else will take its place. Inner tube rubber bands have myriad practical functions, ranging from brake returns to tourniquets. The screw driver can be used to drive screws, pry, split wood, or it may be used as a weapon or shovel. The matches and knife have many obvious uses, and their presence in your kit is partly for survival use. A Swiss Army knive is almost a tool and survival kit in itself.
(Continued on page 84)
Continued from page 83
PERSONAL GEAR
Personal gear should be taken care of immediately after a ride. Leather pants, boots, gloves and helmet should be aired out. Never throw your leathers and gloves into a pile of wash with your jerseys. Allowed to set, the leather will mildew from the dampness. Wipe your leathers clean with a damp rag, and apply saddle soap and neat’s-foot oil after every other ride. Avoid washing leather goods in the washing machine, as it causes the material to lose its natural oils, making the pants and gloves dry and crack. When applying saddle soap, use a sponge or soft rag to work the compound into the leather. Let the pants or gloves set several days, then rub neat’s-foot oil. or another leather protective product into the material with a sponge. After an hour, wipe off any excess oil with a soft rag.
To clean plastic goggle lenses, remove them from the frame and immerse in warm, soapy water. Don’t rub the lenses, just allow them to soak. Swish the lens around in the water to loosen the dirt, then rinse. Use an old t-shirt or other soft rag to dry and polish the lens. Glass goggles are not as easy to scratch as plastic, but it’s still a good idea to rinse them to soften the dirt before wiping. To prevent goggles from fogging up, use an anti-fog paste that comes in stick form and is sold at recreational vehicle supply stores.
If you wear knee or shoulder pads, these should be aired weekly, too.
SERVICE AFTER ONE RIDE OR 100 MILES
Clean and re-oil the air cleaner element. Clean the airbox and regrease all filter mating surfaces. Clean the spark plug or replace it. Clean and lube the drive chain. Tighten spokes as necessary. Check all rimlock nuts. Check tires for nails and other flat-makers. Check and tighten the following as necessary: handlebar clamps, axle nuts, shock bolts, swinging arm pivot nuts, motor-mount bolts, fork crown nut. Inspect exhaust pipe for cracks. Lube cables. Check tire pressure. For most offroad use, pressures should run between 12 and 16 pounds. The general rule is: hard terrain surface, hard tire/soft terrain, soft tire. Rocks should always be ridden in the upper pressure range to protect the rims. Reset chain tension. Change gearbox oil.
SERVICE AFTER FIVE RIDES OR 500 MILES
In addition to your weekly maintenance, these services should be performed after five rides: Remove both wheels and service the brakes. Check wheel bearings for play by inserting the axle through both bearings and trying to move the shaft from side to side. If play is evident, replace the bearing. Change the fork oil and clean the forks out with solvent. Some riders change the rear shock oil at the same time. Check the fender mounts for cracks. Remove the gas tank to inspect the cables and wires underneath. Check the coil mount for cracks. Clean the carburetor with solvent and blow out all the passages with compressed air. Disassemble the throttle assembly and clean. Check the side deflection of the drive chain and replace if deflection is more than 12 inches. Repack
the silencer. Replace the spark plug. Remove the top end and inspect the rings. Replace as necessary. Replace head and cylinder gaskets. Set timing and reseal the mag cover. Inspect the clutch. Tighten as necessary, the sprocket carrier bolts, countershaft nut, clutch drive nut and engine gear nut, all bolts and case screws. Replace any carburetor connecting rubbers that are cracked. Check and reset points if applicable Remove and clean out gas taps.
SERVICE AFTER TEN RIDES OR 1000 MILES
Rebuild shocks. Check fork springs for sacking. Replace piston rings. Replace piston as necessary. Bore as necessary. Check top-end bearing. Check lower end clearance by holding onto the rod and trying to move it up and down. A tiny bit of up-and-down play is okay, but if you have any doubts, let the shop check it out. Replace any cables that are fraying or have any of the metal liner showing through the plastic cover. Replace needle and needle jet in the carb. Replace the slide if necessary. If the slide has a few grooves running up and down, you can smooth them out with fine grit sand paper instead of replacing the slide. Replace the float needle and seat. Replace the fuel lines, because they harden with age and restrict fuel flow. Check the swinging arm for side play in the bushings. Check brake
linings. True the rims and rebalance the wheels. Replace steering head bearings
SEASONAL REPAIRS
When the season is finished, remove the engine from the frame. Super-clean the frame with a steam cleaner, then inspect for cracks. Repaint the frame while the engine is out. Disassemble the forks completely and rebuild with new seals and fork springs. Replace all cables. Replace all worn fender grommets. Replace swinging arm bushings. Replace all rubber exhaust pipe mounts. Replace exhaust pipe springs. Rebuild the shocks or replace. Replace the footpeg bolts, because they get worn in half and can be very dangerous. Replace the engine-mount bolts. Rebuild the carburetor completely, or replace. Replace all hose clamps. Drain and clean the gas tank, and blow out the gas taps and screens.
Completely disassemble the engine to inspect the gear and crankshaft. Replace any worn parts or bearings. Replace clutch plates and clutch springs. Replace all engine gaskets. Replace the air filter element. Repaint the motor and pipe before slipping them back into the frame, and you’ll just about have a new bike!
Our next installment will deal with emergency repairs just in case you fall and break something or simply push too hard in a race. [51