Preparing For the Dirt
PREPARING FOR THE DIRT
No Matter What Your Dirt Bike is Or How and Where You Ride It, Preparation Can Make It Better
Steve Booth
No matter how much thought a motorcycle manufacturer puts into a machine designed for off-road riding, no matter how high the quality or how exotic the components, most riders make changes to fit their bike to their personal preferences and style of riding, and to their own physical build. The alterations and shaping may be subtle with the latest all-out enduro bikes, but even top-ranking factory riders make some changes, and they overlook no detail in preparing for a run.
What makes a good dirt motorcycle, anyhow? Ask riders that question, and you’ll get about as many answers as there are brands of bikes. Some can’t even rate in order of importance the factors that make a bike good or bad.
The reason for the variety of opinions is that what each rider prefers is affected by his experience, his height, weight and strength, the terrain and weather in the areas where he rides, and the class he rides in. If you’re an expert rider you’ll choose a bike for different reasons, and you’ll prepare it differently than a novice will because your experience gives you skill and confidence the beginner probably doesn’t yet have. If you’re small you’re more concerned about the weight of your motorcycle than a 6-foot, 200-pounder who can lift or drag his machine out of trouble when it gets hung up in rocks or mud. Mountain enduros require lower gearing or more low-end power than events held in flatter country. And the factors making a good small-bore bike are quite different than some of those most important in open class enduros.
However, three things are at the top of almost every rider’s list of what makes a good off-road bike—reliability, good handling and rider comfort.
Reliability—lí your motorcycle doesn’t run the distance you’re not going to enjoy yourself. This means more than just holding together to the end of the ride. It’s got to perform well for the duration of the day.
Good Handling—Through the tight stuff, over rough and twisty trails, hopping logs and rocks and pushing along through deep sand or mud, a dirt bike needs good handling if you’re going to be able to make the speed you need.
Rider Comfort—The fresher you feel near the end, the better your chances of riding well. Your bike should feel comfortable and natural even after hours on the trail.
The other factors—speed, low-end power; light weight and easy maintenance—are of almost equal importance to most riders. And of course a provision for lights is useful for enduros and reliability trials and for most play riding.
Unless you're looking for a new bike and have the money to choose from among the best, the only way you’ll come close to getting the qualities you want or may need is through some degree of modification of your present motorcycle or one you can afford, and in the addition of vital equipment to it. If you do it right, this should make your bike as good as the majority of mounts. With proper prepping you may even have the edge.
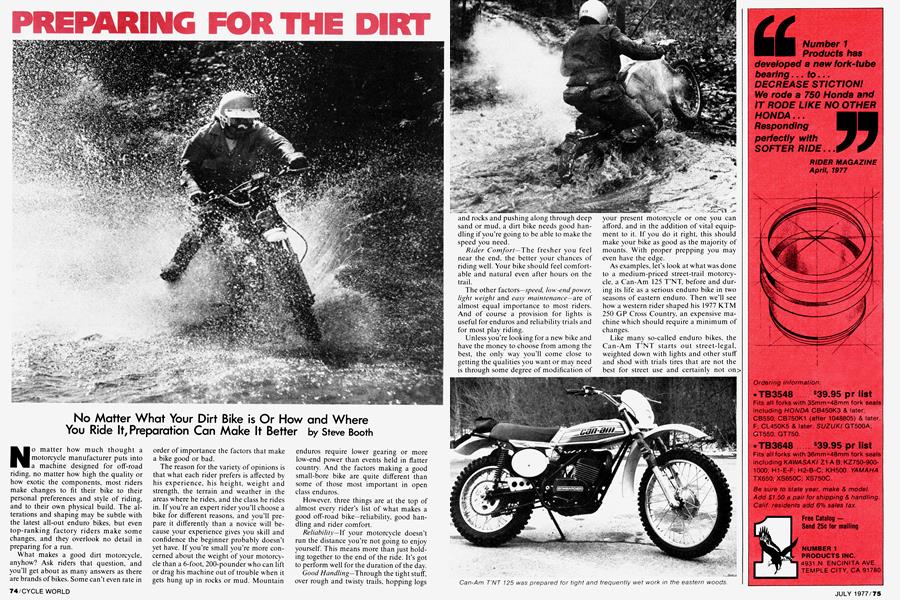
As examples, let’s look at what was done to a medium-priced street-trail motorcycle, a Can-Am 125 T’NT, before and during its life as a serious enduro bike in two seasons of eastern enduro. Then we’ll see how a western rider shaped his 1977 KTM 250 GP Cross Country, an expensive machine which should require a minimum of changes.
Like many so-called enduro bikes, the Can-Am T’NT starts out street-legal, weighted down with lights and other stuff and shod with trials tires that are not the best for street use and certainly not on> trails. This model 125 also had a reputation for less than satisfactory rear suspension, which could be improved most easily by moving the lower shock mounts forward a little.
So before it left the dealer, Lindy’s Suzuki of Romeo, Michigan, this Can-Am sported high-quality knobbies, a 3.00 x 21 Trelleborg in front and a 4.00 x 18 Metzlermanufactured Hi-Point on the rear, in place of the stock universals. Shock mounting gussets had been welded to the top of the swing arm, permitting moving the lower mounting position forward either two or four inches. Further changes were made at home to prepare it for enduro riding. The stock muffler, which was extremely quiet but heavy and not U.S. Forestry approved, and which also blocked use of the forward set of upper shock mounting holes in the frame, was replaced with an X-Dusor silencer-spark arrester mounted farther to the rear at the end of a short piece of custom-bent tubing connecting it with the stock upswept exhaust pipe.
Test riding at a local MX course proved the need for better shocks, so a set of 13.4in. Koni shocks with 80-lb. Hi-Point springs was installed, using the most forward set of top holes and the two-inchforward lower mounts.
Unnecessary lights and equipment were stripped off the bike to reduce weight and eliminate some of the clutter. Turn-indicator lights, speedometer lights, unnecessary wiring, rearview mirror and the handlebar-mounted ignition switch were taken off. The headlight and taillight were replaced with the fashionable and nearly indestructible Preston Petty plastic headlight number plate with 41/2-inch sealedbeam bulb, and a Hillmart rubbermounted enduro taillight and license plate holder. The stock plastic front fender on the Can-Am is a little' skimpy, so it was replaced with an unbreakable Petty integral-bracket Muder, deep and long to help keep mud off the engine and rider.
The speedometer, satisfactory for a beginning enduro rider, would not do the job in serious competition so it was removed and a Specmo 24-mph Enduro Pilot was rubber mounted with a Hi-Point bracket on the handlebar crossbrace, down behind the number plate where it’s protected from damage yet easy to read.
While the Betor forks on this bike are more than satisfactory for enduro-trials, with 6'/2 inches of travel, the vent holes in the caps, which help them work so well, squirted oil on the rider. The solution was to tap the vents for hollow 8-32 screws drilled out on a lathe. After they’d been screwed into the caps and the heads cut off, plastic tubing was pushed over their tops. The oil goes part way up the tubing on compression, then is sucked back into the fork legs as they extend. The tube ends were taped to the back of the number plate, out of the way.
Besides mounting a leather tool bag atop the rear fender, three other changes were made to the Can-Am before its first enduro: the handlebars were trimmed to 32 inches, considered ideal for the tight woods and deep sand encountered in Michigan enduros; a quarter-turn quick throttle, new grips and unbreakable clutch and front brake levers replaced the stock items, and a larger rear sprocket was installed to get low gear down to a fast walk at idle. The bike comes with a skid plate so this important piece of engine protection didn’t need to be added.
The bike’s first all-out test came in the 150-mile Lonesome Pine National Enduro in the mountains of southwestern Virginia, and it flunked. Forty miles from the start, back in the boonies, it ran out of gas! The 1.7-gal. tank that came with this Can-Am was dry. Lots of low-gears running in the early morning fog and rain-slicked, rocky hills had increased consumption ’way beyond normal for a 125 on the trail. A 2.5gal. tank was installed before the next enduro.
Throughout the first season small changes were made as problems showed up. Even with a 125-lb. rider the shocks were bottoming too often so heavier springs were installed. The original foam air filter, while satisfactory, was eventually replaced with a Twin-Air filter treated with the Twin-Air oil that keeps water from passing through to the intake. When the flimsy chain guide was mangled beyond straightening and the chain wrapped itself around the countershaft sprocket, it was replaced by a chain tensioner. The battery was removed to reduce weight and make room under the right number plate for a can of Cycle Spare, in case of a flat tire. The front rim got badly bent in a freak collision with another motorcycle so a lightweight D.I.D. alloy rim was laced on.
By the start of its second year of competition this Can-Am had evolved from a street-trail bike into a hard-core enduro machine. It was already a veteran of three nationals and many state championship runs, and it sported a new, softer seat, a folding shift lever and many replacements for the original replacements. It had become an enduro motorcycle tailored exactly to its rider, but the total cost was approaching that of the best box-stock offroad bikes on the market, machines like the Husqvama WRs and the Penton/KTM Enduros, which are sold race-ready.
Or are they? What was done to a 1977 KTM 250 GP Cross Country to prepare it for competition gives a good idea of what may be needed on even the best off-road cycle.
The Dirt Factory in Concord, California, just east of San Francisco, set up this KTM for the predominantly dry, hard terrain of most western runs. Cost was a secondary consideration and about $600 was spent shaping and increasing the reliability of an already expensive off-road motorcycle.
Work began with the disassembly of the basic bike, down to its frame and wheels. To increase low and mid-range power and to make the engine easier to start, the timing was retarded from 2.55 mm (stock) to 2.40 mm, and the deck height was raised slightly, from .052 inch to .060, and made more accurate, decreasing the high compression ratio of the KTM power plant. (The deck height is increased by adding gaskets at the base of the cylinder, not at the head.) Surgery on some of the fins on both the cylinder head and the lower rear portion of the cylinder itself was done to give better access to the spark plug and the carburetor, both difficult to reach on the stock machine. A hole was drilled in the top of the right vertical head fin near the front so the spark plug wire could be tied away from the exhaust pipe.
The spark plug wire on this bike is much too long when it comes from the factory so it was cut to the right length and a waterproof Malcolm Smith plug cap was installed. The coil wires were tied to the coil with .080 inch stainless wire beneath protective rubber boots. This prevents the wires from coming off the coil and keeps them waterproof. The coil itself was taped firmly to the frame, and weather stripping was added to the top part of the frame to pad the gas tank.
The new Bing V54 carb comes with a new-style float designed to increase fuel capacity in the float bowl and eliminate the fuel starvation problem experienced at high speed with earlier Bings. But with a #50 pilot jet this extra bowl capacity causes a rich running condition on low end, and when the engine is stalled it allows fuel to dump directly into the engine. To cure this problem, Dirt Factory put in the old-style floats and switched to a #40 pilot jet, which still allows passage of enough fuel to start the engine when it is warm. Results have been excellent.
The original #175 main jet was replaced with a #170, and the needle jet was changed from #320 to #318. The stock needle is used in the center position.
Other changes to the carburetor were removal of the choke (the Bing also has a tickler) and modification of the overflow tube in the float bowl, which ends flush with the bottom of the bowl and occasionally allows dirt or water into the carb. The original tube was removed, then replaced with one that extends about lA inch below the bottom of the bowl. A piece of model airplane fuel line was fastened to this, and it extends below the engine. All other overflow lines were lengthened so gas couldn’t pour on the engine. The lines were then bundled together out of the way. The idle adjustment screw and air screw were safety-wired, and a hole was drilled in the flange on the side of the carb so a spare main jet could be carried there.
continued on page 86
continued from page 77
The Marzocchi forks were left unchanged except for the installation of Leak Proof fork seals and the addition of fork boots. Fox Dual-Rate Air Shox (125/160 lb. nitrogen) replaced the original shocks, mainly to improve the ride when the bike is used in cross-country races.
A Barum knobby tire with wrap-around tread was mounted up front and the stock Metzler stayed on the rear. In addition to two rim locks on each wheel. Sun rim pins are used to keep the tires from slipping at low pressures. The pins are not used in the 45° arc opposite the valve stem. This makes tire changes easier. The valve-core hole in each rim was elongated in ease of tube spin, and a red stripe was painted there so it’s easily spotted. Spokes were tied
with stainless safety wire.
The stock KTM fenders were replaced with a Preston Petty Super Muder up front and a Falk plastic fender and splash-guard in the rear. Dirt Factory's own aluminum alloy side panels, cut dow n slightly to clear the shocks, were rubber-mounted in place of the original plastic panels. A Fun-NFast skid plate protects the engine cases.
Gearing. 14/52 originally, was made a bit lower with a 13-tooth countershaft sprocket. Diamond XDL 530 chain is used. Since the 1977 KTM comes equipped with a chain tensioner and nylon rub blocks on the swing arm. no modifications were needed there. The stock exhaust pipe was retained, with the addition of a silencing kit that includes a Super-Trapp silencer and spark-arrester and rubbers for the cylinder fins.
Completing the shop-installed details are Terry cables on all controls, an extrawaterproof Magura kill button, A/C fuel filter with fuel lines armored with metal to prevent damage, Twin-Air filter in the airbox and “Loc-Tite” or safety wire on everything that might come loose. The throttle cable and kill-button wire are covered with gas line tubing for extra waterproofing and to prevent chafing. And of course there's the enduro-proven Hi-Point folding shift lever, which is stock on the Penton but not on the KTM.
With the addition of a full set of enduro instruments, including computer, aircraft clock and route-holder to augment the stock VDO enduro speedometer, the bike was ready for competition. The riding will be entirely off-road so no lights were installed. Essential tools and spare parts are fastened to the motorcycle or carried by the rider instead of in a tool bag.
Although this bike does not have the high-breathing frame of the Penton enduros or the new KTM ISDT-Enduro models, and waterproofing is minimal by eastern enduro standards, this a primo enduro and cross-country mount for the wide-open west. Proof is the fact it finishes . . . and wins!
These two examples show how two enduro-trials motorcycles were set up with different budgets for competition in widely separated parts of the U.S. What was done and how the bikes evolved is typical of what any experienced, serious off-road rider goes through in shaping the machine he can afford. That experience can be applied successfully by anyone with plans to compete in enduro or reliability trials, and it can make weekend trail-riding safer and more pleasant.
ENDURO-TRIALS CHECK LIST
BIKE PREPARATION
1. Be sure engine is in tune, with correct timing, jetting and spark plug.
2. Clean air filter and inside of airbox. Coat inside of airbox with grease. Treat foam element with special filter oil.
3. Waterproof engine side-cover over electrics, and any other places water might enter engine, carburetor or airbox, with silicone sealant and tape.
4. Check forks and shocks for proper operation and adjustment.
continued on page 98
continued from page 87
5. Check wheels, wheel bearings and brakes for damage and wear. Clean and lubricate with grease before reinstalling. Check spokes for tightness and even adjustment.
6. Check for hooked or worn drive sprockets and chain. Cleanchain, soak in oil, then re-install and adjust. Be sure chain guide or tensioner does not guide chain off rear sprocket.
7. Put flat-proof in tires (if not already done), and be sure valve-stem nut is loose. Check air pressure and adjust for expected conditions. (10-12 lb. rear, 13-15 lb. front is common.) Rim locks, pins or screws must be used.
8. Grease bike at all grease fittings (steering head, brake cams, shifter linkage, etc.) if it is equipped with zerks.
9. Check gearbox oil and condition. Change or add as needed.
10. Replace damaged or worn control cables. Route them to reduce chance of snagging branches or other obstacles. Lube so they work freely, then adjust.
11. Install skid plate if necessary.
12. Install brush cables or chains from brake and shift levers to skid plate or frame downtubes.
13. Install number plate, tool bag and enduro instruments, if not already on bike. Also install equipment that is mandatory for the particular run, such as license plate, lights, horn, mirror and fire extinguisher.
14. Check all bolts and screws for tightness. Safety wire or “Loc-tite” everything except aircraft locknuts.
TOOLS & PARTS ON BIKE
1. Standard bike tool kit, including Allen wrenches if needed.
2. Spark plug wrench and at least two spare spark plugs.
3. Small adjustable or universal wrench.
4. Vise-Grips.
5. Small screwdriver(s). (Both standard and Phillips may be needed.)
6. Small lineman’s pliers with wire-cutters, and some soft steel, brass or stainless wire.
7. Chain-breaker and extra links (master and half links and maybe a short piece of drive chain).
8. Small container of chain lube.
9. Extra throttle cable. (You can ride without the others.)
10. Extra gas line tubing.
11. Cycle Spare or other air bottle.
12. Duct tape.
13. Extra rubber bands if used to hold stuff on the bike.
14. Tow rope (at least 15 ft. long).
15. Tire irons and extra tubes (for endurance trials only). Q