The Shimmed Valve Adjust
The Shimmed Valve Adjust
A Gap it Yourself Guide to the DOHC Valve Train
Peter Egan
The owner's manual of one of my early motorcycles, an old pushrod Single, recommended setting valve clearances as follows: Adjust the exhaust rocker so a small but discernable click could be felt while lifting the rocker up and down, and set the intake valve so the rocker could be slid freely from side to side but not clicked. No feeler gauge required, just a small wrench and a screwdriver and you didn’t really need the screwdriver. It was quite a system, valve adjustment by touch and sound. You could set your valves in the dark with no flashlight on a rainy night by the side of the road. And a good thing, too, because sometimes you had to. It was one of those bikes that offer easy maintenance and need lots of it.
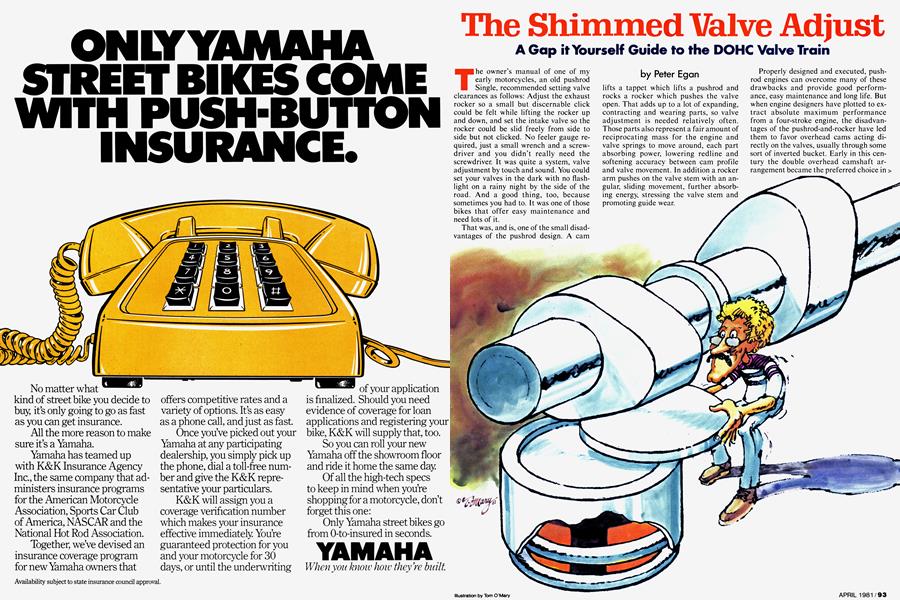
That was, and is, one of the small disadvantages of the pushrod design. A cam lifts a tappet which lifts a pushrod and rocks a rocker which pushes the valve open. That adds up to a lot of expanding, contracting and wearing parts, so valve adjustment is needed relatively often. Those parts also represent a fair amount of reciprocating mass for the engine and valve springs to move around, each part absorbing power, lowering redline and softening accuracy between cam profile and valve movement. In addition a rocker arm pushes on the valve stem with an angular, sliding movement, further absorbing energy, stressing the valve stem and promoting guide wear.
Properly designed and executed, pushrod engines can overcome many of these drawbacks and provide good performance, easy maintenance and long life. But when engine designers have plotted to extract absolute maximum performance from a four-stroke engine, the disadvantages of the pushrod-and-rocker have led them to favor overhead cams acting directly on the valves, usually through some sort of inverted bucket. Early in this century the double overhead camshaft arrangement became the preferred choice in high performance cars and motorcycles and various elaborate means of driving those camshafts became the signature of the engine designer. The bottom ends of two motorcycles, say a Matchless G80 and a Norton Manx, may have been remarkably similar, but the complex geardriven cams in the Norton gave it class and performance. It was a racing bike. In most engines it is still the cylinder head that separates the exotic from the mundane. The placement of valves, rockers, springs, gears, pushrods, cams, shims, etc. define the engine and its intentions.
In the very competitive search for power and King Bike status in each displacement class, many manufacturers have now gone to some kind of dohc arrangement, particularly the Japanese with their current stock of roadburning Fours. The dohc layout lets the designer put the valves at any angle he chooses without complex pushrod geometry to consider, makes cam design easier because the valve follows the cam profile more quickly and accurately, and reduces angular load on the valves. And, as an added bonus, the overhead cam and inverted bucket head is generally easy to machine. Marketing people like a pair of overhead cams too, because they know there is a segment of the public who feel cheated without DOHC in big letters on the side of the engine cases; no small consideration.
Great, you say. Bring on the overhead cams. Another free lunch from technology, right?
Well, not quite.
The dohc inverted bucket rig has just a few problems. First, ohc cylinder heads are generally much harder to remove for servicing than pushrod or sidevalve heads. Removal means disturbing cams and cam timing and disconnecting the shafts or chains that turn the cams. The sliding buckets between the cam lobes and valves are fairly heavy, though normally lighter than the total weight of a pushrod valve train. The valve springs are shrouded and therefore run a little hotter, and lubrication in the cylinder head is more complex.
And worst of all, from the owner’s point of view, the valves on most dohc engines are a first class, A-number-one, royal pain in the nether regions to adjust. Except for a few engines with adjustable pivoted fingers intervening at the cam and valve, such as Suzuki’s GS1100 and GS750, most of the dohc Fours set valve clearances with removable shims. These are small coin-like objects that fit beneath or above the valve bucket and determine clearance between the valve and cam lobe. A thicker shim means less clearance, a thinner one more.
Why, you now ask, must I adjust valves at all? Why can’t I just ride around and have fun and look good? Isn’t my free time better spent at the opera or ballet, or attending contests of mud-wrestling and watching Sheriff Lobo?
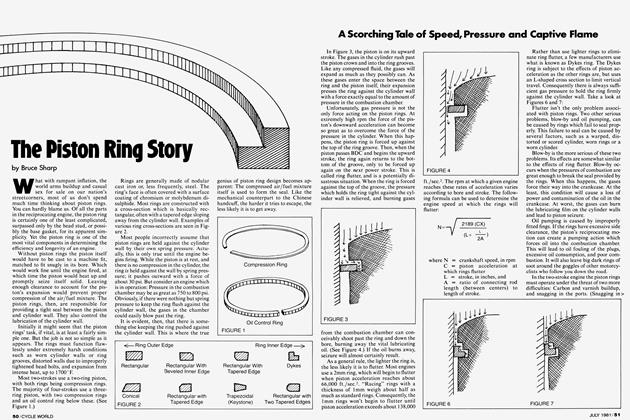
The main reason for adjusting valves is to allow a little slack in the valve train so that the mechanism responsible for opening and closing the valves doesn’t expand, wear, or otherwise distort and prevent the valves from closing fully. A valve that doesn’t close leaks, and an exhaust valve that doesn’t close leaks hot gasses and burns up. Intake valves are cooled every time a fresh fuel charge rushes in, but an exhaust valve can be heated to a bright cherry red and needs to spend a certain amount of time sitting tight in its seat to transfer some of that heat to the cylinder head. For that reason, most shop manuals stipulate a little extra slop between cam and valve on the exhaust side, mainly as a safety factor. An overtight exhaust valve is in more danger of damage than an intake valve, so we willingly put up with a little more noise and clatter in its valve setting. Anyone who has ever blown up an old Volkswagen motor in the middle of South Carolina miles from the nearest glass of ice water knows how hot exhaust valves can become, and how much damage they do when they burn up and snap off in the cylinder. (Four hundred and ten dollars worth, to be exact, but that’s another story.)
Another reason for adjusting valve clearance is valve timing. A valve with lot of clearance opens later, doesn’t lift as far out of its seat, and closes earlier. This is sometimes desirable and gives an engine better mid-range at the expense of peak power at high rpm. In the traditional hotrodder’s rule of thumb, tighter valve clearances yield better power at the upper end and less mid-range.
Valve timing is also important on engines with more than one cylinder because identical valve clearances on each cylinder promote equal output and hence smoother running engine; easier on cranks, rods and other running gear, as well as reducing vibration stress on the frame and rider.
Noise is another problem. Loose valves make a lot of noise, and a single loose valve on an otherwise adjusted engine makes an annoying clacking sound. A certain amount of valve looseness, particularly on pushrod engines, is useful because it helps absorb shock loads from the cam and valve closing, but too much can also be destructive, accelerating wear.
In short, there is usually an ideal valve clearance for every engine, a happy compromise that allows for valve cooling, noise, shock loads, balance, cam timing and power curve, and the relative tendency of that engine to distort or change shape as it heats up. The manufacturer determines those ideal settings and writes them down in the shop manual, in either millimeters or thousandths of an inch.
Valve adjustment, then, is an important part of proper engine tune. And because of the sophistication of the modern dohc engine, the job has become more complex than it is on pushrod designs such as the BMW, Triumph, Guzzi or Honda CX500 engines. Accurate measurement is needed in any valve adjust, but the typical dohc multi also demands parts. Shims, rather than a few turns of a threaded adjuster are needed to fill out the empty spaces. Fortunately dohc engines with shims and buckets generally need valve adjustment much less frequently than pushrod engines. We’ve had dohc long term test bikes that held their original, correct adjustment for over 10,000 miles. When a tuneup is needed, you can set the valves and forget about them for a long time.
However (there’s always a however), when the job is necessary, there’s a bit of work to be done. It ain’t all that hard, but neither is it the kind of thing you’d do just for fun. It is a job the home mechanic can do if he is willing to read the shop manual, spend an hour or two working on his bike, and possibly make a run to the cycle shop for a couple of shims. Many people feel this is a job for the motorcycle shop, and for the truly five-thumbed and thick of skull or spectacle it probably is. But for those who are mechanical enough to change tires, set points, and not slam their groceries in the car door, a fair amount of money can be saved by doing it yourself.
To demonstrate valve adjustment procedures here, we have taken two motorcycles with double overhead cams, each representing the shimmed adjustment problems typical of its type. One, the Kawasaki 550, has its shims located under the valve buckets and is the more complicated of the two to adjust. The other, a Suzuki 1000, carries its shims in recessed pockets atop the bucket, so that the cam lobe rides directly on the shim itself. Most other dohc multis follow similar practice.
What follows is a guide to the shimmed valve adjust, not intended to replace the shop manual of either the KZ550 or the GS1000, but to augment it, at the same time providing a look at what is involved in adjusting valves on a pair of representative Japanese Fours.
THE KAWASAKI KZ550
Kawasaki, on its 550, 650 and 750 Fours, uses a system where the cam pushes on the top of a bucket that shrouds the valve, and clearance is adjusted by the thickness of a small shim that rides under the bucket, in a small pocket directly over the valve stem. The advantage of this system is that small, lightweight shims can be used and they are unlikely ever to flip out of their captive pockets and run amok of the valve gear. Also, no special tools are needed to extract the shims, just the usual sockets, screwdrivers, etc. The big disadvantage—and it is big—is that both cams must be removed to gain access to the shims, and the cams must be reinstalled and retimed.
Kawasaki recommends a 500 mi. breakin valve adjust, and after that checking the valves every 3000 mi. and adjusting as needed. Our guinea pig bike was a KZ550 with only 3000 mi. on the odometer, but all were Box Stock class racing miles spent at redline, so we figured an adjustment
might be due. Keeping track of time and money spent, we proceeded as follows:
Step 1 : Simply getting to the cams and valve train is the hardest part of the 550 adjust. Remove the gas tank, coils and plug wires, horn and emission hoses from the air suction system. Remove the cam cover, ensuring that all 24 bolts are unscrewed before lifting or prying—there ‘s always one left. The cover gasket can be reused if handled carefully during removal of the cover.
Step 2: The cams are now exposed for checking valve clearances. Remove the right side points cover and use a 17mm wrench on the end of the crank to rotate the cams while checking. Turn the engine over until the 1 and 4 top dead center mark is lined up with the fixed mark in the timing window above the points. Intake valves 1 and 3, or 2 and 4, whichever pair is free from cam lobe pressure can now be checked. The valves are always measured for clearance with the cam lobes pointing at a roughly upward angle, away from the buckets—the position of maximum clearance between the cam heels and valves. Rotate the crank 360° to check the other two intakes. Exhaust valves are also checked in pairs, starting with TDC on the number 2 and 3 timing mark (written 2:3 on the points advance plate) and again turning the crank 360 ° for the second pair.
The KZ550 calls for intakes to be set at 0.10 to 0.20mm (.004 to .008. in.) Using a leaf-type feeler gauge, determine the clearance between the cam heel and the valve bucket. If the gap is greater than .20mm, a thicker shim is needed; if less than .10mm, a thinner shim is called for. For instance, if the clearance measures .25mm (.05 too large), a shim .10mm thicker than the one presently under the bucket will return valve clearance to .15mm, or right in the middle of the proper range.
Shims can’t be changed, of course, until all valves are measured and the cams are
removed, so it’s a good idea to write down original clearances on a chart for later reference. Fig. 1 is a sample home-made chart.
Each circle represents one valve, as seen from the top, and the clearance for each valve can be written in the appropriate circle as it’s checked.
If you are lucky, the valves are all within specs and you can put the bike together and go riding. We weren’t so lucky. The number 1 intake measured .08mm; just .02 too tight. All the others were right where we set them at the 500 mile post break-in tuneup. Off with the cams.
Step 3: Before cam removal, turn the engine to TDC on cylinders 1 and 4. This done, marks on the cam sprockets and slots in the cam ends will line up with the top of the cylinder head. Like those for most other dohc bikes, the 550 shop manual has a detailed drawing of the reference marks. Take a good look at the drawing
and at the cam position in the bike, so you can return the cams to correct position later.
Next remove the chain tensioner, spring loaded device bolted to the back of the cylinder barrels, first removing the tensioner spring. The shop manual doesn’t mention that the tensioner is nearly inaccessible with the carbs in place, but you’ll save a lot of groaning and gnashing of teeth if you first disconnect the carbs and lift them out of the way.
Each cam can now be removed by unbolting its four numbered bearing caps. The timing chain should be tied up to the frame with a piece of wire so it doesn’t fall into the crankcase.
Camshafts removed, the valve buckets are now accessible and most easily extracted with a magnet or suction cup valve tool. Remove the shim beneath the bucket and look for numbers etched on it. If the numbers are legible you can check the number chart in the shop manual and pick out the next numbered size up or down as needed. These numbers are often worn off, which means you’ll have to check the size with a micrometer. That, or simply take it into the dealer and tell him you need a shim x amount thinner or thicker than the one in your hand. If you need several shims, it’s a good idea to put them in separate envelopes, marked with the valve number and original clearance. You can sometimes swap shims on your own bike and come up with the right combinations.
The single errant shim on our own Kawasaki had no numbers on it, so we took it into the dealer and asked for something about .05mm thinner. He measured it with a micrometer, said it was a 2.45mm shim and sold us a 2.40mm shim for $1.78.
When the proper shims and buckets are in place, coat the cams with oil and install them, making sure the engine is still at TDC. Don’t turn the crank while the cams are out or you may kink the chain. The shop manual calls for a specific number (43.5) of timing chain links to separate the timing marks on the cam sprockets to ensure proper cam position. Torque the cam bearing caps to recommended specs (104 in.-lb.) and install the chain tensioner. Recheck the timing and sprocket alignment marks for accuracy, then turn the engine over slowly with the 17mm wrench. Bring it around 360° and recheck the marks. Check the newly adjusted valves again to make sure you did your arithmetic right. If everything is okay, then cam cover, carbs, coils and hoses can all be replaced. Assembly, as some shop manuals put it so lightly, is the reverse of disassembly.
That’s it. Connect the fuel hose and ride.
Not a very easy operation, but not impossible either. Flat rate for the job at your Kawasaki dealer is about 1.5 hrs. at anywhere from $15 to $30 an hour. A new cam cover gasket will cost $3.44, give or take a few inflationary dollars or cents. Shims, as mentioned, are $1.78 each. If you do the job yourself you pay only for parts. A shop mechanic can usually do it in flat rate, but the private owner will need considerably longer, what with time spent reading, frowning, scratching the head and wondering if it’s all worth it. You may go riding the same day you start the job, but don’t plan a long ride. You’ll also need spare wheels or sturdy shoes for a parts run to the dealer.
For those accustomed to tuning pushrod Twins, the scope of this job will seem absurd for a normal maintenance procedure; a far cry from the 15-min. roadside valve adjust. And it is, perhaps, an unnecessary trial on a machine that is otherwise straightforward and easy to maintain. Infrequent need for adjustment, however, is still its saving virtue.
An easier dohc alternative to the underthe-bucket shimmed adjust is the shim-ontop style, typlified by the Suzuki GS1000.
SUZUKI GS1000
Adjusting valves on the Suzuki 1000 is essentially a matter of removing the cam cover, rotating the cam lobes into proper position for checking each valve, and replacing the shims as you go along, or making a list of those needed and running out to the Suzuki shop. Because the shims are set in the tops of the valve buckets, the cams need not be removed during adjustment. Instead, your Suzuki dealer will sell you a little hook-shaped tool—for $31.95—which is used to depress the valve bucket and spring to make room for the shim to be slipped out. The tool acts as a lever between the camshaft and the outer lip of the valve bucket. Recommended intervals of checking and possible adjustment are 600 mi. initially and every 3600 mi. thereafter. Our GS1000 had 11,000 on the odometer and hadn’t been checked since the 3000 mi. mark, at which time all valves were still within specs.
Step 1: Remove the gas tank and the two horns at the front of the frame. Remove the metal clips from the horn grommets so they don’t fall into the engine once you get the cam cover off. The Suzuki’s coils are bolted up into the frame tubing and can be left on the bike. Disconnect the spark plug leads and tuck them out of the way, against the frame. Remove the 16 bolts holding the cam cover, lift the cover over the cam chain and set it aside. The cover may need some judicious prying or a few small taps with a plastic mallet to break the gasket seal. The cams and valve buckets are now exposed.
Step 2: As with the Kawasaki, the cams are rotated into position with a wrench ( 19mm) on the end of the crank, under the points cover on the right side. The Suzuki shop manual gives a series of crankshaft rotation movements which allow the valves to be checked in pairs, all simply to make sure you have the cam lobe in one of the two positions shown in Fig. 2, both for measurement and shim removal.
In other words, any time a cam lobe is in position A or B it is safe to check the clearance or remove the shim on that valve. Use a feeler gauge and slide it between the cam heel and shim. GS1000 clearances recommended for our bike were .03 to .08mm (.001 to .003 in.) for intakes and exhaust valves, a fairly small clearance.
Step 3: Once again, it is a good idea to make a chart and keep track of all clearances, as with the Kawasaki. When you are done, the shims with too much or too little clearance can be removed, sealed in a marked envelope and taken to the dealer. If the Suzuki shims have numbers still legible on the bottom sides, you can look up the size in the shop manual shim chart and figure out which sizes, thicker or thinner, are needed. Write down the numbers on a shim shopping list and take them to the dealer.
Suzuki shims are removed by rotating the shim tool under the camshaft and pushing down on the outer lip of the valve bucket. On either side of this bucket is a small cutaway slot which makes it easy to get under the shim.
There are three ways of removing the shim once the bucket is depressed: with a pair of Suzuki factory forceps, available at the dealer; by lifting one side of the shim with a tiny screwdriver or probe and gently lifting it out with a pair of needlenose pliers or your fingers, if you have thin fingers; or by holding a rag over the bucket and blowing compressed air under the shim. The first method is expensive because you have to buy a special tool, the second method is cheap and normally works fine, and the third way will usually lift the shim out of its bucket when sticky oil in the bucket makes the shim hard to lift, though you risk blowing oil all over the place unless you first suction all residual oil out of the valve well. Ours all lifted out easily by the second method.
Valves on our GS1000 were all in perfect adjustment after 11,000 mi., no replacements needed, so we removed a few shims just for examination and photographs. Most dealers will not take shims in on trade for new ones, but the valve buckets are so well bathed in oil the shims virtually never wear out and should be saved for future adjustment or swapping around. Dealers generally reuse all shims and don’t charge customers for shims replaced during a shop tuneup.
Our local Suzuki dealer charges 1 hr. time, or $25, for a valve adjust on a GS1000, shims are exchanged free, and a cover gasket, if one is needed, costs $9.49. We started the valve check and adjust at 10 a.m. and had the bike buttoned up and ready by noon, taking time to photograph the procedure. No shims were needed and the cover gasket was reusable, with a few dabs of silicone sealer on the rough spots. Our only cost was the shim tool, not cheap at $31.95. Had we needed shims, they would have cost $3.35 each.
While the Suzuki valve adjust was not as simple and quick as the same job performed on a pushrod or sohc engine with adjustable rocker arms, it was a fairly easy and seldom required task. A powerful and reliable engine, it needed no adjustment at all, even though that 11,000 miles included a nearly flat-out run from L.A. to Elkhart Lake, Wisconsin, and back.
The KZ550 is also a very high output engine for its size, and held its valve clearances remarkably well, considering the 3000 previous miles had been spent road racing. The one valve needing adjustment was so marginally out of tolerance we might have been tempted to let it go, if we hadn’t been doing a valve adjust story. Left alone, the engine would probably have run just fine for another 3000 or 6000 miles. Still, when an adjustment is needed, the removal of camshafts is a fair amount of bother.
The wave of the future in dohc valve gear may be something on the order of Suzuki’s GS1100, which has the cams pushing on small pivoted fingers, which press down on the valve stems. This system offers less reciprocating weight than shims and buckets, the use of favorable lever ratios between cam lobes and valves, and—best of all for the owner—relatively easy adjustment.
Not to say the current group of shimmed dohc demand some kind of rethink or design change. Those of us who were at first skeptical of the dohc layout in mass-produced road bikes, fearing that another aspect of motorcycle maintenance had been made more difficult for the enthusiastic owner, have largely been won over. It’s hard to fault engines that deliver stock performance undreamed of a generation ago and carry their riders across the U.S. and back at high speed with no more maintenance than an oil change. The sheer convenience is worth the occasional inconvenience.