How To Lace And True Your Wheels
HOW TO LACE AND TRUE YOUR WHEELS
Len Vucci
Keep 'Em Rolling on Your Own
One of the first (and most expensive) lessons in maintenance learned by off-road riders involves the law forbidding two objects from being in the same space at the same time: Ride swiftly over a rough and irregular surface and the irresistible force (wheel and tire) is bound to meet the immovable object (large rock). The result is a dented rim, loose or broken spokes and a wheel which is no longer round and true. That means replacing or relacing and that means an expensive repair. It's an accepted part of the off-road motorcycling experience, regular as rain, but not so easily shrugged off when repair time rolls 'round' cause your w heels don't.
An only-slightly dinged rim can often be hammered upon, then semi-trued to restore serviceability—after all, it’ll only get bent again, right? But when the point of no return—actually re-bent—is reached, a more lasting repair becomes necessary.
Several options present themselves. Normally the cheapest option is to replace the rim with whatever can be obtained at a bargain price, be it new, used, or of dubious origin. Fine to get things rolling again, but of little value if it lets you down when the going gets rough.
Better would be to obtain a high quality replacement rim, whose durability would offset the additional expenditure. Because the wheels used for this article are to be installed on Test Editor Ron Griewe’s Yamaha TT500 (entered in the Baja 1000 race) they have to be strong. We felt Sun competition alloy rims filled the bill perfectly, so they’re what we’re lacing.
Note here that this project is for a racing bike, a heavy one which will be ridden at high speeds across terrible terrain. For this, or for the serious enduro machine or motocrosser, only the best rims and spokes will do, which is why the wheels here have 8gauge stainless steel spokes from Hallcraft.
Even cowtrailers get dented rims, but for lighter motorcycles ridden slowly, the high-zoot rims and spokes may be a touch of over-building. Riders who aren’t hard on their mounts will get perfectly good service from stock replacement rims and spokes.
Either way, you can save money by doing all or part of the replacement or upgrading yourself. Too difficult? It’s no more difficult than lacing your shoes and
we’ve all learned how to do that. With patience and time the average do-it-yourselfer can lace up his own wheels and save a bunch in the process. If you’re good in the shop, you can true the w heels as well. If you’re more cautious, you can take care of the lacing and haul the wheels to a professional for the final touches and still save a substantial sum over what the shop would charge for the complete job.
SIMPLE RIM REPLACEMENT
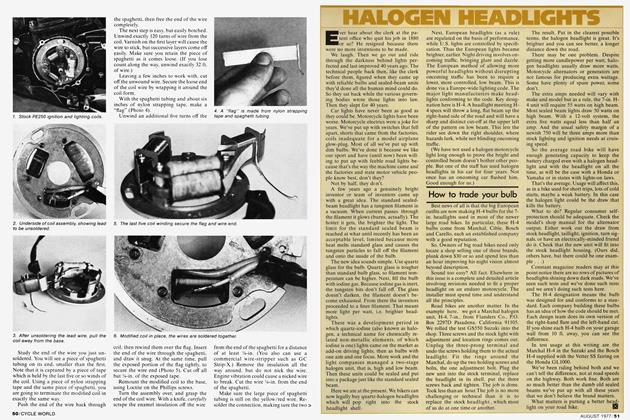
If you choose to retain the original spokes and replace only the rim, the procedure is simple. Using wire, string, or even tape, securely fasten the spokes together at each point where they cross. This will retain the spokes in the correct position during disassembly. Next, with the wheel assembly flat on a bench, place the replacement rim on top of the original. Rotate the new rim until its nipple holes, which are drilled at an angle, line up with those of the assembled rim. It may be necessary to flop the new rim onto its opposite side for proper alignment. Once you’ve matched up the two rims, mark one of the spokes with a felt pen or tape, and make a corresponding mark on the new rim.
If you can’t seem to align the spoke holes, make a quick count for each rim. Excluding rim lock holes, which may vary in number, the number should be the same. You can’t lace a 40-hole rim to a 36-hole hub, or vice-versa!
Once you’ve aligned and marked the rims and hub, the original wheel can be disassembled. Use a spoke wrench to loosen the nipples initially, then a screwdriver may be used to remove the nipples entirely. A reversible drill with screwdriver attachment can speed this job. If the nipples are to be reused, check each for evidence of stripped threads or cracking, and replace those of dubious condition.
Lift the rim off the tied-spokes/hub assembly, being careful not to force the spokes out of alignment. With your reference marks aligned, place the new' rim over the spoked hub (or vice-versa), and carefully insert the spokes into the rim. Start at any point on the rim, then insert the spokes successively until they’re all in place. Apply a drop of oil to each spoke end to make truing easier, then thread the nipples partway onto the spokes.
Center the hub within the rim. then turn the nipples until each just seats on the rim. The wheel is now laced and ready for truing.
WHEEL SENSE
Before you attempt to true the wheel on your own, a few' words of advice. This operation is tricky. Unless you’re lucky and/or experienced, wheel truing can be a most frustrating experience. If, after several hours work, things get worse instead of better, set the w'heel aside and return to it a day or two later. If you just can’t get it straight enough, hand it over to a local wheelsmith. No disgrace there, as many would just as soon leave that task to the more experienced.
RIM TRUING, CONCENTRICITY
Now that you know the wheel will run true—one way or another—mount the wheel on the bike using all spacers, etc., and position the bike so you have room to w'ork. Make sure the wheel spins free and loosen the brakes, if necessary, if they drag.
Starting at the valve stem hole, or any reference mark you choose, tighten each of the spokes half a turn. The spokes should be gripped between rim and hub w'ith little tension.
To facilitate truing, tape a piece of wire to the fork leg or sw ing arm to use as a pointer.
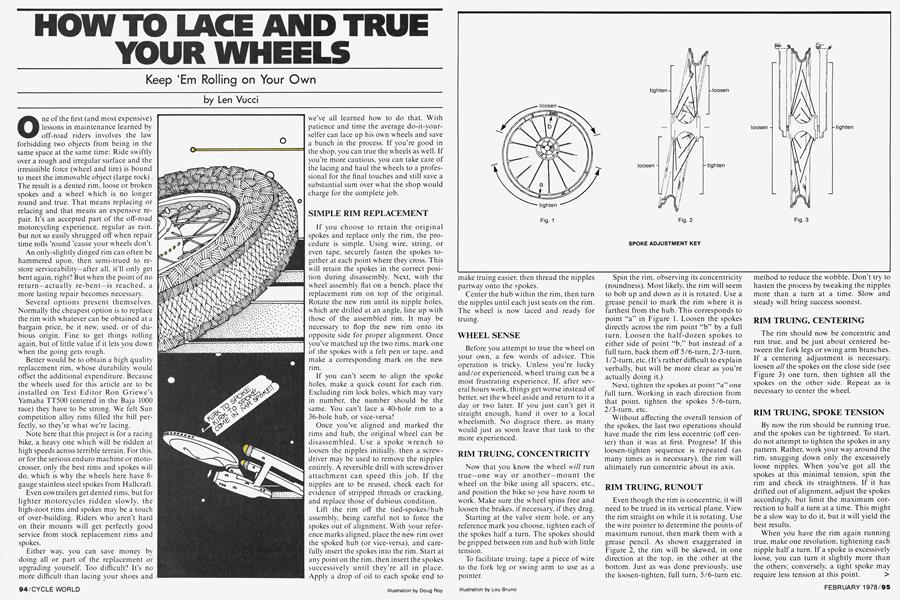
Spin the rim, observing its concentricity (roundness). Most likely, the rim will seem to bob up and down as it is rotated. Use a grease pencil to mark the rim where it is farthest from the hub. This corresponds to point “a” in Figure 1. Loosen the spokes directly across the rim point “b” by a full turn. Loosen the half-dozen spokes to either side of point “b,” but instead of a full turn, back them off 5/6-turn, 2/3-turn, 1 /2-turn, etc. (It’s rather difficult to explain verbally, but will be more clear as you’re actually doing it.)
Next, tighten the spokes at point “a” one full turn. Working in each direction from that point, tighten the spokes 5/6-turn, 2/3-turn, etc.
Without affecting the overall tension of the spokes, the last two operations should have made the rim less eccentric (off center) than it was at first. Progress! If this loosen-tighten sequence is repeated (as many times as is necessary), the rim will ultimately run concentric about its axis.
RIM TRUING, RUNOUT
Even though the rim is concentric, it will need to be trued in its vertical plane. View the rim straight on while it is rotating. Use the wire pointer to determine the points of maximum runout, then mark them with a grease pencil. As shown exaggerated in Figure 2, the rim will be skewed, in one direction at the top, in the other at the bottom. Just as was done previously, use the loosen-tighten, full turn, 5/6-turn etc. method to reduce the wobble. Don’t try to hasten the process by tweaking the nipples more than a turn at a time. Slow and steady will bring success soonest.
RIM TRUING, CENTERING
The rim should now be concentric and run true, and be just about centered between the fork legs or swing arm branches. If a centering adjustment is necessary, loosen all the spokes on the close side (see Figure 3) one turn, then tighten all the spokes on the other side. Repeat as is necessary to center the wheel.
RIM TRUING, SPOKE TENSION
By now' the rim should be running true, and the spokes can be tightened. To start, do not attempt to tighten the spokes in any pattern. Rather, work your way around the rim, snugging down only the excessively loose nipples. When you’ve got all the spokes at this minimal tension, spin the rim and check its straightness. If it has drifted out of alignment, adjust the spokes accordingly, but limit the maximum correction to half a turn at a time. This might be a slow way to do it, but it will yield the best results.
When you have the rim again running true, make one revolution, tightening each nipple half a turn. If a spoke is excessively loose, you can turn it slightly more than the others; conversely, a tight spoke may require less tension at this point.
The main consideration is that rim trueness be maintained during the tightening sequence. If the spokes are tightened, and rim alignment is checked and corrected for, and then the process is repeated, eventually you will have a tight, straight, serviceable rim.
How tight should the spokes be? That’s an excellent question which we can’t answer directly, as we’ve never hooked a torque wrench to a spoke nipple. If you’re an experienced dirt rider you already know. If you’re not, find someone who is and let him show you. But the basic fact is, a looser spoke will work loose sooner, and a tighter spoke will stay tight longer. Short of breaking spokes or nipples, the tighter the better.
INCIDENTALS
When you’ve completed the truing op-
eration, check the tire side of each nipple. If the end of a spoke protrudes above the surface, grind it down flush with the nipple. Otherwise, you risk an unnecessary flat.
The rim band can be reinstalled if desired, but our preference is the of standby: duct tape. Two thicknesses of half-width tape will best serve the purpose. Use a razor blade or X-Acto knife to cut holes for valve stem and rim locks, and you have a durable, slip-free rim band.
Some rims, such as the Sun models we used, don’t have rim locks. Instead they have spikes which protrude into the tire beads. They are made of aluminum, and are tapped in after the rim is laced and trued. They’re relatively soft compared to a steel hammer head. Do not beat on them directly or you’ll have mushroom-shaped bead grabbers. Instead, use some sort of hollow-tip tool—we used the threaded aluminum tips from spark plugs—as makeshift drivers. It took a pair per rim, as the tips get squashed a bit in the process, but they did a fine job.
RIM AND SPOKE REPLACEMENT
If you are also replacing spokes and nipples, the tied-spoke method will obviously not apply. Instead, you must use some reference to get those 36 or 40 spokes in their proper positions.
The best way to respoke a wheel is to use an identical wheel for comparison. You just lace the new rim to match the intact wheel, and it’s ready for truing.
If you don’t have access to a second wheel, you can photograph the intact wheel with a Polaroid camera before disassembly.
You may wish to augment the photos with a sketch or two for clarity. In lieu of photography, an accurate sketch will suffice, but caution is advised. The spoke layout may seem quite clear with the wheel laced, but can become unrecognizable when disassembled.
WHEEL DISASSEMBLY
Before you de-spoke the wheel, sort the new spokes, arranging them by size and end-bend. Compare each type of spoke to the corresponding spoke on the laced wheel. Make sure (a) you have the proper type spokes and (b) you have the proper number of each. It’s far better to discover you have the wrong spoke kit before the wheel is half-laced.
As we outlined in the previous rim re-
placement section, match the new rim to the old, and mark references on both the hub and new rim. This will ease the task considerably. Double check photos and/or sketches, if you are using them, then completely disassemble the wheel.
WHEEL LACING
If you are lacing the rim to a full-width hub, it makes little difference where you start. Run the first 9 spokes (10 for a 40spoker) in the same direction, then the next 9 (or 10) in the opposite direction to complete half the pattern. Repeat for the other side to complete the lacing.
For conical hubs, such as the Yamaha TT500 rear shown in the photos, it’s easiest to lace half the spokes on the wide side, then all the spokes on the small side. Flip the wheel over and lace the remainder of
the large-side spokes. The laced hub can now be trued, as previously described.
CHANGING SPOKE PATTERNS
You probably have heard the terms cross-three or cross-four in reference to spoke patterns, and allusions to the relative strengths of each. The cross-number refers to the number of other spokes any one individual spoke crosses along its entire length. The hubs illustrated are cross-three patterns. Many people desire cross-four patterns for additional strength. We'll go along with that, but cannot provide enough detail in an article of this scope to illustrate the method properly. Your best bet would be to find someone with crossfour laced rims, and borrow, sketch, or shoot (photographically, of course) them for reference.