Basic Chassis Maintenance
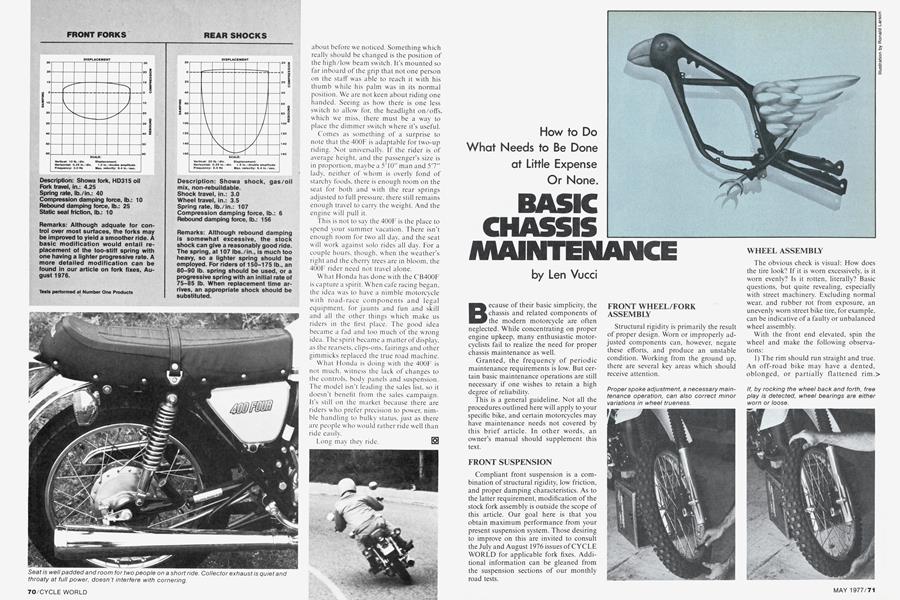
BASIC CHASSIS MAINTENANCE
How to Do What Needs to Be Done at Little Expense Or None.
Len Vucci
Because of their basic simplicity, the chassis and related components of the modern motorcycle are often neglected. While concentrating on proper engine upkeep, many enthusiastic motorcyclists fail to realize the need for proper chassis maintenance as well.
Granted, the frequency of periodic maintenance requirements is low. But certain basic maintenance operations are still necessary if one wishes to retain a high degree of reliability.
This is a general guideline. Not all the procedures outlined here will apply to your specific bike, and certain motorcycles may have maintenance needs not covered by this brief article. In other words, an owner’s manual should supplement this text.
FRONT SUSPENSION
Compliant front suspension is a combination of structural rigidity, low friction, and proper damping characteristics. As to the latter requirement, modification of the stock fork assembly is outside the scope of this article. Our goal here is that you obtain maximum performance from your present suspension system. Those desiring to improve on this are invited to consult the July and August 1976 issues of CYCLE WORLD for applicable fork fixes. Additional information can be gleaned from the suspension sections of our monthly road tests.
FRONT WHEEL/FORK ASSEMBLY
Structural rigidity is primarily the result of proper design. Worn or improperly adjusted components can, however, negate these efforts, and produce an unstable condition. Working from the ground up, there are several key areas which should receive attention.
WHEEL ASSEMBLY
The obvious check is visual: How does the tire look? If it is worn excessively, is it worn evenly? Is it rotten, literally? Basic questions, but quite revealing, especially with street machinery. Excluding normal wear, and rubber rot from exposure, an unevenly worn street bike tire, for example, can be indicative of a faulty or unbalanced wheel assembly.
With the front end elevated, spin the wheel and make the following observations:
1) The rim should run straight and true. An off-road bike may have a dented, oblonged, or partially flattened rim.> Within limits, this is acceptable, and for well used machinery is probably the rule rather than the exception.
Street bikes, on the other hand, cannot tolerate such a used rim condition. Unaided by measuring devices, you should not be able to detect deviation in either concentricity (roundness) or runout (lack of wobble).
2) Using a metallic object such as a screwdriver, tap each of the spokes, noting its sound. As with a stringed musical instrument, the pitch will vary according to length and tension (tightness). Longer spokes produce a lower or dull pitch, as do those that become loose. Spokes that sound flat should be tightened, keeping in mind that spoke tension affects wheel trueness.
Except for cases of actual rim damage, wheel trueness and proper spoke tension are mutually dependent. Most off-road riders should be familiar with the proper procedure for spoke tightening, and not need a warning. The uninitiated, however, should either seek assistance or simply delegate that task to someone who is skilled at it. It is tricky!
3) The wheel should rotate freely, unhampered by dragging brakes or tight bearings. Either of these conditions should be noted, and corrected with the wheel disassembled.
Check bearing play by grasping the tire on opposite sides, and attempt to rock it back and forth on the axle. Free play can be due to worn bearings, or bearings which are not firmly captured by the hub. In any case, the front wheel should be removed, and the assembly inspected.
Depending upon manufacturer, different methods of securing the bearing are used. Circlips or threaded collars are common; the tension of the axle itself often preloads the bearings. Additionally, most hubs utilize seals for the lube retention and dirt restriction. So, unless you’re thoroughly familiar with the assembly beforehand, have the appropriate manual handy for reference. When in doubt as to the serviceability of components, follow the manufacturer’s recommendations.
BRAKES
With the wheel removed, the drum brake linings and the drum itself. should be inspected. Most linings are about 3/16-in. thick when new. The useful life remaining is something you’ll have to judge for yourself, based on your riding conditions. If the lining is marginally good, the fact that the wheel is off might be an incentive to install new shoes.
If the same shoes are to be reinstalled, the glaze may be removed with #320 abrasive paper. The shoes and drum should then be cleaned with lacquer thinner, alcohol, or other non-residual solvent.
Replacement of a motorcycle brake drum is normally neither easy nor inexpensive. Fortunately, the need for replacement seldom arises. A severely scored drum may be unsuitable for auto use because of the side-to-side braking imbalance it may cause. No such worry for the typical motorcycle. After an initial break-in period, new shoes will adequately conform to the drum surface.
If the drum is out of round, the situation is reversed. The drum must either be machined true or, more likely, replaced.
Disc brake maintenance is also relatively easy. Visual inspection of the brake pads (pucks) should verify their condition. Additionally, the appearance of the disc is an excellent indicator of puck condition. This should preclude excessive wear due to neglect, as is all too common for drum-type brakes.
As a general rule, whenever the brake pads are replaced due to wear.the fluid in the system should be flushed and bled, using fresh brake fluid. Fresh does not simply mean unused fluid. Since brake fluid has a tendency to absorb water, even moisture from the air, only fluid from a closed container should be used. Contaminated fluid will rust the ferrous metals in the system, creating the need for an otherwise unnecessary and expensive rebuild.
STEERING HEAD BEARINGS
With the front wheel removed, the steering head bearings can be easily checked for play. Grasp both of the fork sliders, and attempt to move the bottom of the fork assembly fore and aft. If the bearings are adjusted properly, no play should be felt. Loose bearings require the nut on the steering stem be tightened until slight binding occurs, then backed off.
In some cases, this nut is on the very top of the steering stem, adjustable after loosening a pinch bolt. Other bikes, however, require that the crown (handlebar mount) be removed, as the adjustment nut is located below' it. The top nut. in such assemblies, merely holds the crown in position.
For street bikes, the steering head should be disassembled and the bearings inspected and greased at 5to 10-thousandmile intervals. Dirt bikes, depending upon usage, will require this service at much shorter intervals. In general, the repeated occurrence of excess play warrants a teardown and inspection, and most likely bearing replacement.
FORK TUBES AND SLIDERS
Assuming neither the stanchion tubes nor sliders have been deformed in a major mishap, fork action should be fairly slick. Disassembly of the forks should be unnecessary unless leaking fork seals need replacement.
A street bike’s original fork oil should last virtually indefinitely. The seals usually fail before the oil does.
A long travel motocross fork, however, can consume seals and require oil changing more frequently.
Regardless of use, fork oil level should be checked at least as often as the steering head bearings, or when a decrease in fork damping is suspected.
REAR SUSPENSION
Maintenance of the rear end of your bike is much the same as the front. Tire, rim, spokes, bearings and brake should be inspected and serviced, following the same general procedure.
SWING ARM
Usually taken for granted as being straight, the swing arm should first be inspected to ensure it is neither bent nor cracked, especially at the welds.
With the motorcycle held vertical, the rear tire, viewed from the rear, should be perpendicular to the ground. Assuming the rim is straight, if the wheel is canted to either side, the swing arm has been twisted.
Harder to detect is when the swing arm has been bent sideways. This will shift the wheel slightly to either side. The bike will not track properly, and the drive sprockets > will be misaligned.
Neither of the above conditions usually result from normal riding. Rather, they most often occur when the bike is subjected to high forces, i.e. a bad get-off or accident of some type. Unless one wishes to have his bent swing arm straightened and reinforced with gussets, replacement is normally the method of repair.
Once you know the rear of the bike is not tweaked, a check of the swing arm pivot is in order. Grasp the swing arm at the axle mounts, and try to twist it, and deflect it to each side. It should be virtually rigid. If not, the swing arm bushings or bearing must be replaced.
There are three basic types of pivot mechanisms:
1 ) Rubber bushings: A section of rubber is bonded between two metal sleeves. The swing arm rides on the outer sleeve, and a through-bolt secures the inner sleeve. The motion of the swing arm is accommodated by the elasticity of the rubber. Although not requiring lubrication, this type has two drawbacks. The rubber can accommodate only 15 degrees or so swing arm travel before it shears, and, simply stated, rubber rots.
2) Sleeve bushings: A true bushing, there is a sliding action between the bushing and another surface. Bushings may be metal, composition, plastic (nylon or teflon), or a combination of two materials. In most cases, the bushings require lubrication, usually grease. While a Zerk fitting is often installed, some swing arms require disassembly for lubrication.
3) Bearings: Usually of the needle variety, roller-type bearings are becoming more common as long travel suspension places greater demands on the pivot mechanism. These are superior in all respects, but definitely require lubrication.
SHAFT DRIVES
If your bike has drive gears rather than a chain, a periodic gear oil change is in order. Intervals between oil changes vary widely among manufacturers, so adherence to factory specifications is advised.
CHAIN DRIVES
There is some controversy concerning proper chain maintenance—we’ll offer our method, as it’s worked well for us. Visual inspection of the sprockets comes first. Slight cupping of the teeth is inevitable; the useful life of the sprocket can be lengthened simply by turning the sprocket over. Severely worn sprockets should be thrown away, for they are a major cause of chain wear.
Many will argue that a worn chain will wear out sprockets. Also true. A stretched chain will greatly accelerate sprocket wear. It’s the chicken/egg question with a simple answer: Yes. If sprockets are in great shape but the chain is stretched, fine, install only the new chain. But remember, if the sprockets are indeed worn, you will have just spent a good deal of money for an item which will not last long.
Conversely, replacing worn sprockets without a new chain will wear the new sprockets out that much faster. This is not to say that in all cases if either the chain or sprockets are replaced the other must be too. But in most of the cases we’ve seen where the drive chain was deemed unfit, so too were the sprockets.
DRIVE CHAIN CARE
Another grey area. Few will argue the need for generous amounts of lubrication. The aerosol evaporative types are generally preferred—they penetrate well, and cling tenaciously. They’re also easy to apply, even in the field. Simply elevate the bike’s rear tire, and with the transmission in neutral, spin the wheel. Lube should then be sprayed on the sprocket side of the chain, with the spray directed at the link plates. This task is even more simple if the aid of a friend is enlisted.
The question of chain cleaning, however, especially for an off-road bike, will net many answers. Some feel the chain should be soaked and thoroughly cleaned in solvent to remove abrasive dirt particles from the links, then re-lubricated. We disagree.
Removal of abrasive particles is a worthwhile endeavor, but in this case can be fruitless. In order to enter into the spaces between the chain bushing surfaces, dirt particles must first penetrate that protective layer of lube which you’ve previously applied. Realistically, for a properly lubed chain, this is easier said than done. >
Dunk the same chain into a tub of solvent and you have a different situation. As the lubrication dissolves and is displaced by the solvent, the abrasive dirt particles are carried further into the innards of the chain. The Second Law of Dirt is then applicable: Dirt always goes in easier than it comes out. Although you will have cleaned away much of the exterior crud, you will have allowed more dirt particles to enter than were originally present! Because of the negligible circulation of solvent between the chain’s bearing surfaces, that dirt is gonna stay there too.
The easy way, then, is at least as good as any. Brush away the big chunks first, then wipe the chain with a rag to remove surface crud. A lube job and adjustment w ill then complete this portion of the maintenance procedure.
CHAIN ADJUSTMENT
Especially critical for long travel suspension motorcycles is proper chain tension. There are several methods by which a chain can be adjusted, but one is considerably more effective than the rest.
Using either a heavy-duty friend or a bike tie-down secured to the swing arm. collapse the rear suspension so the centers of the countershaft sprocket, swing arm pivot, and axle are in a straight line. (This is easiest if one shock is first removed.) At this point, the chain will be at its tightest. It should be adjusted for about '/2-inch total up and down play for street bikes, and % inch for off-roaders. This slight play must be present to reduce the extremely high tension forces which occur during suspension compression. An overly tight chain will stretch and wear prematurely. It can also cause suspension binding and result in a harsh ride.
An important point on chain adjustment involves proper wheel alignment. Most manufacturers provide index marks on the adjustment mechanisms. Setting them equally does not necessarily mean the rear wheel is aligned. Although relatively accurate for some bikes, for others this method results in gross misalignment. Use the marks as a starting point, then align the rear tire properly. Prop the bike so it is vertical, with the front wheel straight ahead. Stand about 10 feet to the rear, and look along the sidewalls of the rear tire forward. The rear wheel is aligned when the front tire is evenly framed by these lines of sight. If performed with care, this method will result in accurate wheel tracking. Some, however, prefer to use a long straight edge rather than visual sighting. Either way is acceptable, and far better than none.
CHAIN TENSIONERS
If your bike is so equipped, the chain tensioner requires minimal maintenance. It should line up properly with the chain, and its arm and rollers should operate freely.
The chain tensioner is not a substitute for proper chain adjustment. Rather, it is a device for taking up chain slack when the wheel is in a fully extended position. If you are currently having chain retention problems, check chain/sprocket condition and alignment before laying down your money for a tensioner.
SUMMARY
The key to reliability through proper maintenance involves not cubic money, but common sense. Following the guidelines presented here should yield excellent results from even the novice mechanic. While not the total solution to the problem of motorcycle upkeep, these guidelines should provide a solid foundation on which a more comprehensive program can be structured. 13