Rd250/350/400 Fork Fix
RD250/350/400 FORK FIX
Easy Modifications for Improved Performance
Len Vucci
In the July and August 1976 issues of CYCLE WORLD, we provided instructions for modifying the forks on many common street bikes. Suggestions for rear shock and/or spring replacement were also offered. In subsequent issues, CW has utilized the suspension dyno section of its road tests to provide this information for current onand off-road machines. Although road test space limitations prevent us from giving very detailed instructions, we have been able to anticipate and answer many of your questions on new model bikes.
This brings us to the purpose of this article. We have been receiving quite a bit of mail concerning suspension fixes not covered in the original articles or road tests. Understandable. We're trying to answer these questions as they come, usually in our “Service Department” column. But an overwhelming number of suspension queries concern the RD-series Yamahas, which were covered in the original fork fix article. We were tempted to direct those inquisitors to the appropriate back issue, but thought our readers would be better served by devoting another, more comprehensive, article to the RDs alone.
PROS . . .
Unlike many others, the RD forks have very good damping characteristics. Rates differ slightly on late RD400s, and will be discussed in detail further on. Additionally, later forks have a teflon-coated bushing just below the seal. This bushing significantly lowers fork bind because of side loading. This is most noticeable when traversing relatively smooth roads with small irregularities—freeway expansion joints, for instance. In any event, both fork types will work quite well if the proper modifications are performed.
. . . AND CONS
In stock form, only the late RD400 forks utilize any of the potential of their basically sound design. And even their performance can be considerably improved over stock.
We will be primarily concerned with three aspects of suspension dynamicsspring rate, travel, and damping—and their application to the RD forks. It is the combination of these three variables which determines whether a fork will work well or not.
SPRING RATE AND TRAVEL
In the RD series bikes other than the 400, the primary offender is spring rate. Early RD forks used a 30/45 progressive spring. This is much too stiff for the weight of the bike. The RD400, on the other hand, has a lighter spring, preloaded to restore ride height. This is an improvement over previous models but the now too-light spring allows an excessive amount of frontend dive during braking.
A certain amount of dive will always occur under hard braking, and is in itself entirely acceptable. But should the fork be compressed to its limit, and an additional bump encountered, the now rigid fork transmits the full force of impact to the motorcycle proper, and to the rider. Depending upon the severity of the encounter, the results range from surprise to loss of tire/ground contact and control.
Thus it can be seen that for a fixed amount of travel, spring rate is an arbitrary value. A soft spring gives a soft ride, but makes forks susceptible to bottoming. A firm spring, while less prone to bottoming, will yield a proportionally harsher ride. Without changing travel then, selection of the proper spring rate is a compromise between comfort and control.
Fortunately, construction of the RD forks is such that the stock travel may be increased. While beneficial in itself, the additional travel also allows the spring rate to be softened slightly, while maintaining the same resistance to bottoming. In other words, the original compromise between comfort and control can be altered to the benefit of both.
The final variable, damping, can be best explained in terms of effect. A lack of damping would allow the front end of the bike to pogo up and down whenever a dip or bump is encountered. This is the same effect that worn out shocks produce.
Excessive damping will cause the fork to feel stiff. Much of the force of both bumps and dips will be felt by the rider, instead of being accommodated by the forks.
A more comprehensive explanation of damping would serve little purpose here. All that need be emphasized is that damping rates are determined in conjunction with spring rates and available travel.
THE FIXERS
There are several different ways in which the stock forks can be modified. The RD350 modifications are different than the RD400’s, and will be discussed first.
MODIFICATION #1, RD250/350
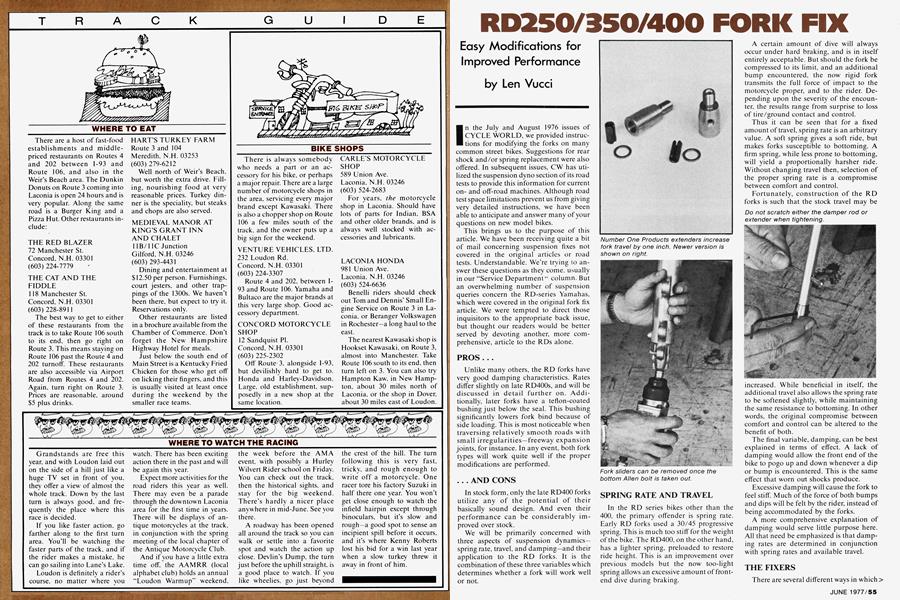
Least expensive of the modifications is a simple travel extension, utilizing a Number One Products #299 Extender Kit. This will increase travel from 4.75 inches to 5.75 inches, but retain the original damping and spring rates. It costs $5.95.
Place the bike on the center stand or a box, and remove the front wheel, fender, and brake caliper assembly. You will find an Allen bolt at the bottom of each fork slider. These bolts must be removed to separate the sliders, but are often difficult to break loose. If you don’t have access to an impact wrench, tighten the bolts slightly, then loosen and remove them. In very few cases will you need to use an impact wrench if done in this manner. With the bolts removed, and a drip pan in place, remove the fork sliders. Remove and discard the stock oil lock cones at the bottom of each damper rod.
Let the stanchion tubes drain for an hour or so, then clean the damper rods with solvent or lacquer thinner, especially at the threads.
Inspect the extenders which you will be installing. Earlier versions are solid, while later ones are drilled. If you have the early extenders, each should have a .156 (V32) inch hole drilled through its center, then cross-drilled just below the taper. (See photo.) Center-drilling is best done in a lathe to avoid damage. Install each of the extenders in a damper rod, using “Loctite” or a similar thread adhesive. To avoid damage to the rod and extender, small Phillips screwdrivers or drill bits may be inserted through their holes and used for tightening.
If you wish, RD400 seals can be installed in your 350 sliders, reducing seal friction by a third. Install the sliders, using one of the washers provided under each Allen bolt head. Tighten these bolts securely. Remove one of the fork caps, and extract the fork spring. Pour about 100 cc of 10 wt. fork oil into the stanchion tube, then work the slider up and down several times. Add oil in 10 cc amounts, working the slider up and down after each dose. When properly filled, each of the tubes should have just enough oil so that the top of the damper rod is just covered.
Replace the spring and cap, and repeat the filling procedure for the other fork tube.
With the extender kit in place, ride height will have been increased an inch. To restore the bike to original height, loosen the stanchion tube pinch bolts, and move the tubes up until the tops protrude an inch. Tighten the pinch bolts to complete the modification.
MODIFICATION #2, RD250/350
To better utilize the extra travel gained by installing the extender kit, softer fork springs can be installed. Yamaha RD400 springs can be used, although they are a bit soft and will allow slightly more front end dive than desired. Number One has a set of 28/35 springs for the RD, priced at $ 14.95, which are an excellent choice. If one is willing to search, there are other springs which could be used. Make sure spring length and diameter are the same as stock. If necessary, fork springs may be shortened to fit.
MODIFICATION #3, RD250/350
The most comprehensive modification to be discussed is the installation of a Number One Products “Drop-In Suspension Kit.” Rather than modify the stock components, this kit provides new damper rods, with a very slight difference in rate. Fork springs are also provided, eliminating the need to hunt down or modify springs.
The kit number is Y250/350-13, and is priced at $49.95.
As outlined previously, remove the wheel assembly brake caliper, fender, and both fork sliders. Retain the stock cones. Remove the fork caps and springs, and push the damper rods up and out of the stanchion tubes.
The new damper rods are then dropped into the stanchion tubes. Replace both springs and caps, tightening them hand tight. This will keep the damper rods from turning while the Allen bolts are tightened.
Use some heavy grease to hold the cones onto the damper rods. The fork sliders, preferably with RD400 seals in place, should then be reinstalled. Tighten the Allen bolts, then remove the fork caps and springs once more. Install the fork oil as previously outlined, then replace the springs and caps. Make sure that you’ve installed the new springs, rather than the originals!
Once the wheel assembly, fender, and brake caliper are in place, the conversion is complete.
MODIFICATION #4, RD400
There are two types of RD400 forks. The early 1976 version has a 13-mm diameter damper rod, while later versions have 17-mm diameter damper rods. A Number One Extender Kit #299 can be installed on the 13-mm damper rod, but not on the 17-mm rod. Before attempting this installation, remove one slider and measure the rod to be sure.
Both types of RD400 forks are deficient in compression and rebound damping. Whether or not an extender kit has been installed, an improvement in damping is easily had by changing to 20 wt. fork oil.
MODIFICATION #5, RD400
Replace the stock fork springs with a pair of Number One springs ($14.95).
MODIFICATION #6, RD400
Number One also has Drop-In Kits for the RD400, priced at $49.95. There is one important point which must be stressed. There are two kits available: Y400-13 and Y400-17. The two kits are not interchangeable, so check damper rod size before purchasing a kit for your bike.
The installation of the Y400 kit is the same as for the 250/350. Because the new damper rods have damping rates more suitable to the bike, 10 wt. oil should be used, rather than 20 wt. suggested for previous RD400 mods.
ADDITIONAL SUGGESTIONS
Once you have modified the forks, a look at the rear shocks is in order. Stock shocks on all models are acceptable if in good condition, but spring rates on all but the RD400 are too stiff. An 80 lb./in. spring, as on the 400, is the correct spring to use for solo riding. Preload it so that the bike settles 3/4to 1-inch when the rider mounts.
When shock replacement time comes, an accessory shock is in order. There are so many good products on the market we hesitate to recommend one over any other. Regardless of brand, use an 80 lb./in. spring, preloaded as mentioned.
SUMMARY
The RD series is an excellent motorcycle, which responds quite well to a few basic mofidications. Handling can be improved, and at the same time comfort also benefits. Considering the minimal expense involved, serious RD riders should consider undertaking such modifications.