Bolt On A Little Comfort
Bolt On A Little Comfort
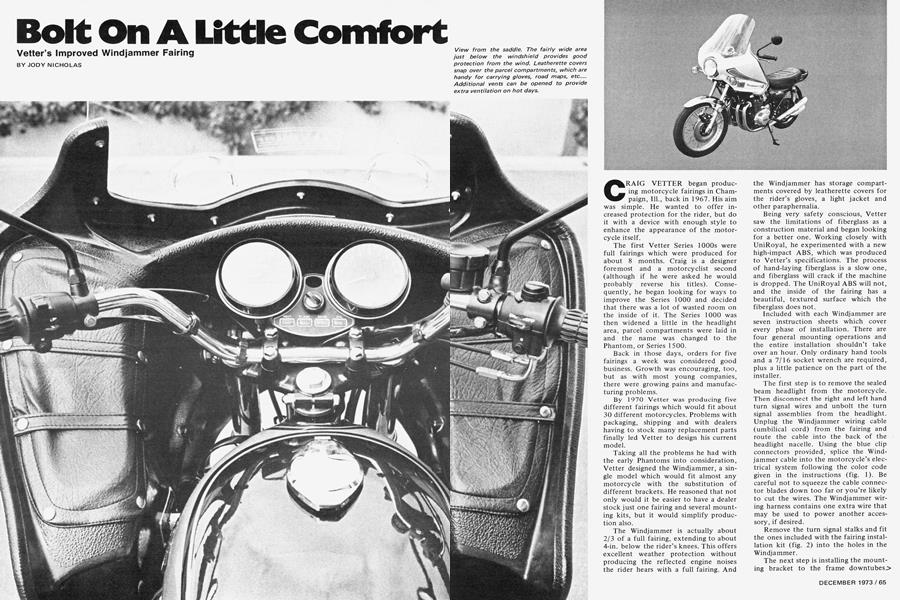
Vetter’s Improved Windjammer Fairing
JODY NICHOLAS
CRAIG VETTER began producing motorcycle fairings in Champaign, Ill., back in 1967. His aim was simple. He wanted to offer increased protection for the rider, but do it with a device with enough style to enhance the appearance of the motorcycle itself.
The first Vetter Series 1000s were full fairings which were produced for about 8 months. Craig is a designer foremost and a motorcyclist second (although if he were asked he would probably reverse his titles). Consequently, he began looking for ways to improve the Series 1000 and decided that there was a lot of wasted room on the inside of it. The Series 1000 was then widened a little in the headlight area, parcel compartments were laid in and the name was changed to the Phantom, or Series 1500.
Back in those days, orders for five fairings a week was considered good business. Growth was encouraging, too, but as with most young companies, there were growing pains and manufacturing problems.
By 1970 Vetter was producing five different fairings which would fit about 30 different motorcycles. Problems with packaging, shipping and with dealers having to stock many replacement parts finally led Vetter to design his current model.
Taking all the problems he had with the early Phantoms into consideration, Vetter designed the Windjammer, a single model which would fit almost any motorcycle with the substitution of different brackets. He reasoned that not only would it be easier to have a dealer stock just one fairing and several mounting kits, but it would simplify production also.
The Windjammer is actually about 2/3 of a full fairing, extending to about 4-in. below the rider’s knees. This offers excellent weather protection without producing the reflected engine noises the rider hears with a full fairing. And
the Windjammer has storage compartments covered by leatherette covers for the rider’s gloves, a light jacket and other paraphernalia.
Being very safety conscious, Vetter saw the limitations of fiberglass as a construction material and began looking for a better one. Working closely with UniRoyal, he experimented with a new high-impact ABS, which was produced to Vetter’s specifications. The process of hand-laying fiberglass is a slow one, and fiberglass will crack if the machine is dropped. The UniRoyal ABS will not, and the inside of the fairing has a beautiful, textured surface which the fiberglass does not.
Included with each Windjammer are seven instruction sheets which cover every phase of installation. There are four general mounting operations and the entire installation shouldn’t take over an hour. Only ordinary hand tools and a 7/16 socket wrench are required, plus a little patience on the part of the installer.
The first step is to remove the sealed beam headlight from the motorcycle. Then disconnect the right and left hand turn signal wires and unbolt the turn signal assemblies from the headlight. Unplug the Windjammer wiring cable (umbilical cord) from the fairing and route the cable into the back of the headlight nacelle. Using the blue clip connectors provided, splice the Windjammer cable into the motorcycle’s electrical system following the color code given in the instructions (fig. 1). Be careful not to squeeze the cable connector blades down too far or you’re likely to cut the wires. The Windjammer wiring harness contains one extra wire that may be used to power another accessory, if desired.
Remove the turn signal stalks and fit the ones included with the fairing installation kit (fig. 2) into the holes in the Windjammer.
The next step is installing the mounting bracket to the frame downtubes> This method of mounting a fairing is very good because wind gusts don’t cause the handlebars to be deflected. The mounting bracket is to be loosely attached to the frame with the hose clamps provided. Center the mounting bracket and tighten the hose clamps and 7/16-in. bolt last (fig. 3).
Install the fairing proper on the frame rails of the bracket after placing the plastic cover over the headlamp (fig. 4). It is important not to overtighten the bolts or the material may crack. Push through the soft rubber molding for the windshield with a Phillips head screwdriver to allow the plastic screws to be pushed through and install the windshield, remembering to gently tighten the nuts or the plexiglass windshield may crack (fig. 5).
After the windshield has been installed, the fairing umbilical cord should be plugged into the fairing receptacle and then attach a large plastic ty-rap to give the wiring support and to keep the wiring harness from being pulled out of the fairing receptacle. Detailed illustrations of this and all other installation procedures are included with the fairing.
Check the headlight for proper aiming and operating and make certain the turn signals operate properly. Adjust the handlebars and rear view mirrors, if necessary, to provide maximum turning radius. One nice feature of the Windjammer is that the sealed beam unit used is a standard 7 in., 12V automobile one that is readily available should failure occur.
At $193, the Windjammer is an expensive proposition, but the protection it offers from the elements somehow makes it all worthwhile...especially at 70 mph in a driving rain! |0