Basic Motorcycle Photography
A BEGINNER'S GUIDE.
MOTORCYCLES are photographic creatures. Sitting still or carving up roadway, no matter the model or year, they are alive, magnetic and they beg for you to get out that camera and record their beauty of line and motion. A good part of the in terest you get from CYCLE WORLD is in the photos, which make up a hefty part of the editorial and advertising content and draw you into a story or into the text on what a manufacturer has to say about his product. This is proof that bikes and photography go together.
If you are in the snapshot class of photography like I was for many a year, you have probably wondered why the pictures you have taken don’t always come up to expectations. Perhaps it looked like it would be a good shot when you pressed the button. But what happened between that time and the time you forked over a couple of hard-earned bucks for a set of dull prints that will soon be kissing the bottom of your desk drawer?
BASIC MOTORCYCLE PHOTOGRAPHY
DAN HUNT
The motorcycle snapshooter’s lament is what this article is all about. You CAN take decent pictures, big ones, color ones, little ones, and you can do it without having to get overly involved in the technical madness that is called modern day photography.
Your subject matter has a great bearing on the kind of camera you need. Chances are that you’ll only have to change your habits to improve the results you get, rather than having to change cameras. If you are very interested in getting pictures of motorcycles under difficult conditions — fast moving action or unusual lighting conditions — you may have to resign yourself to spending a little money for a new camera. But you shouldn’t have to spend much. Most of the photos in this issue, with few exceptions, could be duplicated
with equipment costing less than $50. And you must remember that a good camera will outlast the motorcycle you’re riding (and you don’t have to worry about gasoline consumption or ring jobs).
Motorcycle picture-taking can be divided into two categories — action and nonaction. In non-action, the subject holds still for you : it includes such things as your bike at rest, with people on it or around it, or the bike and rider in the presence of a monument or other scenery. Even for owners of the lowliest camera, this type of shooting presents no technical problem as long as the light is good. Just make sure the sunlight is off to your side or behind you. No adjustable lens needed, no high speed shutter to stop action. Just wind the thing and shoot.
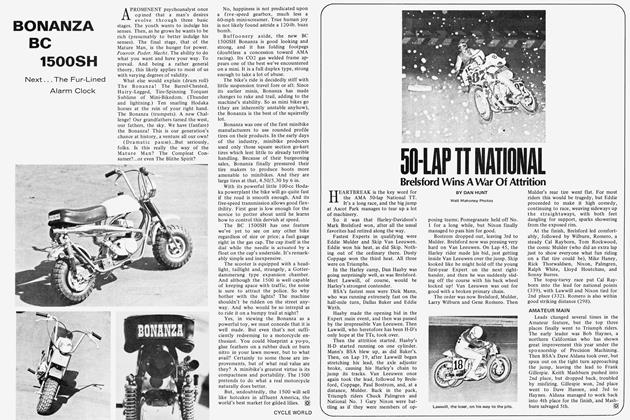
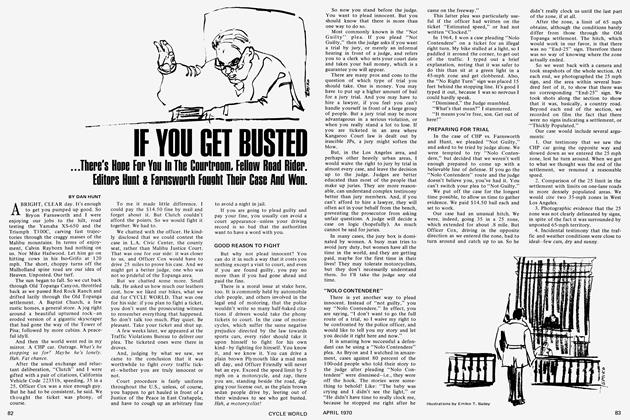
But, within these limits, it is amazing how you can waste film. For example, thé most common error made by Sunday-outing photographers is that they try to get everything into the picture. To wit: Floyd Hotshoe comes over to Paris with his bike, parks the machine and his flame of the moment in front of the Eifel Tower and then steps back 50 feet so he can get the whole tower in the picture. When he develops the film, bike and girl appear as tiny, unrecognizable dots and he can’t understand why.
His idea was to prove that he, bike and girlfriend visited the tower, but how should he have done it so that the figures and the machine could be recognized? One way is to forget trying to get the whole tower. He could have parked bike and girl near the base of the tower which is every bit as recognizable as the whole thing. Then he should have moved back only four or five big steps from his subjects, lining them up with just a piece of the tower in the background.
Rule of the thumb: move in on your subject until it fills the rangefinder but not so close you cut off things like legs or wheels. Other pointers: If you don’t care about background for your subject, place the subject in front of a background as simple and uncluttered as possible to avoid weird effects like garbage cans growing out of rear fenders.
Avoid obvious errors like punching your shutter with such force that it causes camera shake (which in turn causes blurring), or being out of focus. On the latter point, beware of getting too close if your camera has no focusing adjustment; such a camera will give clear shots as close as seven feet but no less.
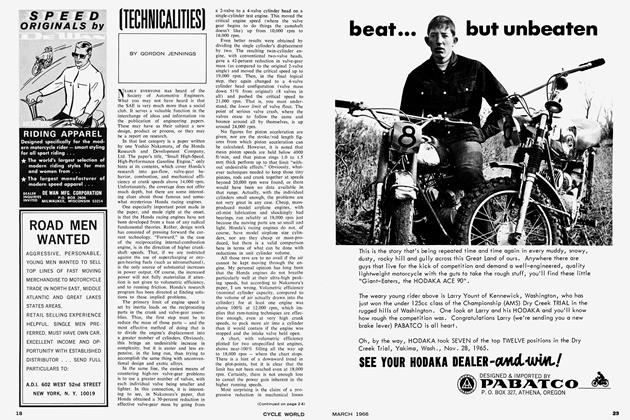
Now we move to the domain of action photography where bikes are supreme. Motorcycles in motion make infinitely better subjects than their four-wheeled cousins because they lean, they jump, they slide, and they show more of the rider, which adds the all-important human element to that of speed and action.
Unfortunately for the Brownie camera type of photographer, shooting action photos requires more than mere skill or care. It requires “advanced” equipment, which some people may find too expensive, even though good cameras capable
of handling most action situations are selling for less than half of what they were ten years ago.
By an “advanced” camera, I mean one that has settings for different shutter speeds, and for lens opening. A shutter speed of 1/250 of a second is the minimum for most action situations, and 1/500 is better. The variable lens opening lets one use these fast speeds, which allow less time for light to register on the film.
Given a good camera, anyone can take a so-so action picture once in a while; he’s bound to make a correct mistake now and then. But the secret of taking consistently good action lies in three principles: 1) Your placement in relation to your subject; 2) Your willingness to keep the camera ready and alert at all times; and 3) Your timing when you push the button. For bike photography, add a fourth principle: The more you know about what a motorcycle does when it’s moving, on road or dirt, the better shots you’re likely to get, because you can anticipate the motions of a bike and be better able to trip the shutter at the right place and moment.
For placement, the rule is the same as for still subjects. The subject is more important than its surroundings and you should try to fill as much of the viewfinder (and thus the negative) with it. This is why you see many race photographers with telephoto lens cameras that bring the subject “in close.” But, if you use your feet and brains a bit, to place yourself within 25 feet of the subject, you won’t need this expensive addition.
A motorcycle event divides itself readily into four types of places for picture taking: straights, curves, jumps and activity at the start-finish line and pits. The spice of photography is variety, so if you’re not planning to move around the course a bit, you might as well leave your camera at home and clip your photos out of CYCLE WORLD.
Corners offer good action, particularly the tight radius corners, because some riders will attempt hairier things at the slower speeds found there. You can position yourself on the inside or outside of a tum. I find the inside more interesting because the rider’s limbs, machinery and facial expression are more likely to be exposed (particularly in races where fairings are used). Another reason the inside is preferable is that course barriers are set closer to the track. Finally, the inside is safer for the photog.
Decide at what distance you’re going to shoot beforehand and set your shutter, lens opening and focus in advance. Also, decide what kind of grouping or bike position you want to take. Consider your vantage point carefully. Shots from a high or low position often have greater impact than those taken at eye level. When you’ve made up your mind, wait, and keep the camera in position and ready to shoot. Nothing is worse than to witness a beautiful slide and then miss out on it photographically because your camera hap-
pened to be dangling loose on its strap.
For home movie buffs, the same principles apply. Further, the movie photographer should provide his scenes with good continuity: overall shots of the course to establish setting, and shots of bikes that carry the action completely from the entrance of a turn to the exit. Indiscriminate, short bursts of movie film can make jerky and tiresome viewing.
Jumps provide some of the most exciting action to be found in bike competition. The very idea of 400 pounds of metal and flesh becoming airborne captures the imagination. A bit of care will make your jump shots extraordinary.
One trick is to place yourself as low as possible. Squat down. This makes the rider and his machine appear higher off the ground. Also, look for ways to emphasize the perspective — a piece of backgrôund that leads away from the camera and gives a feeling of motion to the rider in midair.
Both in cornering and jumping shots, you must remember that the more you shoot off to the side of a rider’s direction, the greater the effects of motion become. Thus, if you hold your camera dead still as a bike goes by sideways, there is a great chance that the subject will appear blurred on the film, even with a very fast shutter. The technique for avoiding blurring is called “panning,” or moving the camera sideways so it follows exactly the motion of the subject.
The effect is that the subject does not blur, but the background does. You’ll find that the blurring of background is desirable in many cases and adds to the feeling of motion. Be careful when tripping the shutter as you pan that you don’t jiggle the camera. Smoothness is the key, and the technique of tripping a shutter is the same as that for squeezing off a shot with a shotgun as you take a swinging lead on a covey of quail.
I prefer dirt events because of their variety — the jolt and slide of a scrambles or the amusing contortions of an observed trial. I feel that road races are very difficult to photograph well, time after time, because the smooth road surfaces take away some of the exciting uncertainties that you find on a TT course or a desert run. However, you can make the most commonplace tuck-in right or left hander look interesting, if you use your head a bit. There is a beautiful flowing sweep to road racing in the European style and with care you can get it down on film. Look for interesting backgrounds such as signs, trees, spectators and painted lines on the road. Look for the expression of the rider. PROCESSING: HALF THE ART
Processing is half the art of getting good photos. No, you don’t need your own darkroom, but you do have to take more than the usual pains when you take your film into the dealer’s shop to get it processed.
The greatest device for self-punishment ever inflicted on the photographer is the “cheap,” handy-sized, master-sized, super quick and fully automated snapshot. Not only are these little prints too small to convey the real feeling of the scene you have taken, but they are, by virtue of their large numbers, downright expensive.
Total the price up. You shoot a roll of film at a bike meet and drop it off for development. Depending on what kind of film and camera you use you get anywhere from 8 to 36 prints which cost about 15 cents each in black-and-white, or 35 cents each in color. For example, take a 20-exposure roll of 35mm film (a very popular size nowadays). Development into 20 snaps works out to about $3 for black-and-white and about $7 for color. The real crime in this is that nobody — amateur or pro - can get 20 perfect pictures from a 20-exposure roll. We all make mistakes. But why should we pay extra for them?
The secret of good photography is SELECTION of the best shots you have taken and the discarding of the bad ones. Make your choice: would you like three or four of the best shots on the roll blown up to a whopping 8 by 10 inches in size? Or are you going to settle for 20 snapshots, three-fourths of which are of little interest? Both choices cost the same.
If you don’t care about blowups, why not forget about making little prints of all those shots on the roll that aren’t interesting. Chances are you’ll save 50 percent in doing so. The method is to do your developing in two stages. Here’s how to go about it: With black-and-white or color print film, you take the exposed roll to your dealer and you say: “Develop the negatives only.” You’ll find that this costs only 50 to 75 cents.
You’ve no doubt seen a negative. The light patterns are reversed so that all light spots appear dark and vice versa. This can be confusing at first but you’ll find that you can soon be able to interpret a negative so that you may decide whether or not you want a print made from it. Look for sharpness of line, and a good balance of black and white tones. With color, the evaluation of tones is more uncertain, so have your dealer help you. Make sure the images of the bikes and people aren’t too small.
If you have trouble in recognizing things because of the reversal of light and dark, try this trick: shine a flashlight or a bright light bulb on the hazy side of the negative while holding it against a dark background; you’ll find that a trick of optics makes everything appear “positive” and easier to recognize. In this manner, you can pick the shots you like for snapshots or enlargements. The three most popular sizes for enlargements are 4 by 5, 5 by 7, or 8 by 10 inches.
Before you tell the dealer what you want, take another look at the negative. Would you like to make the subject appear closer by throwing out some empty space on the negative? This is called “cropping” or “close-cropping.” Essentially, it amounts to putting a smaller frame around the best part of your picture.
In your case, you want to make the bike appear closer and get rid of some surrounding sagebrush. So you tell the dealer, “I want an 8 by 10 inch print of this negative. But will you crop it close to the rider? I’d like him to fill the picture completely.” The beauty of this is that the dealer will do so willingly, yet it won’t cost you one cent more.
If you do change from a one-button Brownie to something more advanced, you’re going to discover that there are more types of films than you’ll know what to do with. The following list of films attempts to boil this down a bit. It happens to be an all-Kodak list, not because I’m paid by them, but because their film has the widest distribution in the United States. I have used all of these films. Here are my suggestions of the uses for which they are appropriate: For snapshot photographers, use Verichrome for black-and-white and Kodacolor for color prints. When you get into the advanced stage, you’ll run across the following useful films: Plus-X for fine, clear prints up to 11 by 14 inches and larger in black-and-white. Good for action or scenic photography.
Tri-X is twice as sensitive as Plus-X and will give good black-and-white prints up to 8 by 10 inches, even with a bit of cropping. If you have a 35mm camera and want blowups larger than that, you’re going to get a slightly “grainy” effect, caused by the chemical used to make this film so sensitive. This is the perfect film for action photographers.
Kodachrome II is most popular in the 35mm size, and is a wonderful film for making color slides. However, its light sensitivity is low and makes going difficult when high shutter speeds are needed to stop action. Ektachrome also is used for color slides. For action work, use the High Speed version which has the same sensitivity as Plus-X. If you’re more interested in beautiful, fine-grained color, use the less sensitive version called Ektachrome-X. If the light is good, you can get away with using Ektachrome-X for action. Keep in mind that you may order color prints from Kodachrome or Ektachrome transparency film the same way you can from Kodacolor negatives.
For movie buffs, Kodachrome-II is the best all-around choice. It’s hardly worth the trouble to take black-and-white movies anymore, but if you insist, try Kodak Panatomic-X, or one of the foreign blackand-white films such as Perutz or AgfaGevaert.
If you’re in the market for a new camera, still or movie, you’ll find the variety is blinding. Here are a few guidelines:
One of the most important considerations to make is the film'.size you’ll be using. For movie makers, I recommend staying away from 16mm because of its expensiveness. Then new Super-8mm size is the best bet going for amateurs. For those who already have a normal 8mm camera, remember that if you buy a new Super-8 camera you’re going to have to change projectors too.
As for still cameras, you should stay away from cameras taking oddball sizes of film. Otherwise, you may have difficulty in buying or processing film, or you find a poor variety of films available in the size you are stuck with. By far the most popular size is 35mm, because it enables the use of a small, easy-to-carry camera. This is also the No. 1 size for color slide showing. Another point in its favor, film advance on all 35mm cameras is automatic, so you don’t have to stare in a window to line up the number on your next shot.
A new and promising development on the market is the “half-frame” 35mm. It uses the normal 35mm film, but the negative size is smaller so you get more pictures per roll. The cameras are supersmall and make for vest-pocket carrying. But, if you like nothing but 8 by 10 blowups, stay away from it. If you’re interested in telephoto lens photography, you’ll find that the normal 35mm size is the best choice, because of the wide range of accessories available.
The new instamatic size with pop-in film cartridges is here to stay. But I recommend it only for the casual amateur, because “advanced” cameras made for this size are few and expensive. In larger formats, I feel that 120 is the only logical choice because of its wide use by amateur and pro alike, and the large choice of films offered. You’ll find that the most popular camera in this size is the twin lens reflex, which has two lenses, one for shooting and one for viewing. “Advanced” cameras using this type of film are very inexpensive. Make sure if you buy a twinlens reflex that it has a sports finder, which is an auxiliary viewer allowing direct, eye-level viewing.
No matter what camera you choose, make sure that the viewfinder offers a brilliant and easy-to-interpret view of the scene. This is very important for action photography. Also check to see if the controls are well laid out and easy to handle. When looking at used cameras, open up the back and check for dirt and scratches on the lens. Set the shutter to stay open when you press the button and hold the lens up to the light.
On cameras that have automatic film advance mechanisms, it’s worth the price of a roll of film to see if the advance is even and that the lever moves without forcing or funny noises. Get some prints made and look for odd effects caused by the lens, such as distortion or fogging. When buying a used camera, try to get your dealer to guarantee it for a month or two.
One final note for buyers of advanced cameras: while you can operate one without having to use a light meter, you’ll find you get better results if you have one. Some cameras have them built in, but will cost at least $20 more than those cameras without. You can buy a decent light meter separately for as little as $10. ■