Stop & Go Tire Repair Kit
Stop & Go Tire Repair Kit
EVALUATION
Flat tires, like all mechanical malfunctions, are seldom convenient. That doesn't mean having flats at the worst possible time makes it any more fun, so when we had a string of floppy tubes and ripped stems and didn’t have the gear or time to effect a speedy fix, mention was made in these pages. And duly noted. We heard from the folks at Stop & Go International. They’d read about our struggles with flat tires, they produce and sell what they believe to be the perfect solution to the problem, and they enclosed said cure, a kit for fixing tires while away from home.
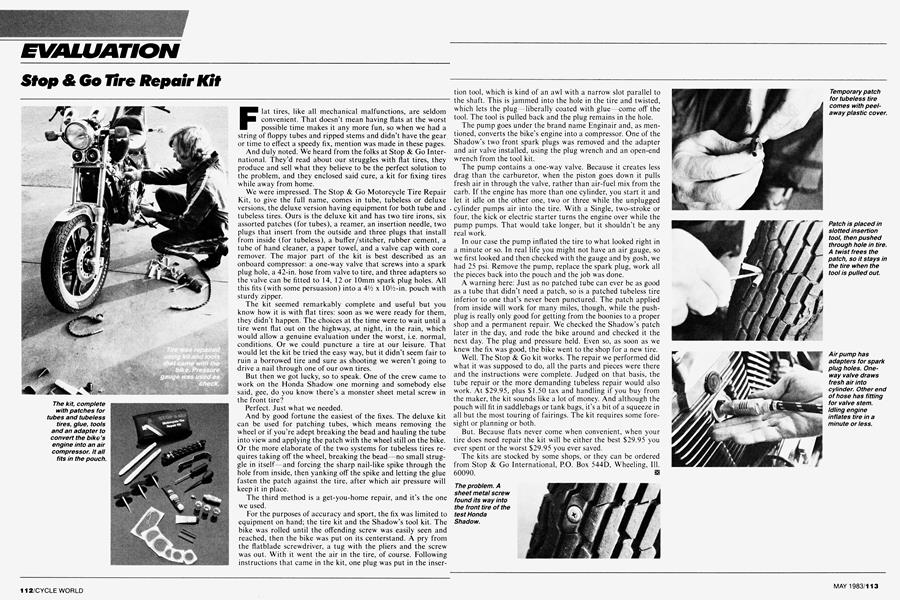
We were impressed. The Stop & Go Motorcycle Tire Repair Kit, to give the full name, comes in tube, tubeless or deluxe versions, the deluxe version having equipment for both tube and tubeless tires. Ours is the deluxe kit and has two tire irons, six assorted patches (for tubes), a reamer, an insertion needle, two plugs that insert from the outside and three plugs that install from inside (for tubeless), a buffer/stitcher, rubber cement, a tube of hand cleaner, a paper towel, and a valve cap with core remover. The major part of the kit is best described as an onboard compressor: a one-way valve that screws into a spark plug hole, a 42-in. hose from valve to tire, and three adapters so the valve can be fitted to 14, 12 or 10mm spark plug holes. All this fits (with some persuasion) into a 41/2 x lO’/2-in. pouch with sturdy zipper.
The kit seemed remarkably complete and useful but you know how it is with flat tires: soon as we were ready for them, they didn’t happen. The choices at the time were to wait until a tire went flat out on the highway, at night, in the rain, which would allow a genuine evaluation under the worst, i.e. normal, conditions. Or we could puncture a tire at our leisure. That would let the kit be tried the easy way, but it didn’t seem fair to ruin a borrowed tire and sure as shooting we weren’t going to drive a nail through one of our own tires.
But then we got lucky, so to speak. One of the crew came to work on the Honda Shadow one morning and somebody else said, gee, do you know there’s a monster sheet metal screw in the front tire?
Perfect. Just what we needed.
And by good fortune the easiest of the fixes. The deluxe kit can be used for patching tubes, which means removing the wheel or if you’re adept breaking the bead and hauling the tube into view and applying the patch with the wheel still on the bike. Or the more elaborate of the two systems for tubeless tires requires taking off the wheel, breaking the bead—no small struggle in itself—and forcing the sharp nail-like spike through the hole from inside, then yanking off the spike and letting the glue fasten the patch against the tire, after which air pressure will keep it in place.
The third method is a get-you-home repair, and it’s the one we used.
For the purposes of accuracy and sport, the fix was limited to equipment on hand; the tire kit and the Shadow’s tool kit. The bike was rolled until the offending screw was easily seen and reached, then the bike was put on its centerstand. A pry from the flatblade screwdriver, a tug with the pliers and the screw was out. With it went the air in the tire, of course. Following instructions that came in the kit, one plug was put in the insertion tool, which is kind of an awl with a narrow slot parallel to the shaft. This is jammed into the hole in the tire and twisted, which lets the plug liberally coated with glue—come off the tool. The tool is pulled back and the plug remains in the hole.
The pump goes under the brand name Enginair and, as mentioned, converts the bike’s engine into a compressor. One of the Shadow’s two front spark plugs was removed and the adapter and air valve installed, using the plug wrench and an open-end wrench from the tool kit.
The pump contains a one-way valve. Because it creates less drag than the carburetor, when the piston goes down it pulls fresh air in through the valve, rather than air-fuel mix from the carb. If the engine has more than one cylinder, you start it and let it idle on the other one, two or three while the unplugged cylinder pumps air into the tire. With a Single, two-stroke or four, the kick or electric starter turns the engine over while the pump pumps. That would take longer, but it shouldn't be any real work.
In our case the pump inflated the tire to what looked right in a minute or so. In real life you might not have an air gauge, so we first looked and then checked with the gauge and by gosh, we had 25 psi. Remove the pump, replace the spark plug, work all the pieces back into the pouch and the job was done.
A warning here: Just as no patched tube can ever be as good as a tube that didn’t need a patch, so is a patched tubeless tire inferior to one that’s never been punctured. The patch applied from inside will work for many miles, though, while the pushplug is really only good for getting from the boonies to a proper shop and a permanent repair. We checked the Shadow’s patch later in the day, and rode the bike around and checked it the next day. The plug and pressure held. Even so, as soon as we knew the fix was good, the bike went to the shop for a new tire.
Well. The Stop & Go kit works. The repair we performed did what it was supposed to do, all the parts and pieces were there and the instructions were complete. Judged on that basis, the tube repair or the more demanding tubeless repair would also work. At $29.95, plus $1.50 tax and handling if you buy from the maker, the kit sounds like a lot of money. And although the pouch will fit in saddlebags or tank bags, it’s a bit of a squeeze in all but the most touring of fairings. The kit requires some foresight or planning or both.
But. Because flats never come when convenient, when your tire does need repair the kit will be either the best $29.95 you ever spent or the worst $29.95 you ever saved.
The kits are stocked by some shops, or they can be ordered from Stop & Go International, RO. Box 544D, Wheeling, 111. 60090. 0