New Ideas In Electronic Ignition Suspension
New Ideas In Electronic Ignition Suspension
CYCLE WORLD hears about many new products each month. We choose the ones we think would be of the most interest to our readers. We obtain a sample we can test and proceed with an evaluation that is just as thorough as the one we give the bikes we test. We can’t test everything, but if you have a preference drop us a line and we ’ll do our best to obtain the product and pass on our test information.
DYNA III ELECTRONIC IGNITION
Add-on ignition systems suffer from the handicap of a bad reputation. For at least 50 years companies reputable and otherwise have offered the gullible all manner of devices, from widgets to intensify the spark to instruments with flashing neon lights claimed to illustrate the high degree of zap reaching the spark plugs. Most of these systems were trash and anybody old enough to have read countless ads for such devices is bound to be wary.
But there have been significant improvements in electronic technology in recent years. While the refugees from the county fair are still in business, there are other firms offering what appear to be genuine improvements at acceptable prices.
Seemed to us the promising systems deserved an unbiased appraisal. We picked one. the Dyna 111 Electronic Ignition, made by KV Products, and put it to the test on a Kawasaki KZ900.
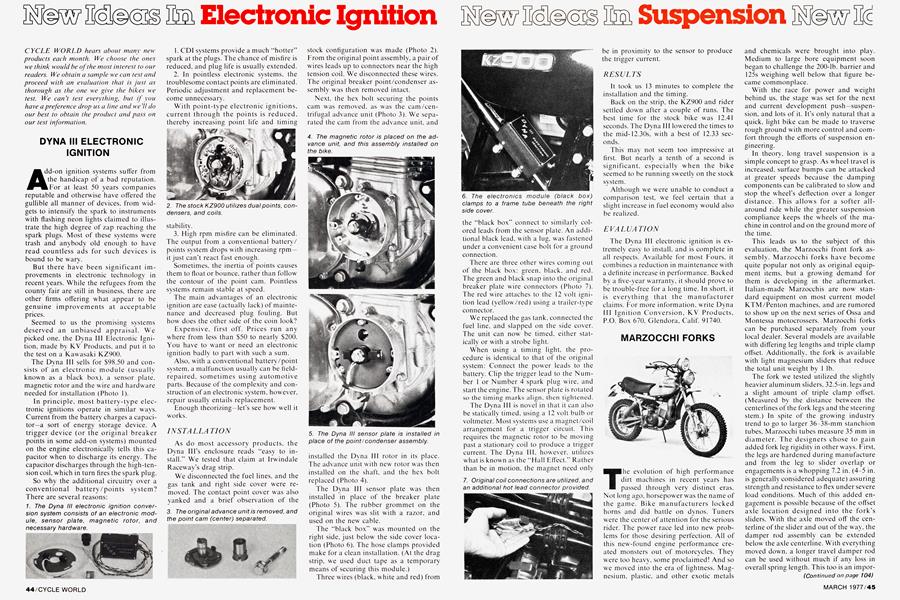
The Dyna III sells for $98.50 and consists of an electronic module (usually known as a black box), a sensor plate, magnetic rotor and the wire and hardware needed for installation (Photo 1).
In principle, most battery-type electronic ignitions operate in similar ways. Current from the battery charges a capacitor—a sort of energy storage device. A trigger device (or the original breaker points in some add-on systems) mounted on the engine electronically tells this capacitor w'hen to discharge its energy. The capacitor discharges through the high-tension coil, which in turn fires the spark plug.
So why the additional circuitry over a conventional battery/points system? There are several reasons:
1. CDI systems provide a much “hotter” spark at the plugs. The chance of misfire is reduced, and plug life is usually extended.
2. In pointless electronic systems, the troublesome contact points are eliminated. Periodic adjustment and replacement become unnecessary.
With point-type electronic ignitions, current through the points is reduced, thereby increasing point life and timing stability.
3. High rpm misfire can be eliminated. The output from a conventional battery/ points system drops with increasing rpm — it just can’t react fast enough.
Sometimes, the inertia of points causes them to float or bounce, rather than follow the contour of the point cam. Pointless systems remain stable at speed.
The main advantages of an electronic ignition are ease (actually lack) of maintenance and decreased plug fouling. But how does the other side of the coin look?
Expensive, first off. Prices run any where from less than $50 to nearly $200. You have to want or need an electronic ignition badly to part with such a sum.
Also, with a conventional battery/point system, a malfunction usually can be fieldrepaired. sometimes using automotive parts. Because of the complexity and construction of an electronic system, however, repair usually entails replacement.
Enough theorizing—let’s see how' well it works.
INSTALLATION
As do most accessory products, the Dyna Ill’s enclosure reads “easy to install.” We tested that claim at Irwindale Raceway’s drag strip.
We disconnected the fuel lines, and the gas tank and right side cover were removed. The contact point cover was also yanked and a brief observation of the stock configuration was made (Photo 2). From the original point assembly, a pair of wires leads up to connectors near the high tension coil. We disconnected these wires. The original breaker point/condenser assembly was then removed intact.
Next, the hex bolt securing the points cam was removed, as was the cam/centrifugal advance unit (Photo 3). We separated the cam from the advance unit, and installed the Dvna III rotor in its place. The advance unit with new rotor was then installed on the shaft, and the hex bolt replaced (Photo 4).
The Dyna III sensor plate was then installed in place of the breaker plate (Photo 5). The rubber grommet on the original wires was slit with a razor, and used on the new cable.
The “black box” was mounted on the right side, just below' the side cover location (Photo 6). The hose clamps provided make for a clean installation. (At the drag strip, we used duct tape as a temporary means of securing this module.)
Three wires (black, white and red) from the “black box” connect to similarly colored leads from the sensor plate. An additional black lead, with a lug. was fastened under a convenient case bolt for a ground connection.
There are three other wires coming out of the black box: green, black, and red. The green and black snap into the original breaker plate wire connectors (Photo 7). The red wire attaches to the 12 volt ignition lead (yellow/red) using a trailer-type connector.
We replaced the gas tank, connected the fuel line, and slapped on the side cover. The unit can now be timed, either statically or with a strobe light.
When using a timing light, the procedure is identical to that of the original system: Connect the power leads to the battery. Clip the trigger lead to the Number 1 or Number 4 spark plug wire, and start the engine. The sensor plate is rotated so the timing marks align, then tightened.
The Dyna III is novel in that it can also be statically timed, using a 12 volt bulb or voltmeter. Most systems use a magnet/coil arrangement for a trigger circuit. This requires the magnetic rotor to be moving past a stationary coil to produce a trigger current. The Dyna III. however, utilizes what is known as the “Hall Effect.” Rather than be in motion, the magnet need only be in proximity to the sensor to produce the trigger current.
RESULTS
It took us 13 minutes to complete the installation and the timing.
Back on the strip, the KZ900 and rider settled down after a couple of runs. The best time for the stock bike was 12.41 seconds. The Dyna III lowered the times to the mid-12.30s, with a best of 12.33 seconds.
This may not seem too impressive at first. But nearly a tenth of a second is significant, especially w'hen the bike seemed to be running sweetly on the stock system.
Although we were unable to conduct a comparison test, we feel certain that a slight increase in fuel economy would also be realized.
EVALUATION
The Dvna III electronic ignition is extremely easy to install, and is complete in all respects. Available for most Fours, it combines a reduction in maintenance with a definite increase in performance. Backed by a five-year warranty, it should prove to be trouble-free for a long time. In short, it is everything that the manufacturer claims. For more information, write Dyna III Ignition Conversion. KV Products, P.O. Box 670. Glendora, Calif. 91740.
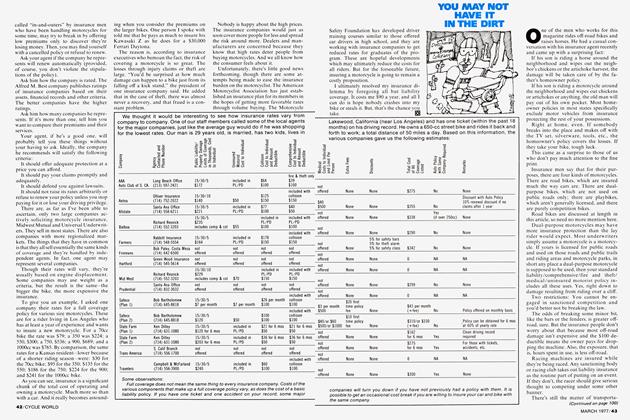
MARZOCCHI FORKS
The evolution of high performance dirt machines in recent years has passed through very distinct eras. Not long ago, horsepower w'as the name of the game. Bike manufacturers locked horns and did battle on dynos. Tuners were the center of attention for the serious rider. The powder race led into new problems for those desiring perfection. All of this new-found engine performance created monsters out of motorcycles. They were too heavy, some proclaimed! And so w'e moved into the era of lightness. Magnesium, plastic, and other exotic metals and chemicals were brought into play. Medium to large bore equipment soon began to challenge the 200-lb. barrier and 125s weighing well below that figure became commonplace.
With the race for power and weight behind us, the stage was set for the next and current development push—suspension, and lots of it. It’s only natural that a quick, light bike can be made to traverse rough ground with more control and comfort through the efforts of suspension engineering.
In theory, long travel suspension is a simple concept to grasp. As w'heel travel is increased, surface bumps can be attacked at greater speeds because the damping components can be calibrated to slow' and stop the wheel’s deflection over a longer distance. This allows for a softer allaround ride while the greater suspension compliance keeps the w'heels of the machine in control and on the ground more of the time.
This leads us to the subject of this evaluation, the Marzocchi front fork assembly. Marzocchi forks have become quite popular not only as original equipment items, but a growing demand for them is developing in the aftermarket. Italian-made Marzocchis are now' standard equipment on most current model KTM/Penton machines, and are rumored to show up on the next series of Ossa and Montessa motocrossers. Marzocchi forks can be purchased separately from your local dealer. Several models are available with differing leg lengths and triple clamp offset. Additionally, the fork is available with light magnesium sliders that reduce the total unit weight by 1 lb.
The fork we tested utilized the slightly heavier aluminum sliders, 32.5-in. legs and a slight amount of triple clamp offset. (Measured by the distance between the centerlines of the fork legs and the steering stem.) In spite of the growing industry trend to go to larger 36-38-mm stanchion tubes, Marzocchi tubes measure 35 mm in diameter. The designers chose to gain added fork leg rigidity in other ways. First, the legs are hardened during manufacture and from the leg to slider overlap or engagements is a whopping 7.2 in. (4-5 in. is generally considered adequate) assuring strength and resistance to flex under severe load conditions. Much of this added engagement is possible because of the offset axle location designed into the fork’s sliders. With the axle moved off the centerline of the slider and out of the way, the damper rod assembly can be extended below the axle centerline. With everything moved down, a longer travel damper rod can be used without much if any loss in overall spring length. This too is an important by-product of the design because longer springs can be wound more accurately and their added compression length provides smoother action.
(Continued on page 104)
Continued from page 45
Tested metal-to-metal. full travel of this fork measures 8.75 in. While this is a bit short of the claimed travel, the Marzocchi's workable stroke is as much as you can safely achieve with any production fork available. The seals on our test units held up under rigorous use. but while keeping oil from escaping, they developed a full 11 lb. of static drag on the stanchion tubes. This is considered excessive and leads to ride problems under certain conditions.
Tight or binding seals can and do cause a loss of damping action under light load conditions. In riding terms this means fast straightaways on the MX track, or smooth trails and fireroads. Let's say you are running dowm a dirt trail marked with small washboard cross-grain. Chances are until you hit something sizable on the trail, the bump load being placed on the work will be less than that of the seal drag, so the front end of the bike will be practically rigid.
Normally, an easy fix for this would be to change to a Universal or even a teflon seal from Yamaha. Unfortunately, the outer diameter of the Marzocchi seal is 47 mm. This is an odd size and so far. the only suitable replacement comes from Honda. (It’s best to take the original seals with you when purchasing the Honda replacement.) This seal reduces static friction down to the 8-lb. range and although far from ideal, it does provide a measurable improvement over the stock seal.
The cast triple clamp assembly for the Marzocchis can be ordered in two configurations. One places the centerline of the fork tubes in line with the steering stem. The other, like our test model, uses a top clamp offset of .9 in. and a bottom clamp offset of 1.2 in. The quality of hardware used is high. The clamps are robust-looking and hardened Allen bolts are used to secure the tubes in place.
By using either flat or mild offset clamps, steering precision is enhanced bylowering steering inertia and affecting a closer ratio of steering input to tracking. Surface bumps have less effect on steering kickback, giving the rider more control over which way the bike will travel. The lower offset axle location comes into play again by moving the axle forward to compensate for the loss of steering head angle created by the triple clamps.
The result of this change in geometry is the main reason for considering the expensive Marzocchi fork. Provided the proper set of these variables is applied to a conventional straight leg bike, the machine will benefit from quicker steering, a minute shift of weight to the front wheel, less kickback from the steering, greater tracking ability. This is in addition to very long travel and damping control superior to most forks on the market today. There is, however, a fine line between quick steering and high-speed stability. You can't have one without affecting the other. But unlike the radical steering and handling differences between a speedwaiy bike and a desert mount, the Marzocchi fork provides a blend of both.
Under the circumstances it was felt that the best way to evaluate the ride and handling qualities of the fork w as to install the unit on a bike which would be subjected to extreme changes in course conditions. The course conditions sought were available to competitors of the fabled Baja 1000. Although it is common knowledge that the 1000 contains some very high speed sections, there are also sections as twisty as any MX track in the land. A perfect place to test the ratio of steering speed to high-speed stability.
A worthy machine was found when it was learned that Baja and desert racing star Bruce Ogilvie was building a new Baja racer specifically for these long events. Bruce agreed to try the Marzocchis during the 1000 providing they passed the testing he would subject the new machine to prior to the race.
(Continued on page 108)
Continued from page 104
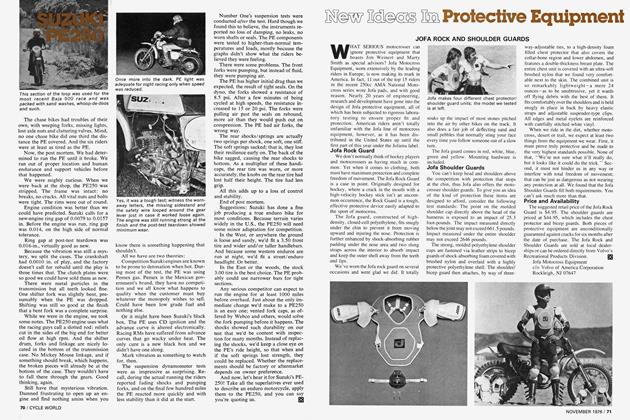
Ogilvie, at 22, is already a veteran of Baja racing and was considered one of the favorites going into the event. With class and overall wins under his belt we felt our test forks would get a good workout. They did. Bruce and race partner. Bob Rutten, installed the forks on Ogilvie’s C&Jframed Harley 250. Bruce and Bob use a Yamaha YZ front hub on the custom Harley so they had to fabricate a brake stay arm to connect the Yamaha backing plate to the Marzocchi stay mount located halfway up the slider. With this done, they slipped the fork on the bike only to find half the steering lock was lost. The nearly flat triple clamps were hitting the large Vesco desert tank used for long events. After some fiddling, another Vesco tank was fitted and mounted in such a way that full lock-to-lock steering was attained. Rear swinging arm and shock arrangement on the Harley/C&J provided rear wheel travel comparable to the Marzocchi set-up so the balance of the machine was not disturbed.
Initial testing showed the fine line between quick steering and high-speed control is traced quite well by the fork assembly. Riding impressions by both Bruce and Bob confirmed that cornering ability was vastly improved over the straight leg Betors originally planned for the bike. Bruce reported the Harley could be stuffed into a corner using either the inside or outside line. Before using the Marzocchis, an outside berm was needed to negotiate a given turn at comparable speeds. Both riders noted the added frontend control enabled them to shift some of their concentration away from the front wheel in rocky sections, and pay more attention to the trail ahead.
Test sessions ended with 30 wt. oil in the legs. The racers found the front bottomed too easily at high speed so the original 10 wt. oil was replaced. For less serious riding 10-15 wt. oil will be ideal.
Ogilvie and Rutten managed to win the 250 class and place 2nd overall in the event to the Roeseler/Mayes team aboard a Husky 360. Bruce and Bob were running dead even with the Husky through most of the race, until an electrical problem late in the running slowed them down. A class win in such an event is nothing to take lightly, and is proof that Marzocchi forks work.
The Marzocchis did not survive the ordeal intact, however. Some local spectators near the finish line managed to alter some course markers. Bob Rutten was charging for the finish and got confused by bogus markings and he T-boned an erosion ditch. The ditch was so deep that it literally stopped the bike in its tracks. Rutten survived the ensuing endo by landing in some soft mud, but the forks were not as fortunate. The result was a pair of bent fork tubes. This only shows that nothing is invincible, especially on a dirt bike, as the hardened tubes were overcome by the forces of someone’s law. It’s difficult to know how the same crash would have effected a conventional fork as these conditions could never be duplicated. But judging by the speed at which this bike was ridden during the race, it is safe to say that the forks were subjected to stresses far beyond what might be considered normal use.
The bent fork legs have since been straightened at a local shop following the crash. After this operation, they were sent out to be magnafluxed to be sure the hardened metal in the legs was not permanently damaged. This precautionary step is strongly advised when working with Marzocchi legs.
We are impressed with the Marzocchi fork. So much in fact, that they were removed from the Baja racer and are being fitted to another project machine in the CYCLE WORLD shop. The fork is a good, honest product that demonstrates the very latest thinking in dirt bike suspension and geometry. Marzocchi forks have the potential to improve the handling of most machines. Care must be taken before purchase to ensure the proper fork is being purchased. Consult your dealer to be sure everything will fit your bike. |§1