The Service Dept
THE SERVICE DEPT
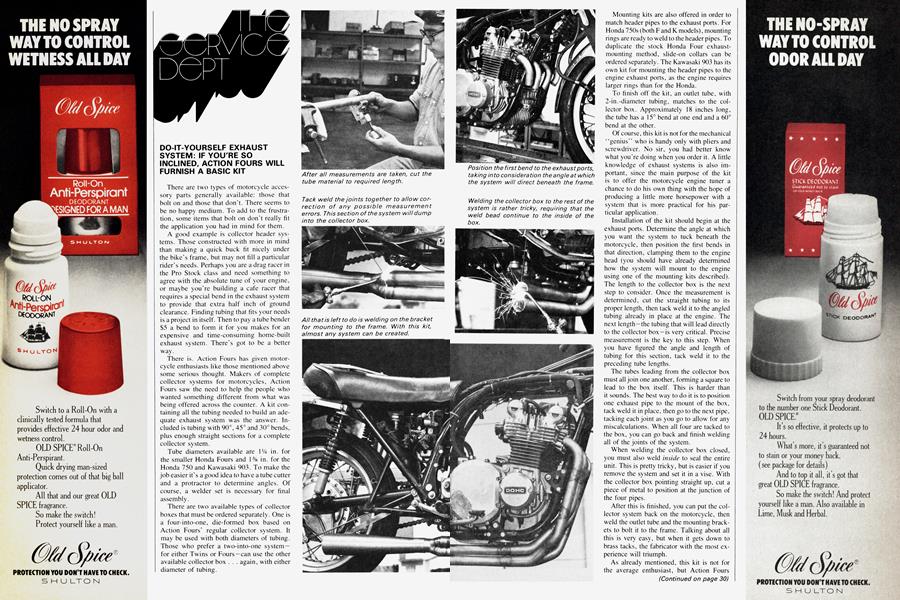
DO-IT-YOURSELF EXHAUST SYSTEM: IF YOU'RE SO INCLINED, ACTION FOURS WILL FURNISH A BASIC KIT
There are two types of motorcycle accessory parts generally available: those that bolt on and those that don't. There seems to be no happy medium. To add to the frustration, some items that bolt on don't really fit the application you had in mind for them.
A good example is collector header sys: terns. Those constructed with more in mind than making a quick buck fit nicely under the bike’s frame, but may not fill a particular rider's needs. Perhaps you are a drag racer in the Pro Stock class and need something to agree with the absolute tune of your engine, or maybe you're building a cafe racer that requires a special bend in the exhaust system to provide that extra half inch of ground clearance. Finding tubing that fits your needs is a project in itself. Then to pay a tube bender $5 a bend to form it for you makes for an expensive and time-consuming home-built exhaust system. There's got to be a better way.
There is. Action Fours has given motorcycle enthusiasts like those mentioned above some serious thought. Makers of complete collector systems for motorcycles, Action Fours saw the need to help the people who wanted something different from what was being offered across the counter. A kit containing all the tubing needed to build an adequate exhaust system was the answer. Included is tubing with 90°, 45° and 30° bends, plus enough straight sections for a complete collector system.
Tube diameters available are 1XA in. for the smaller Honda Fours and 1% in. for the Honda 750 and Kawasaki 903. To make the job easier it's a good idea to have a tube cutter and a protractor to determine angles. Of course, a welder set is necessary for final assembly.
There are two available types of collector boxes that must be ordered separately. One is a four-into-one, die-formed box based on Action Fours’ regular collector system. It may be used with both diameters of tubing. Those who prefer a two-into-one system — for either Twins or Fours —can use the other available collector box . . . again, with either diameter of tubing.
Mounting kits are also offered in order to match header pipes to the exhaust ports. For Honda 750s (both F and K models), mounting rings are ready to weld to the header pipes. To duplicate the stock Honda Four exhaustmounting method, slide-on collars can be ordered separately. The Kawasaki 903 has its own kit for mounting the header pipes to the engine exhaust ports, as the engine requires larger rings than for the Honda.
To finish off the kit, an outlet tube, with 2-in.-diameter tubing, matches to the collector box. Approximately 18 inches long, the tube has a 15° bend at one end and a 60° bend at the other.
Of course, this kit is not for the mechanical “genius” who is handy only with pliers and screwdriver. No sir, you had better know what you're doing when you order it. A little knowledge of exhaust systems is also important, since the main purpose of the kit is to offer the motorcycle engine tuner a chance to do his own thing with the hope of producing a little more horsepower with a system that is more practical for his particular application.
Installation of the kit should begin at the exhaust ports. Determine the angle at which you want the system to tuck beneath the motorcycle, then position the first bends in that direction, clamping them to the engine head (you should have already determined how the system will mount to the engine using one of the mounting kits described). The length to the collector box is the next step to consider. Once the measurement is determined, cut the straight tubing to its proper length, then tack weld it to the angled tubing already in place at the engine. The next length-the tubing that will lead directly to the collector box —is very critical. Precise measurement is the key to this step. When you have figured the angle and length of tubing for this section, tack w'eld it to the preceding tube lengths.
The tubes leading from the collector box must all join one another, forming a square to lead to the box itself. This is harder than it sounds. The best way to do it is to position one exhaust pipe to the mount of the box, tack weld it in place, then go to the next pipe, tacking each joint as you go to allow for any miscalculations. When all four are tacked to the box, you can go back and finish welding all of the joints of the system.
When welding the collector box closed, you must also weld inside to seal the entire unit. This is pretty tricky, but is easier if you remove the system and set it in a vise. With the collector box pointing straight up, cut a piece of metal to position at the junction of the four pipes.
After this is finished, you can put the collector system back on the motorcycle, then weld the outlet tube and the mounting brackets to bolt it to the frame. Talking about all this is very easy, but when it gets down to brass tacks, the fabricator with the most experience will triumph.
As already mentioned, this kit is not for the average enthusiast, but Action Fours never intended it to be. They had in mind the person who likes to create his own systems. This kit allows that. Action Fours is located at 1517 E. McFadden, Santa Ana, CA 92705.
(Continued on page 30)
Continued from page 29
TYME BOX: A NEW TOOL TO MAKE TIMING FOUR-CYLINDER ENGINES EASY
Tuning a motorcycle engine can be as easy as one-two-three, or a pain in the seat w'armer. It all depends on how you do it and what tools you use. If you're using the Tyme Box, tuning Honda Fours and Kawasaki 903s can be a snap.
The Tyme Box is a simple device that enables the tuner to bypass the motorcycle ignition system. By utilizing a coil in the Tyme Box itself, there is no reason to tap into the number one plug lead, thereby simplifying the tuneup procedure.
To set the timing on a Honda 750 (or any four-cylinder motorcycle), just attach the red alligator clip of the Tyme Box to points 1 and 4 (the left points when looking at them from the right side of the engine), and the black clip to numbers 2 and 3, which fire the two inside cylinders. The other red wire serves -as the ground and can be attached to almost any part of the bike. The engine fins offer good contact for the ground fixture because there is no paint on them.
To set the dwell, which is the first step in checking timing, the meter on the Tyme Box must be set between 25 and 27 degrees. Make sure that the toggle switch is set at number one for the 1 and 4 set of points. If the meter reads above 27°, the point gap is too close together and must be opened until the meter reads 25-27 degrees. Below' 25 is too far apart and requires some closing up. A gap of .015 in. is a good place to start if the points are way out of adjustment. Flip the toggle switch to number two to check the dwell for points 2 and 3.
Once the dwell is set, it’s time to check the ignition timing. Follow' the method prescribed in the owner's manual. Again, the toggle switch must be on number one for points 1 and 4, and on number two for 2 and 3. Using a timing light, check to see that the timing marks on the breaker plate and the crankshaft line up when the engine is run at about 5000 rpm.
(Continued on page 32)
Continued from page 31
The Tyme Box is manufactured by the Motorcycle Clinic, 1410 E. St. Andrews Place, Unit C, Santa Ana, CA 92705. Price is just under S50. The Motorcycle Clinic also makes a smaller version of the Tyme Box without a dwell meter for the enthusiast who already owns one. It works the same way but costs about $30 less. Using the Tyme Box, you can accurately time your own fourcylinder motorcycle engine at a price that beats the local service shop’s.