Trials Notebook
Trials Notebook
THE TRIALS NOTEBOOK is intended to provide the basics for an analytical approach to the learning of competitive trials riding. We intend to start with basics (which many "experts" do not yet thoroughly understand), and progress rapidly to the sophisticated and subtle techniques used by the most advanced riders in the world. Many of these techniques will help in normal trail or off-road riding, as well. Machine preparation, consistent practice and attitude are the keys to rapid progress in trials riding, so let's start with essential machine preparation.
You must use trials-style bars. Only the flat, relatively straight trials bar will allow you to use all four limbs to work the bike. Crossbraces are out, as they keep you from bringing the steering head up to your chest on steep climbs and steps.
Higher pegs, seen on some experts’ machines, are all right, since they give you more leverage and ground clearance; stock location is fine for 95 percent of all riders, however.
Controls must be absolutely smooth and easy to work; two-finger brake and clutch operation is preferred.
Carburetor slides and needle jets sometimes begin to wear after several months of hard use, so replace them to keep the bike in razor-edge tune.
On the average, after three to four events, the tire blocks (knobs) begin to wear down, making it necessary to reverse the tires on the rim for another three or four events. Sharp edges on the blocks are essential. Reversing the tires will give you slightly less braking power, so watch this. Don’t over-tighten rim locks, because they will deform and become useless. Watch your valve stems; if they start to angle over, this means that the tire is spinning and will eventually tear the valve stem out. Five to seven pounds front, and three to five pounds rear is about right, depending on your weight and the terrain requirements.
Safety-wise, good boots are essential. Most riders wear thin gloves, and many wear knee pads. Helmets are beginning to be seen more frequently, and Bell has a new prototype lightweight trials helmet with ear cutaways, so that you can hear the engine. RUN A MUFFLER!
If you’re learning, learn how to “get off.” If you stall on a hill, let the bike down to the uphill side and get off the same way. Start small and work up to the white knuckle stuff.
Practice regularly, keep your weight down and strength up. Eschew loose women, alcohol and funny cigarettes. Walk eacn section every time before you ride, and know where you want the bike to go. Don’t expect to win every trial, but try to ride to the limit of your ability. Stick with us, bubbie, and you’ll be surprised at all the weird things you’ll know how to do a year from now!
LESSON ONE
How to ride in a circle. Okay, quit laughing! You just think you know how. The key to this lesson is learning exactly where your rear wheel is tracking at all times, and where it should go. Watching the good guys isn’t always helpful, because their lines and moves are so subtle, but try to watch both wheels. The front wheel must often go in an apparently inappropriate place so that the rear wheel, tracking in a tighter arc in turns, can avoid the obstacle that would otherwise kick it off line.
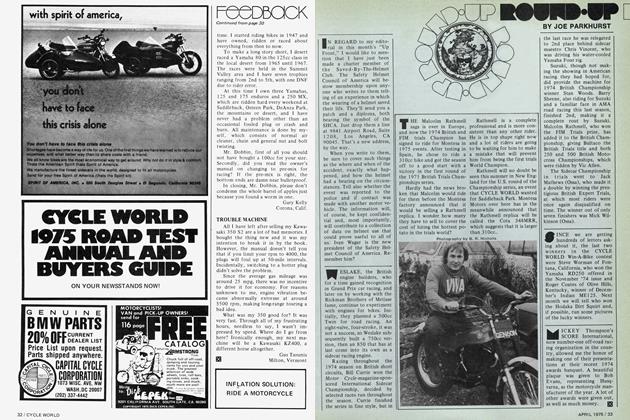
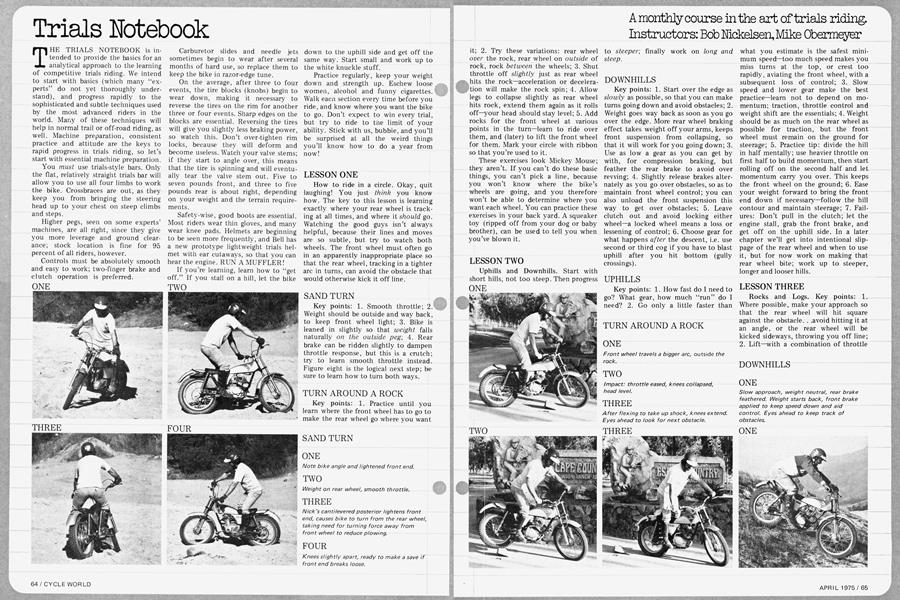
SAND TURN
Key points: 1. Smooth throttle; 2. Weight should be outside and way back, to keep front wheel light; 3. Bike is leaned in slightly so that weight falls naturally on the outside peg; 4. Rear brake can be ridden slightly to dampen throttle response, but this is a crutch; try to learn smooth throttle instead. Figure eight is the logical next step; be sure to learn how to turn both ways.
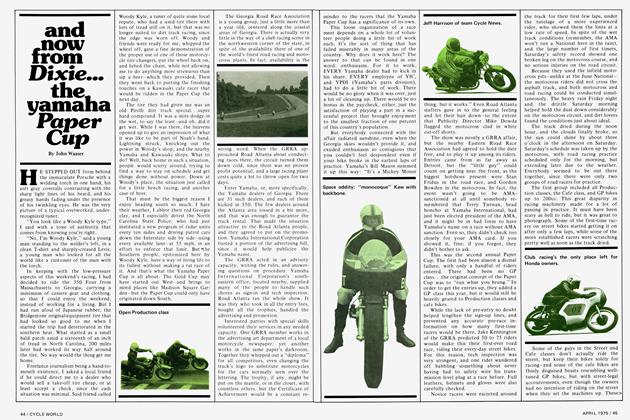
TURN AROUND A ROCK
Key points: 1. Practice until you learn where the front wheel has to go to make the rear wheel go where you want it; 2. Try these variations: rear wheel over the rock, rear wheel on outside of rock, rock between the wheels; 3. Shut throttle off slightly just as rear wheel hits the rock—acceleration or deceleration will make the rock spin; 4. Allow legs to collapse slightly as rear wheel hits rock, extend them again as it rolls off—your head should stay level; 5. Add rocks for the front wheel at various points in the turn—learn to ride over them, and (later) to lift the front wheel for them. Mark your circle with ribbon so that you’re used to it.
SAND TURN
ONE
TWO
THREE
FOUR
A monthly course in the art of trials riding. Instructors: Bob Nickelsen,MIke Obemeyer
These exercises look Mickey Mouse; they aren’t. If you can’t do these basic things, you can’t pick a line, because you won’t know where the bike’s wheels are going, and you therefore won’t be able to determine where you want each wheel. You can practice these exercises in your back yard. A squeaker toy (ripped off from your dog or baby brother), can be used to tell you when you’ve blown it.
LESSON TWO
Uphills and Downhills. Start with short hills, not too steep. Then progress to steeper; finally work on long and steep.
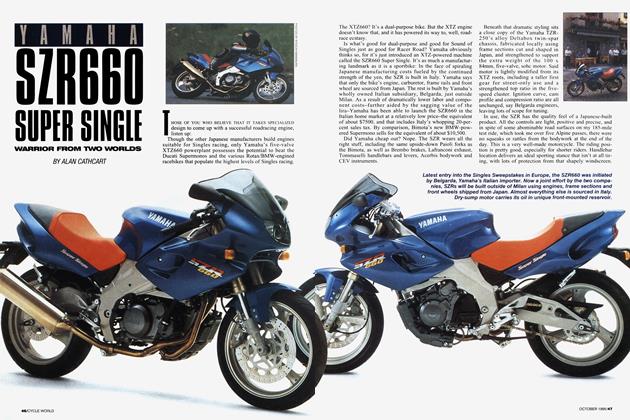
DOWNHILLS
Key points: 1. Start over the edge as slowly as possible, so that you can make turns going down and avoid obstacles; 2. Weight goes way back as soon as you go over the edge. More rear wheel braking effect takes weight off your arms, keeps front suspension from collapsing, so that it will work for you going down; 3. Use as low a gear as you can get by with, for compression braking, but feather the rear brake to avoid over revving; 4. Slightly release brakes alternately as you go over obstacles, so as to maintain front wheel control; you can also unload the front suspension this way to get over obstacles; 5. Leave clutch out and avoid locking either wheel—a locked wheel means a loss or lessening of control; 6. Choose gear for what happens after the descent, i.e. use second or third cog if you have to blast uphill after you hit bottom (gully crossings).
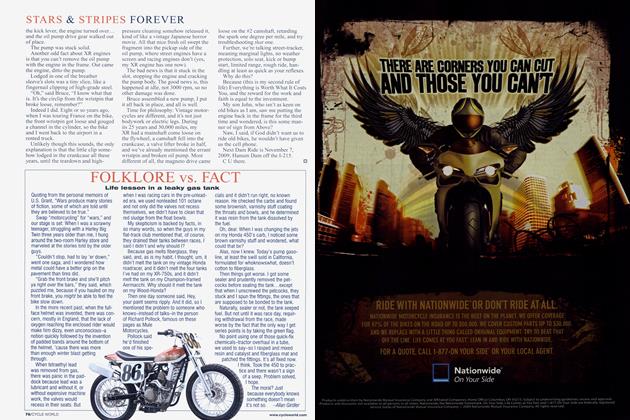
UPHILLS
Key points: 1. How fast do I need to go? What gear, how much “run” do I need? 2. Go only a little faster than what you estimate is the safest minimum speed—too much speed makes you miss turns at the top, or crest too rapidly, aviating the front wheel, with a subsequent loss of control; 3. Slow speed and lower gear make the best practice—learn not to depend on momentum; traction, throttle control and weight shift are the essentials; 4. Weight should be as much on the rear wheel as possible for traction, but the front wheel must remain on the ground for steerage; 5. Practice tip: divide the hill in half mentally; use heavier throttle on first half to build momentum, then start rolling off on the second half and let momentum carry you over. This keeps the front wheel on the ground; 6. Ease your weight forward to bring the front end down if necessary—follow the hill contour and maintain steerage; 7. Failures: Don’t pull in the clutch; let the engine stall, grab the front brake, and get off on the uphill side. In a later chapter we’ll get into intentional slippage of the rear wheel and when to use it, but for now work on making that rear wheel bite; work up to steeper, longer and looser hills.
TURN AROUND A ROCK
ONE
TWO
THREE
LESSON THREE
Rocks and Logs. Key points: 1. Where possible, make your approach so that the rear wheel will hit square against the obstacle. . .avoid hitting it at an angle, or the rear wheel will be kicked sideways, throwing you off line; 2. Lift—with a combination of throttle and pull on the bars—high enough to clear the frame; try to protect it from sharp impacts, especially on rocks; 3. Weight slightly back at start of lift, then forward to bring the front end down and regain steerage; 4. Throttle off as rear wheel hits, to bring front end down and avoid rear wheel slippage caused by torque—your momentum and flywheels will carry you over, aided by weight transfer; 5. Pick your line so that you come down headed in the right direction; 6. Keep the bike vertical. If you hit one frame tube it can knock you over violently to the opposite side; if you have trouble with this, you may be unconsciously putting unequal weight on the pegs, thus forcing the bike over. Conversely, it’s easy to straighten the bike while it’s monowheeling by application of weight to the high-side peg; 7. Advanced techniques: A. “Loading” the rear suspension by pressing down with leg action before the rear wheel hits can aid the wheel in getting over steeper obstacles; to augment this, you can “jump off the pegs” up and forward to get the bike moving in the right direction, and even grip your heels under the frame tubes to pull it over. These are advanced techniques that we will treat later in detail. For now, think in terms of avoiding rear wheel impact with the shocks totally compressed—leave room for the suspension to work for you. Never hit a rock or step stiff-legged! B. If you must go over at an angle, throttle off, especially if log is wet or slickwheel spin will make the rear wheel slide sideways. C. Loading and unloading the shocks is a real help for sharp approach angles or slick surfaces.
DOWNHILLS
ONE
NEXT MONTH: How to practice rear shock loading and unloading on your curb and alienate the neighbors at the same time.
Bob Nickelsen has been an active trials competitor for 10 years, and has ridden all major brands of trials bikes. His achievements include the following: California Number One, 1969 and 1970; California Number Two, 1967 and 1972; California Number Three, 1968 and 1971; Colorado Number One, 1973 and 1974; AMA-NATC Number 11, 1974. Nick was parts "" manager for Yankee West for two and a half years, has been employed in the motorcycle industry for five years, and is now Trials Team Coordinator for American Honda. He holds an airframe mechanic's license, and has been called by Mick Andrews “the best trials rider in the U.S. "
Mike Obermeyer is an attorney and freelance writer from Denver, and has been an active trials competitor since 1969. A frequent contributor to CYCLE WORLD, Mike won the Press/ Industry class at the 1974 Trial de España. Obermeyer masterminded Sammy Miller's 1973 U.S. tour and Ute Cup Trial appearance, and is 1975 chairman-elect of Colorado's Rocky Mountain Trials Association.
UPHILLS
ONE
ROCKS AND LOGS
ONE
TWO
THREE
FOUR