The Service Dept
THE SERVICE DEPT
JODY NICHOLAS
BECAUSE Harley-Davidson Sportster models are usually very reliable, many owners neglect servicing them at the prescribed intervals. Needless to say, a properly executed tune-up is a time consuming, if not costly procedure, but it is well worthwhile, and is perfectly capable of being performed by the average owner with a minimum of special tools.
The secret of a thorough tune-up is to begin at some spot on the machine and work all the way around, ending at the same spot at which you started. Begin at the front, left hand side and check the front tire pressure. This should be 18 lb./sq. in. with a rider weight of 150 lb. and 1 lb more for each 50 lb. increase in rider weight.
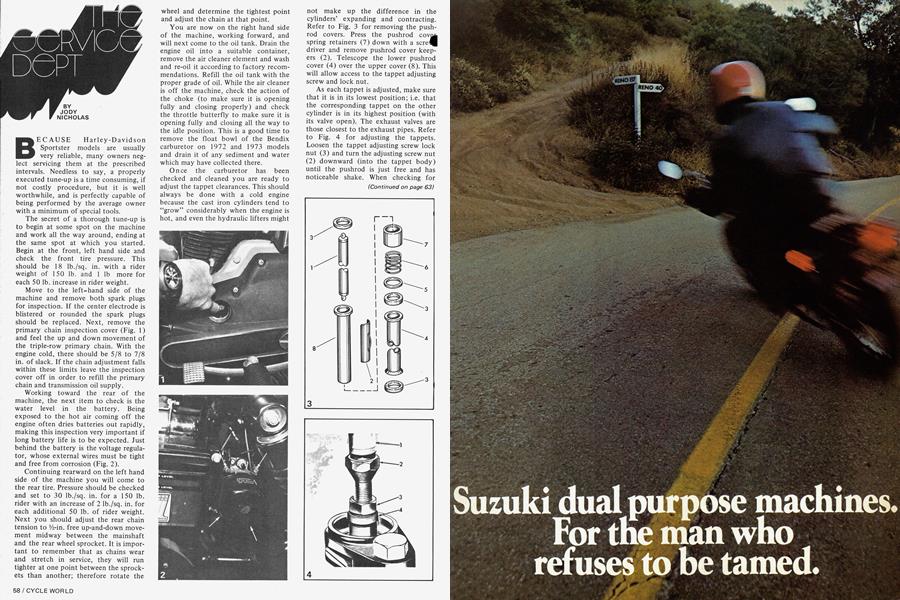
Move to the left-hand side of the machine and remove both spark plugs for inspection. If the center electrode is blistered or rounded the spark plugs should be replaced. Next, remove the primary chain inspection cover (Fig. 1) and feel the up and down movement of the triple-row primary chain. With the engine cold, there should be 5/8 to 7/8 in. of slack. If the chain adjustment falls within these limits leave the inspection cover off in order to refill the primary chain and transmission oil supply.
Working toward the rear of the machine, the next item to check is the water level in the battery. Being exposed to the hot air coming off the engine often dries batteries out rapidly, making this inspection very important if long battery life is to be expected. Just behind the battery is the voltage regulator, whose external wires must be tight and free from corrosion (Fig. 2).
Continuing rearward on the left hand side of the machine you will come to the rear tire. Pressure should be checked and set to 30 lb./sq. in. for a 150 lb. rider with an increase of 2 lb./sq. in. for each additional 50 lb. of rider weight. Next you should adjust the rear chain tension to V2-in. free up-and-down movement midway between the mainshaft and the rear wheel sprocket. It is important to remember that as chains wear and stretch in service, they will run tighter at one point between the sprockets than another; therefore rotate the wheel and determine the tightest point and adjust the chain at that point.
You are now on the right hand side of the machine, working forward, and will next come to the oil tank. Drain the engine oil into a suitable container, remove the air cleaner element and wash and re-oil it according to factory recommendations. Refill the oil tank with the proper grade of oil. While the air cleaner is off the machine, check the action of the choke (to make sure it is opening fully and closing properly) and check the throttle butterfly to make sure it is opening fully and closing all the way to the idle position. This is a good time to remove the float bowl of the Bendix carburetor on 1972 and 1973 models and drain it of any sediment and water which may have collected there.
Once the carburetor has been checked and cleaned you are ready to adjust the tappet clearances. This should always be done with a cold engine because the cast iron cylinders tend to “grow” considerably when the engine is hot, and even the hydraulic lifters might not make up the difference in the cylinders’ expanding and contracting. Refer to Fig. 3 for removing the pushrod covers. Press the pushrod COVSJB spring retainers (7) down with a scre^ driver and remove pushrod cover keepers (2). Telescope the lower pushrod cover (4) over the upper cover (8). This will allow access to the tappet adjusting screw and lock nut.
As each tappet is adjusted, make sure that it is in its lowest position; i.e. that the corresponding tappet on the other cylinder is in its highest position (with its valve open). The exhaust valves are those closest to the exhaust pipes. Refer to Fig. 4 for adjusting the tappets. Loosen the tappet adjusting screw lock nut (3) and turn the adjusting screw nut (2) downward (into the tappet body) until the pushrod is just free and has noticeable shake. When checking for (Continued on page 63) Continued from page 58 ushrod shake, grasp the pushrod near its top end under the cylinder head, and shake it from the front to the rear of the engine. Carefully turn the adjusting screw (2) upward (toward the pushrod) until nearly all play is removed. Now, lock the tappet screw lock nut against the tappet body (4) and check again for correct tappet adjustment. The tappets are correctly adjusted when the pushrods have a barely perceptible amount of play or shake, and can be turned completely around with the finger tips without trace of bind (Fig. 5). Reassemble the pushrod covers in the reverse order of disassembly.
The next step in the tune-up procedure is to inspect the contact breaker points. If the points have seen long service (12,000 or more miles) or are visibly pitted or corroded, they should be replaced and re-gapped to 0.018 in. by rotating the engine forward until the cam (rubbing block) is at the highest point of the cam. To adjust the points, (Fig. 6) loosen the lock screw (3) and move the stationary contact plate, using a screwdriver in the adjusting notch (1) to obtain correct contact point gap. Re-tighten the lock screw (3) and again check the gap to make sure it remains correct.
Accurate ignition timing requires the use of a strobe-type timing light to view the front cylinder advance timing mark located in an inspection hole on the left hand side of the engine slightly below the cylinders’ bases (Fig. 7). An accessory plastic plug is available from your Harley-Davidson dealer to keep oil from squirting out of the hole, but few mechanics use them.
The timing light leads should be connected to the front spark plug, ground and to the positive, red wire battery terminal. The light will flash each time the front cylinder fires. If the timing mark is not in the center of the inspection hole (Fig. 7), the entire circuit breaker plate may be shifted using a screwdriver in notch (9) (Fig. 6) until the light aimed into inspection hole (11) stops timing mark (12) in center of hole. Note the timing light being aimed at timing mark inspection hole in Fig. 8.
Next, drain the transmission/primary case oil into a suitable receptacle, making sure you lean the machine from side to side and rock it back and forth while holding the front brake on to make sure all the oil drains from the transmission. Clean the metal particles off the magnet on the drain plug (Fig. 9). Refill until oil runs out of the level screw located near the bottom of the primary crankcase with the grade of oil recommended for your engine.
Although the hydraulic brake fluid level remains fairly constant unless there is a leak in the system, it is a good idea to check the brake fluid level. Prop the machine as upright as possible, turn the handlebars to the left, wrap a rag around the master cylinder to catch any fluid that may spill out, loosen the cover, remove the rubber gasket and add disc brake fluid until the reservoir is nearly full (Fig. 10). Adjust the rear brake so that there is approximately 1% in. of free travel in the brake pedal before any braking takes place.
Keeping in mind that you have made a great many adjustments to the machine, go for a slow test ride to check your work. If you’ve worked carefully and followed all the procedures, your machine should perform well and the servicing operation will add many miles to its useful life.
(Continued on page 108)
Continued from page 63
WHEEL BALANCING
One subject of motorcycle maintenance on which I’ve never seen an article is wheel balancing. Nor have I ever seen any motorcycle shop with wheel balancing equipment.
New bikes, particularly the heavier models, usually come with the wheels balanced as evidenced by weights mounted on the spokes. However, what happens when you mount a new tire? The shop doesn’t balance it, other than lining up the colored dot on the tire with the valve stem and often not even that.
With the proliferation of heavy bikes having high cruising speeds this subject has become quite important. A wheel out of balance can produce quite a bit of vibration leading to discomfort, tire wear and other problems as well as poor high speed handling.
My method is simple but time consuming and not as accurate as I’d like. I set the wheel and axle on blocks so the axle is level and spin the wheel. Each time it stops I mark the spot at the bottom-the heavy side. To balance it I wrap lead solder around the spokes opposite the heavy side until the wheel seems balanced; it stops at various points, not one.
But, how do the factory teams balance wheels for 170 mph? They must have some kind of equipment or infinite patience. Somehow I can’t picture a factory mechanic for Suzuki or Kawasaki mounting a new tire and having to spend a long time balancing it-not at the rate those racers eat up tires.
Thank you for your usual clear and comprehensive answers to service problems and I look forward to your reply to this topic of general interest.
Steven A. Ross Hebron, Conn.
You are quite correct in your observations about motorcycle wheel balancing. All of the larger Japanese, English and German motorcycles come from their factories with wheel balancing weights attached to the spoke nipples. In the case of the BMW, the wheels are spun by a balancing machine similar to the ones found in automobile tire shops and some filling stations. The weights, of course, are attached to the spoke nipples by hand.
Most of the wheel assemblies used by the Japanese manufacturers (Yamaha, Suzuki, Kawasaki, Honda, etc.) come from the same manufacturer which fits the tires and balances them statically, in a horizontal position, using a machine with a bubble in the center which lines up with a cross hair as the weights are correctly applied to the spoke nipples. This method, of course, is not as accurate as the dynamic method used by BMW, but seems to work out very well in practice.
As far as I know, there are no commercially available wheel balancing machines specifically for motorcycle wheels. But to answer your question regarding the balancing of tires for the Suzuki and Kawasaki 170 mph road racers: it may come as a surprise to find that they are statically balanced using a method not unlike the one you described—a special jig with its own bearings in which the wheel’s axle fits is used and the wheel is mounted vertically. These bearings are dry and have practically no friction of their own. The wheel is rotated slowly and lead wire (solid core solder) is wrapped around the spoke(s) at the top of the wheel. The tire is spun and the process is repeated until the wheel stops at no one particular place, indicating that the wheel is in balance; statically, at least.
If patience is used, this method seems to work well enough. I feel qualified to make this observation because I was a member of the U.S. Suzuki road racing team in 1972 and have ridden a TR750 water-cooled road racer at speeds in excess of 170 mph with no unusual effects other than some peculiar buffeting that occurred around the windscreen.
YAMAHA OIL LEVEL
When I drain the transmission oil on my ’73 RD350 Yamaha and refill with 1500cc (1.6 qt.), the oil level on the dipstick is twice as high as the full mark. Is the oil not completely draining out, or is the stick incorrectly marked? Any harm being overfull? A hint I’d like to pass along is to drill a hole in the oil plug and wire it. I lost one on a different bike-no fun.
Bernard McKeon, Jr.
Lake Shawnee, N.J.
When changing the transmission oil on your Yamaha RD350 it is important that the engine be warm to aid the draining of the old oil. Once the oil is drained, replace the transmission drain plug, refill the transmission using 1500cc of oil and run the engine for a couple of minutes to allow the oil to distribute itself throughout the engine.
The reason you’re getting an “overfull” indication on your dipstick is probably because you are screwing it into the transmission case to check the level. The correct procedure is to merely insert the filler plug into the oil hole, withdraw it and check the oil level. Chances are it will be right up to the full mark on the dipstick.
Although it’s not a good idea to overfill your transmission, very little harm can come of it. 101