Safety Wire For Safety
Safety Wire For Safety
WILLIAM MARON
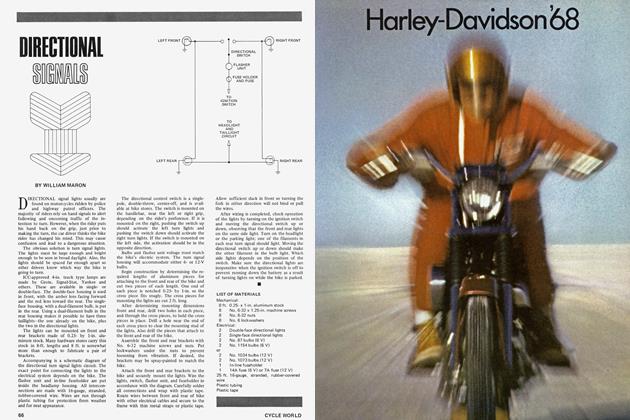
SAFETY WIRE INSTALLATION
INHERENT VIBRATION of motorcycles makes them especially prone to loosening of nuts and bolts — unless suitable precautions are taken. Motorcycles have critical places where a nut coming off or a bolt falling out can lead to serious consequences.
Even if a nut is properly torqued, there always is the chance of it loosening and working off from vibration, but there are several methods for control of loosening effects. The use of lockwashers is com monplace, but they are not a surefire guarantee. Nuts are available with nonmetallic inserts that grip the bolt thread tightly and resist loosening. Another method is to use nuts and bolts that are slightly oval-shaped. These exert a binding action on the mating surfaces to resist vibration.
The best way to cope with vibration, however, is to borrow a method used in the aircraft and missile industry — use of safety wire. Nuts and bolts have holes drilled in them and safety wire is run through the holes and around convenient fixed points to prevent loosening.
Drilled bolts of various lengths and diameters, drilled nuts, and safety wire are available at most aircraft parts suppliers and many sporting motorcycle dealers' shops.
Alternatively, the nuts and bolts on motorcycles may be removed and drilled to accommodate safety wire.
For maximum security the safety wire must be properly installed. Two methods of safety wiring are described: the double twist and single wire.
The double-twist method is preferred. In all cases, the safety wiring must be installed so that loosening the nut tends to tighten the safety wire. The wire should be new upon each application. Tools required are diagonal cutters and safety wire pliers, plus a supply of standard size safety wire (0.032-in. diameter).
Install safety wire using the doubletwist method (panels A through E) as follows:
First insure that items to be safety wired are properly seated and torqued to recommended values. To secure castellated nuts with safety wire, tighten nut to low side of recommended torque range, then continue to tighten until the slot in a nut aligns with the hole in a bolt.
Next, check all the drilled holes in both nuts and bolts for freedom from obstruction.
Then measure distance between items to be secured, and cut a length of safety wire approximately five times the distance between the items. If the span between the items exceeds 6 in., secure the items individually (panel E).
Insert the safety wire through the hole in the first item and route wire either around or over it (Panels C and D).
If the safety wire is routed over the item, it may be twisted in either direction. If the wire is routed around the item, it must be twisted clockwise for right-handthreaded items and counterclockwise for left-hand-threaded items.
Next, cross the end of wire and form a loop around the item so that loosening it will cause the wire to tighten. Pull the wire ends tight, using needle-nosed pliers. Then give the wire seven to ten turns to the inch.
When the last item in the series is secured, twist the ends of the wire into a pigtail approximately 0.5 in. long, with three to seven twists.
Preferably while wearing safety goggles, cut off the surplus wire ends with diagonal cutters, then bend the pigtail toward the item to prevent snagging.
Finally, check the wire for security, direction of rotational tension, and safety. Insure that wires do not interfere with moving parts or other components.
The technique is almost identical when a single strand is used to connect a number of bolt threads (Panels F and G). ■