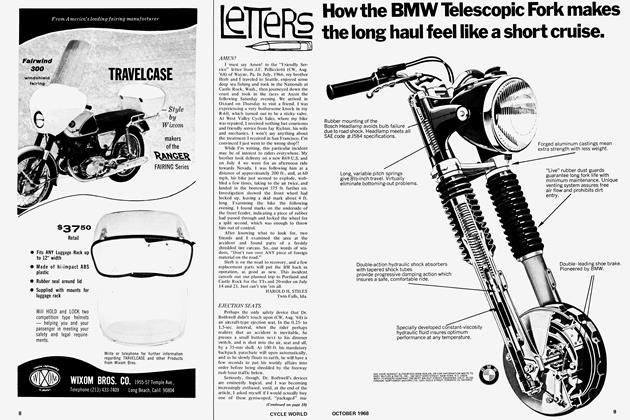
If It Won't Start....

IF IT WON’T START....
A Primer On the Motorcycle Temperament
JAMES MARCHAND
MOTORCYCLE engines are a temperamental lot, and they have some reason to be. Generally speaking, no other class of internal combustion engine produces as much power in relation to its size. With this comes something less than smooth, slow speed running or easy starting. Let’s say your motorcycle was running fine just before you last shut it off and now it refuses to start. Do not immediately assume there is something wrong with it! Sometimes, even with careful maintenance, the day will arrive when the thing just will not start. To make the situation more annoying you’ll probably have worked up quite a sweat before you’re totally convinced that it’s not going to start. Remember that the engine is stronger and more stubborn that you probably are, and that you’re not going to force it into doing anything it doesn’t wish to do. It is difficult, at times, to avoid such desperation tactics as continuing to prod at the kick starter for 15 min. without result because you see no good reason why it won’t start.
If it won’t start in a reasonable number of tries, apply technique, not muscle. At this point it is always wise to check the obvious. Do you have sufficient gas in the tank? Is it necessary to switch to reserve? Is the ignition switch on and does the kick starter feel like it’s turning the engine over? Are there any loose wires that should be connected to something? Assuming the obvious is in order, take off your jacket, cool off, and remain calm while waiting a few minutes. You may have applied slightly incorrect amounts of throttle or choke. There is no way to predict exactly what sort of mixture an engine desires in order to start. When you’re familiar with your machine’s needs, you usually can come close enough with throttle and choke position, but you may be far enough in error to make starting difficult. Altitude, engine temperature, air temperature, or a combination of these various factors may have an influence on starting. Wait a few minutes. Conditions may change, although imperceptibly, to a degree to allow you to get started. Riders of single-cylinder machines should take special note of the above advice. The more cylinders an engine has, the better the chances are for conditions to be correct for combustion in at least one of the cylinders. If one will fire, the others are almost sure to follow its example. Onecylinder engines depend on correct conditions in only one area, and it follows that the odds here are not as good.
Assuming you have allowed sufficient time for the temperamental aspects without result, the time comes for deeper searching. Keep in mind that if the following four factors are present, an engine must run: (1) reasonably correct carburetion, (2) a spark at the plug(s) at approximately the right time, (3) valves (if any) opening and closing when they should, and (4) sufficient compression in the cylinder. One of these four factors causes far more trouble than the other three. Perhaps it could be said that it causes as much trouble as the other three factors combined. This most important factor is ignition, which hopefully results in a healthy spark at the plugs. Ignition, therefore, should receive your attention first when investigating starting trouble. The first step is to determine if the spark plug wire is carrying current to the plug. Hold the wire about one-eighth inch from a clean metal area on the engine and kick the engine over. There should be a spark jumping the gap between the wire and the metal area. Most motorcycle spark plug terminals will require that you remove the waterproofing cap from the spark plug end of the wire or put an extension into the cap to place the end of the wire in a workable position. Turn the engine over several times to be sure the spark is consistent. To be sure the ignition system is okay, the spark plug should be removed and the wire reconnected to the plug. Then, holding the metal side of the plug firmly against a clean metal area on the engine, turn the engine over several times and watch for a spark between the plug’s electrodes. If the spark is there each time the engine is revolved, the plug probably is good. It is possible the plug is breaking down under compression and won’t fire in the cylinder. If you have a spare spark plug, by all means give it a try.
If current is reaching the top of the plug through the wire, but there is no spark between the plug’s electrodes, you can safely assume the spark plug is faulty. While the spark plug is removed two more checks can be made. Place your thumb over the plug hole and kick the engine over. You should feel a strong pressure build up in the cylinder. Poorly seating valves, valve-rocker clearance way out of adjustment, a burned piston or other internal damage cause a lack of compression pressure. If this should be the case, more than a roadside fix will be required.
If there is compression in the cylinder, the third and fourth factors previously listed can be eliminated as being the trouble makers. Without (3) valves opening and closing near the correct moment there can be no (4) compression in the cylinder. At any rate, if there is trouble in the valve train it will very likely be accompanied by some strange internal noises even while attempting to start. Two-stroke riders can eliminate item (3), valve opening and closing, entirely, as a source of trouble. While the spark plug is out you can help it do its job better by scraping it clean of soot and carbon as much as possible. For all engines a plug gap about two thicknesses of a matchbook cover should prove to be close enough if you lack a gap gauge.
In the process of checking the ignition you’ve checked out compression and valve trouble. If there’s no current at the spark plug wire you’ll have to trace farther back along the circuitry. If your motorcycle is magneto equipped, there remains little else to check. Magnetos are quite reliable, but if your starting trouble points in this direction here are some items to go over: The most common problem is a short in the ground wire. This is the wire leading from the magneto to the kill button. If the insulation anywhere on this wire is damaged, and it is allowed to ground itself, the same thing is happening as if you were operating the kill button itself. If you have any doubt about the condition of the wire, remove it at the magneto and try again for a spark at the plug wire.
Check the connections between magneto and plug(s) to be sure they’re tight and clean. The connectors that are fastened to the magneto and hold the high tension wire should be removed to verify that they are making internal contact and that they are not worn to the extent of being unable to pick up current generated by the magneto. The points in the magneto also should be checked. See that they are definitely opening and closing as the magneto is revolved and that they are not badly burned, pitted, dirty, or oily. If they are, they can be cleaned in an emergency with the paper from the striking area of that common item again-a matchbook. After using an abrasive, the points should be wiped clean by sliding a piece of clean, ordinary paper between them. This handy tool also serves admirably for cleaning the tips of spark plugs, as well as being a gauge for checking spark plug and point gap. One should, of course, try to carry more sophisticated tools for such emergencies. Occasionally, grime builds up or a piece of carbon from one of the magneto brushes breaks off and this foreign matter finds its way into the space between the armature and the housing, short circuiting the magneto with a resultant lack of spark at the spark plug. Investigate this only as a last measure, because magneto disassembly will destroy engine timing entirely. Timing must be reset according to your owner’s manual upon reassembly. If all the preceding fails to produce results for you and the magneto looks all right, chances are good the armature is defective. This is rather rare however.
(Continued on page 43)
Continued from page 41
If your model is equipped with battery and coil ignition, some of the above will apply: the condition of the breaker points (gap can be checked with something the thickness of a matchbook cover), high tension wiring and connections. In regard to a battery-coil ignition system, a good first step, if there is no spark at the plug or the high tension wiring and this and the point assembly seem all right, is to be sure the battery ground wire has a tight, clean connection. Next, be sure the battery has some life in it. Check this by turning on the lights (not forgetting to shut them off). Or, if you’re not equipped with lights, momentarily touch a piece of metal, such as a pair of pliers, between the two posts of the battery-this should produce a fat spark. If the battery is dead, try the emergency start position on the ignition switch if you are so equipped. If the engine starts, immediately switch to normal “on” position. If you have no emergency start position, try pushing with the transmission in second gear and the clutch lever held in until you get moving; then release the clutch fairly slowly, pulling it in when the engine starts to fire.
If the battery, points, high tension wiring, plugs, and compression are okay and there is still no spark at the plugs, it’s time to see just how far along the electrical system current is traveling between the battery and the points, and thereby locate the area of trouble. With the ignition switch on, turn the engine over and see if there is sparking between the points. If there is, the trouble lies between here and the spark plugs. With no sign of current reaching the points, trace the wiring between the points and the ignition coil(s). See that all connections are clean and tight. To insure there is current at various connections (be sure the ignition is turned on), remove the wire in question from its terminal and strike it quickly against a metal ground which should produce sparks. Proceed in the same way with wiring between the coil(s) and ignition switch, and also between the ignition switch and battery. Common troubles are dirty or loose connections, frayed wires, corrosion, faulty ignition switch (jiggle the key), ignition switch coming apart, condensor breakdown (evidenced by burned points), or faulty coil(s) (rare).
Because you’re working with the ignition, and have the plugs and point cover removed, now is a logical time to check the ignition timing. This applies to magneto and coil ignition alike, whether it’s being used on a twoor four-stroke engine. Breaker points should just commence to separate when the piston is a fraction of an inch below the top of its compression stroke. Exact details of this procedure vary with different makes, and reference should be made to your owner’s manual for directions in regard to ignition timing. Motorcycles are particularly sensitive to ignition timing, especially the higher performance models. The makers, therefore, often recommend use of some equipment for setting the timing which is not available to a rider broken down alongside the road. Nevertheless, a couple of general comments may prove valuable. A time honored, and decently accurate, method of determining the moment points are beginning to open is to place a piece of cigarette paper between them and turn the engine until you are just able to pull the paper out.
You probably are without a degree disc or dial gauge for determining piston position, but there is a substitute method. Some makers even recommend using this procedure. This operation is a necessity on machines which have no scribed lines and pointer on the crankshaft end to indicate piston position. Put the piston on top center of the compression stroke (both valves closed on four-strokes). This can be done easily by putting a small rod or wire through the spark plug hole, allowing it to rest on the piston, and rocking the engine back and forth slowly until you find the place where the rod is at its highest position. The piston can be moved slowly up or down by turning the rear wheel while the transmission is in top gear. Make a mark on the rod or wire at the edge of the plug hole (the edge being used as a reference point). With the rod removed, make a second mark higher up the rod corresponding to the amount of ignition advance required. For example, if an ignition advance of 0.25 in. is called for, the second mark should be 0.25 in. above the first. Replace the rod in the engine and, resting it on the piston, rock the engine backward using the rear wheel, until the top mark registers with the edge of the spark plug hole. With the points just beginning to open at this point, the engine is set for 0.25 in. of ignition advance. In other words, the spark will occur at the plug 0.25 in. before the piston reaches its topmost position. Some manufacturers advise you to set the ignition with the advance-retard mechanism in some particular position. Refer to your manual. If you have serious doubts as to your ability to set the timing accurately in the situation you’re in, it’s best not to attempt it, for serious engine damage can result if the timing is very far in error.
Carburetors are blamed for far more trouble than they cause. Therefore, investigate this component only after having eliminated ignition as a source of starting trouble. Before you begin to tear apart the carburetor! s), see that the joint between the carburetor and its spacer or intake manifold is air tight. The same applies to the joint between the latter items and the engine itself. Air entering through a poor seal here can drastically upset fuel mixture. Before going farther, find out if fuel is reaching the carburetor from the tank. You may have to pull off the hose, if it isn’t of the see-through variety, to check this. If gas isn’t flowing, first be positive there’s some, in the tank. It sounds a bit silly to mention this, but it’s a simple thing, too often overlooked by those of us who may be too quick to assume there is some more exotic ailment afflicting the beast. Don’t forget to try the reserve position if the fuel level appears to be low. If gasoline still will not flow, remove the fuel tap from the tank for inspection and cleaning. Dirt, pieces of rubber, and water all are common contaminants in tanks. Something not to be overlooked is the filler cap itself. The small vent hole must be clear to allow free gasoline flow from the tank. Finally, before inspecting the carburetor, check the possibility of a clogged air cleaner. If fuel is getting as far as the carburetor, it remains to investigate the movement of gas through the carburetor.
After you’ve tried for some time to start the engine, and you’ve left the gas tap on during this time, there may be some raw gas running out of the carburetor. This is most likely flooding, not some mechanical fault. You may want to remove the carburetor completely or leave it attached to the engine while examining it. In any case, find out if the various small passages and jets are free from foreign matter. Resist the temptation to run a wire through any small parts of the carburetor. Jets are delicate and their critical size can easily be damaged by such probings. When the float bowl cover is removed, see that the float has no gasoline inside. You can verify this by shaking it very gently. All the jets within the carburetor must be screwed in snugly. Check for loose ones. A carburetor’s working parts are well protected, and for the most part non-moving. Comparing this to an ignition system whose components are harder working, more delicate and exposed to damage, it’s easy to see what should receive most of your attention.
There is the possibility that some of the above reasons for difficult starting may be working in combination, especially in motorcycles that are in a generally poor condition. Again, it may be a case of borderline trouble where hard starting shows up on some occasions and not others. Under these conditions it’s very possible some component is not working as it should, but at the same time not failing entirely either. This situation calls for extra care and patience since it’s probably easier to locate the source of outright failure rather than grope even more blindly for an on-and-off problem. It should be pointed out that all the things mentioned here can result in poor engine performance as well as hard starting and are equally worth investigating for the sake of the former aspect.
Admittedly, motorcycle machinery isn’t all it should or could be from a reliability standpoint. When you have trouble, don’t think you’re alone. Ask someone how he likes his particular brand of machine and more often than not he’ll tell you it’s the greatest and he never has any trouble with it.. Unless he’s a good friend or you spend another hour talking to him, don’t you believe it. If he’s halfway honest, he’ll eventually mention a fairly serious shortcoming. Yet, to the rabid enthusiast, once he understands his machine’s faults, they will only add to his pleasure of owning, riding, and looking after a truly unique and personal conveyance. Naturally, an affinity for wiping out bearings or the like will hardly endear the brute to anyone. Maximum owner satisfaction, however, is only to be gained from a machine exhibiting a certain degree of “personality” whether of appearance or behavior. ■